6. Neon Drip Art Manicures
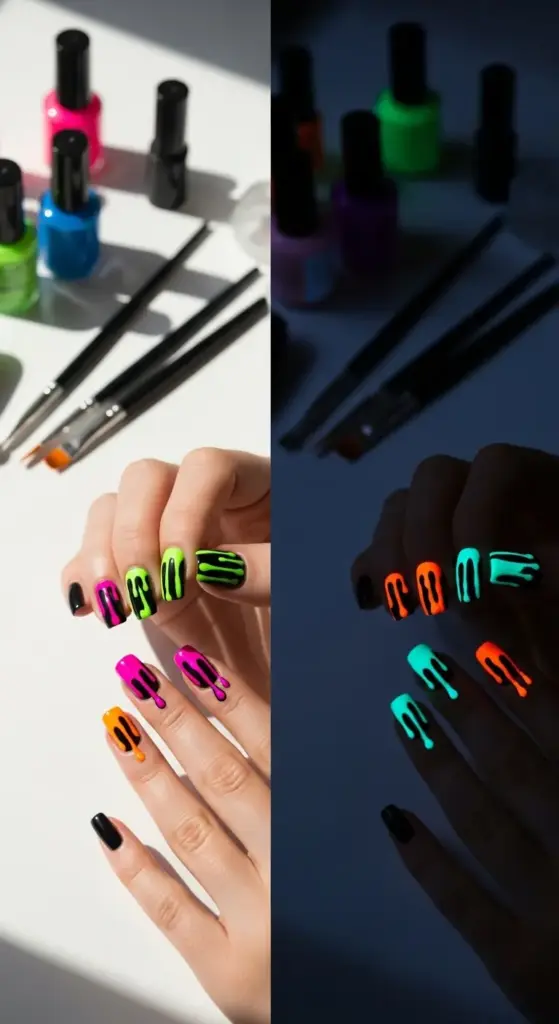
Okay, confession time – I discovered neon drip art nails at 2 AM while scrolling through nail art TikToks, and I immediately knew I had to try them. The way those electric colors seemed to melt down the nails was absolutely hypnotic!
My Glow-in-the-Dark Awakening
My first attempt looked like a highlighter exploded on my fingertips. Not in a good way! I used regular bright polish thinking it was the same as true neon.
Real neon pigments are a whole different beast – they literally glow under UV light and have this intensity that regular “bright” colors just can’t match.
The moment I switched to actual neon gel polish and saw my nails under a blacklight? Mind officially blown. It was like having tiny rave lights attached to my fingers!
Neon Color Selection That Actually Glows
Electric lime green is hands down the most vibrant neon color I’ve ever worked with. It practically hurts your eyes in direct sunlight – in the best possible way.
Hot pink and electric blue create the most stunning contrast when used together in drip designs. The colors seem to vibrate against each other.
Neon orange is tricky because many “neon” oranges are actually just bright orange. Look for ones that specifically say “UV reactive” on the label.
Yellow neon is the hardest to work with but creates the most dramatic glow effect. It’s worth the extra effort for that electric sunshine look.
Drip Effect Tools and Techniques
Here’s where I got creative with household items. A toothpick creates the thinnest, most delicate drips that look super realistic.
Dotting tools in different sizes let you control drip thickness. Small dots for fine drips, larger ones for those chunky paint-dripping effects.
A small brush loaded with polish and held vertically creates natural-looking drips through gravity. Let physics do the work for you!
Dental floss might sound weird, but dipping it in polish and dragging it down creates these amazing irregular drip patterns that look totally organic.
Layering for Maximum Impact
Start with a black base – this makes neon colors pop like nothing else. I learned this from a nail artist who specializes in festival nail art.
Layer your drips in order of intensity – lightest neon first, then build up to the most vibrant. This creates incredible depth and dimension.
Multiple thin drip layers look way more realistic than one thick application. Patience is key with this technique – rushing leads to muddy colors.
Let each drip layer dry completely before adding the next. I used to get impatient and end up with colors bleeding into each other messily.
UV Light Considerations
This is where neon drip nails get really fun! Under regular lighting, they look bright and cool. Under UV light? They transform into something magical.
LED nail lamps don’t show the full neon effect – you need actual UV blacklight for that incredible glow. I bought a small UV flashlight just for showing off my nails!
Natural sunlight contains UV rays that make neon pigments pop during daytime. Your nails will literally look different indoors versus outdoors.
Club and concert lighting often includes UV elements, which is why neon nails are perfect for nightlife. You become a walking light show!
Safety Tips I Wish Someone Had Told Me
Neon pigments can be more irritating to skin than regular polish. Always use a good base coat to protect your natural nails.
Work in a well-ventilated area – neon polishes often have stronger fumes than regular formulas. I learned this during a particularly intense drip art session!
Wear gloves when handling pure neon pigments if you’re mixing your own colors. Some of these chemicals can stain skin temporarily.
Keep neon polishes away from heat sources – they can be more volatile than regular formulas and the colors can shift with temperature changes.
Color Mixing Secrets
Never mix neon with regular polish – it kills the UV-reactive properties instantly. Stick to neon-to-neon mixing only.
Electric blue and neon green create the most incredible turquoise that seems to shift colors as you move your hands.
Hot pink and electric purple blend into this amazing magenta that looks different under every type of lighting.
Start with tiny amounts when mixing – neon pigments are incredibly concentrated and a little goes a very long way.
Depth and Dimension Techniques
Varying drip lengths across your nails creates visual interest. Some short drips, some that go all the way to your tips – it looks more organic and realistic.
Overlapping drips in different colors create these amazing color-blend effects where they intersect. The layering creates natural gradients.
Adding tiny dots of contrasting neon colors within larger drips mimics how real paint behaves when it’s wet and flowing.
Matte top coat over some drips while leaving others glossy creates incredible textural contrast that catches light differently.
Festival and Party Perfect
Music festivals are where neon drip nails truly shine. Under stage lighting and UV effects, your nails become part of the show!
Blacklight parties are obviously perfect for showing off this technique. I’ve had people literally stop dancing to stare at my glowing fingertips.
Rave culture has embraced neon nail art in a big way. It’s like wearing tiny glow sticks that never run out of battery!
Pool parties at night with underwater lighting make neon nails look absolutely magical. The water refracts the colors in amazing ways.
Maintenance and Longevity
Neon colors fade faster than regular polish when exposed to sunlight. It’s the trade-off for that incredible UV reactivity.
Apply a UV-protective top coat if you want your neon drips to last longer. Some of the glow effect is sacrificed, but the longevity improves dramatically.
Touch-up small drips as needed rather than redoing entire nails. Keep your neon colors handy for quick fixes.
Store neon polishes in cool, dark places to maintain their intensity. Heat and light can break down the special pigments over time.
Ready to switch gears to something totally zen? Hit “next” to discover minimalist line art florals – after all this electric intensity, these delicate designs will show you how sometimes less really is more, and the fine brush technique I’m about to share will make you feel like a nail art poet! 🌸✨


GIPHY App Key not set. Please check settings