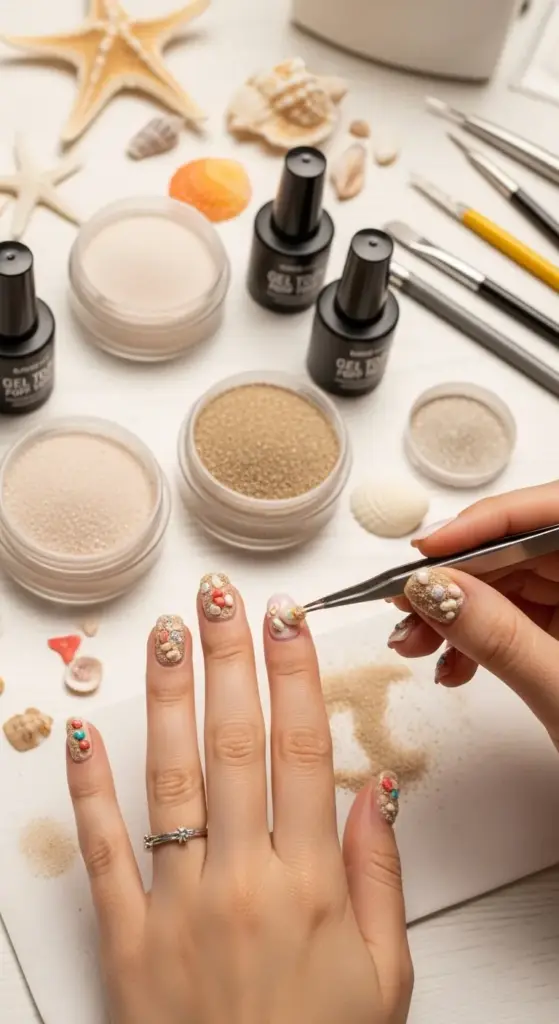
5. Textured Sand and Shell Accents
I’m not gonna lie – my obsession with textured sand nails started during a particularly brutal February when I was desperately missing beach vacations. Creating tiny beaches on my fingertips became my weird form of therapy!
My Sandy Disaster (And What I Learned)
My first attempt involved actual beach sand from my last vacation. Seemed logical, right? Wrong! The sand was too coarse and kept falling off no matter how much top coat I used.
Plus, real beach sand can harbor bacteria and salt that’s not great for your nail beds. I learned this the hard way when my cuticles got irritated and started peeling.
The game-changer was discovering nail art sand – it’s specifically made for this purpose and comes in different textures and colors. Who knew there was such a thing?
Texture Creation Methods That Actually Work
Velvet powder mixed with clear polish creates the most realistic sand texture I’ve ever achieved. The key is getting the ratio right – too much powder and it gets clumpy.
Sugar mixed with base coat sounds crazy but works amazingly well for coarser sand effects. Just regular granulated sugar from your kitchen!
I discovered that textured nail polish like OPI’s liquid sand formulas make perfect bases for adding real texture elements. It’s like having a head start on the sandy effect.
Safe Sand and Shell Incorporation
Here’s what nobody tells you about using real crushed shells – you need to sanitize them first! I soak mine in rubbing alcohol for 24 hours before use.
Craft store sand is your safest bet for nail art. It’s clean, consistent in size, and comes in tons of colors. I buy mine in bulk because I’m obsessed.
Mica powder creates that gorgeous shimmer you see in wet sand. Mix it with your textured base for that just-hit-by-a-wave sparkle effect.
Never use shells with sharp edges – I learned this when I accidentally cut my finger trying to place a piece of broken conch shell. Smooth, rounded pieces only!
3D Shell Placement Techniques
Tiny shells need to be secured with gel top coat, not regular polish. The thickness helps hold them in place without looking bulky.
Place shells while the base is still tacky – this creates the strongest bond. I used to wait until everything was dry and wondered why my shells kept popping off.
Asymmetrical placement looks more natural than perfectly centered shells. Real beaches don’t have shells arranged in neat little rows!
Use tweezers for precise placement – your fingers are too big and clumsy for tiny shell positioning. I have a dedicated pair just for nail art now.
Color Coordination Magic
Neutral base colors work best with textured sand effects. Think beiges, soft pinks, and warm whites that actually look like real sand.
Coral and turquoise accents paired with sandy textures create that perfect tropical vibe. I match these to my summer wardrobe colors for cohesive looks.
Sunset colors (oranges, pinks, purples) work beautifully with gold-tinted sand textures. It’s like having a permanent sunset on your nails!
Avoid cool-toned bases with warm sand textures – the clash looks unnatural and breaks the beach illusion you’re trying to create.
Wardrobe Pairing Strategies
White summer dresses look absolutely stunning with textured sand nails. The neutral tones complement without competing for attention.
Denim and sand textures are a match made in heaven. Something about that casual, beachy vibe just works perfectly together.
Coral and turquoise clothing echo tropical waters and look amazing with sandy nail textures. I plan my beach vacation outfits around this color combo!
Avoid busy patterns when wearing heavily textured nails. Let the texture be the star of your look, not compete with printed fabrics.
Vacation-Proof Sealing Methods
This is where I made my biggest mistakes initially. Regular top coat just doesn’t cut it for textured nails – you need something stronger.
Gel top coat is absolutely essential for vacation durability. I use three thin coats instead of one thick one for maximum protection.
Cuticle oil application needs to be strategic with textured nails. Apply it around the edges but not directly on the texture – it can break down the adhesion.
Pack a small bottle of top coat for vacation touch-ups. Sand and shell textures take more wear than regular polish, especially with beach activities.
Protection Methods I Swear By
Rubber gloves are your best friend for any water activities. Chlorine and salt water can break down the adhesives holding your texture elements.
Apply base coat to the underside of your nails too – sand can get trapped underneath and cause lifting if you’re not careful.
Avoid using nails as tools even more than usual with textured designs. The raised elements create weak points where chips can start.
Moisturize your hands religiously but keep lotions away from the textured nail surface. Use a small brush to apply cuticle cream precisely.
Advanced Texture Techniques
Layering different sand textures creates incredible depth. Fine sand as a base with coarser elements on top mimics real beach sand perfectly.
Mixing in tiny glass beads with your sand texture catches light like wet sand in sunlight. Just a few per nail – subtlety is key!
Gradient sand effects from fine to coarse across your nails create this amazing textural journey. Still perfecting this technique myself!
The Maintenance Reality Check
Let’s be real – textured sand nails require more upkeep than regular manicures. Plan for touch-ups every 3-4 days instead of weekly.
Keep a small container of your sand mixture for quick repairs. Losing one shell or having a rough patch is fixable if you’re prepared.
Professional removal is worth the cost for heavily textured nails. Trying to remove all those elements yourself can damage your natural nails.
Ready to go completely electric? Click “next” to explore neon drip art manicures – this technique literally makes your nails glow under blacklight, and the dripping method I’m about to share will make you feel like a total nail art rebel! 🌈⚡


GIPHY App Key not set. Please check settings