3. Negative Space Geometric Patterns
I’ll be honest – when I first heard about negative space nail art, I thought it was just a fancy way of saying “I forgot to paint part of my nail.” Boy, was I wrong! This technique is actually way more sophisticated than I ever imagined.
My “Aha!” Moment with Negative Space
The lightbulb went off when I realized that negative space isn’t about what you paint – it’s about what you don’t paint. Your natural nail becomes part of the actual design!
I was struggling with this concept until my sister pointed out that it’s like those optical illusion pictures. Sometimes the empty space is more important than the filled space.
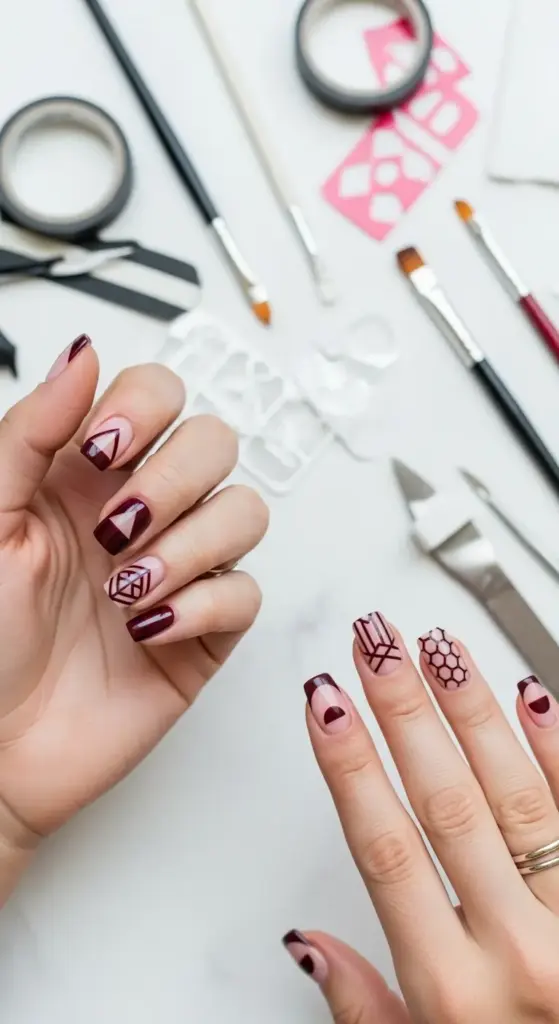
My first successful attempt was a simple triangle cutout on my ring finger. Nothing fancy, but seeing that perfect triangle of my natural nail surrounded by deep burgundy polish? Chef’s kiss.
Geometric Shapes That Actually Work
Triangles are your best friend when starting out. They’re forgiving and look intentional even if your lines aren’t perfectly straight.
Hexagons are having a major moment right now – I see them everywhere on Instagram. They’re trickier than triangles but create this amazing honeycomb effect when you do multiple nails.
Diagonal stripes might seem basic, but they’re actually genius for elongating shorter nails. I learned this trick from a nail tech who charges $150 for geometric designs!
Half-moon shapes at the cuticle create this vintage-modern vibe that’s absolutely stunning. Way harder than it looks though – took me about six attempts to get them even.
Tape Techniques That Changed My Life
Here’s where I made my biggest rookie mistake: using regular Scotch tape. Don’t do this! It leaves residue and the adhesive is too strong.
Nail striping tape is your holy grail – it’s thin, flexible, and removes cleanly. I buy mine in bulk from Amazon because I go through rolls like crazy.
Washi tape works surprisingly well for wider geometric sections. The adhesive is gentler, and you can find it in tons of colors at craft stores.
Press the tape down with a cuticle pusher to get those crisp, clean lines. I used to just press with my finger and wondered why my edges looked fuzzy!
Stencil Game-Changers
I discovered vinyl stencils on Etsy and they’re absolutely life-changing. Perfect shapes every single time, and they’re reusable!
Make your own stencils using contact paper – this was a total game-changer for my budget. Just cut out your shapes with a craft knife and boom, custom stencils.
Hole reinforcement stickers from office supply stores make perfect circles for negative space dots. Who knew office supplies could be nail art tools?
Color Theory That Actually Makes Sense
This is where I got really nerdy about nail art. Contrasting colors make negative space pop way more than similar tones.
Dark polish with natural nail space creates the most dramatic effect. Think black geometric shapes with your natural pink nail showing through – stunning!
Metallic polish against natural nails gives this expensive, minimalist jewelry vibe. Rose gold is my personal favorite for this technique.
Avoid neon colors for negative space designs – they compete too much with your natural nail tone and the whole effect gets muddy.
Clean Lines: My Biggest Learning Curve
Getting razor-sharp edges took me forever to master. The secret? Remove the tape while the polish is still slightly wet, not completely dry.
Thin coats are everything with geometric designs. I used to glob on thick polish and wonder why my lines looked wobbly and uneven.
Clean up with a small brush dipped in acetone after removing tape. This step makes the difference between amateur and professional-looking results.
Personal Style Customization Ideas
Mix different geometric shapes on each nail for an eclectic look. I do triangles on my thumbs, stripes on my pointers, and hexagons on my ring fingers.
Incorporate your favorite colors into the geometric sections. My go-to combo is sage green geometrics with natural negative space – so chic!
Add tiny rhinestones at geometric intersections for special occasions. Just one or two per nail, not a whole bedazzled situation.
Play with scale – tiny geometric details on shorter nails, bold shapes on longer ones. This creates visual balance across your whole hand.
Trending Pattern Combinations
Chevron patterns with negative space triangles are everywhere right now. They create this amazing zigzag effect that’s super eye-catching.
Mixed geometric shapes in the same color family look incredibly sophisticated. Think all triangles, hexagons, and diamonds in different shades of blue.
Asymmetrical designs are having a moment – different patterns on each nail that somehow work together. It’s like controlled chaos for your fingertips!
Mistakes I Made So You Don’t Have To
Don’t attempt complex geometric patterns on your dominant hand first. Practice on your non-dominant hand where mistakes are less noticeable.
Never rush the drying process between tape removal and cleanup. I’ve ruined so many designs by being impatient!
Plan your design before you start taping. I used to wing it and end up with wonky proportions that looked more accidental than intentional.
Ready for some serious nail magic? Click “next” to discover holographic butterfly wing effects – this technique literally makes your nails look like they’re from another dimension, and the color-shifting trick I’m about to share will have people questioning reality! 🦋✨


GIPHY App Key not set. Please check settings