2. 3D Fruit Slice Nail Art
Okay, so I’m gonna be real with you – my first attempt at 3D fruit slice nails looked like a toddler had attacked my fingertips with Play-Doh. But now? People literally ask me if I have tiny fruit glued to my nails!
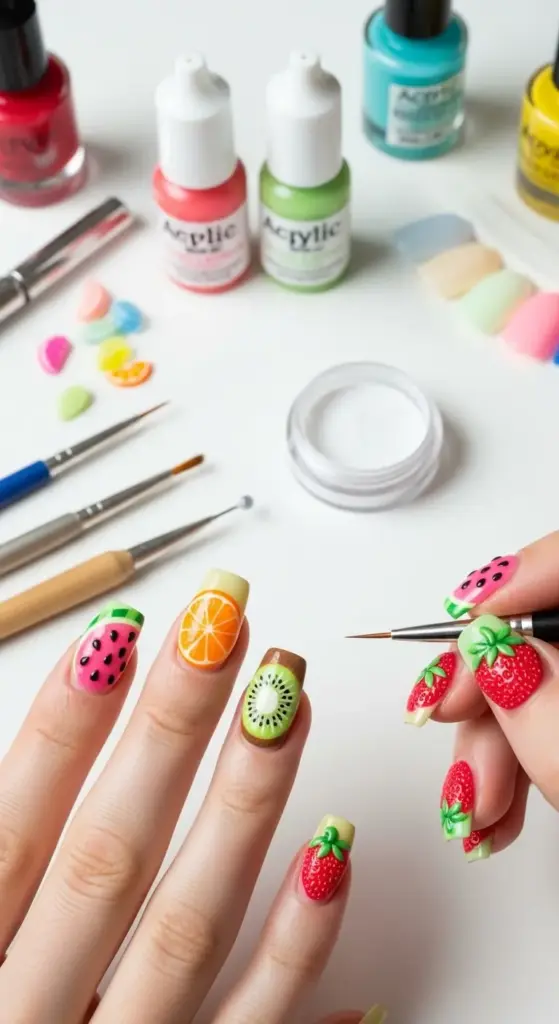
The Tools That Changed Everything
I used to think I could create 3D nail art with just regular polish and hope. Spoiler alert: that doesn’t work!
The absolute must-have is acrylic paint – specifically Apple Barrel paints from the craft store. They’re like $1 each and way better than expensive nail art paints for this technique.
You’ll need dotting tools in different sizes, a fine detail brush, and here’s the kicker – clear acrylic powder. This stuff creates that realistic glossy fruit skin texture that makes people do double-takes.
My Watermelon Obsession (And How to Nail It)
Watermelon slices were my gateway drug into fruit nail art. The technique seems simple but there’s definitely a learning curve involved.
Start with a light green base for the rind. I use Sally Hansen’s “Go Go Green” because it’s the perfect watermelon rind shade.
Layer on the pink flesh using a small brush in semi-circular motions. Don’t make it perfectly smooth – real watermelon has texture!
The seeds are where most people mess up. Use a black dotting tool and place them randomly, not in perfect rows like I did initially. Real fruit is imperfect, and that’s what makes it look authentic.
Orange Slice Magic (My Personal Favorite)
Orange slices are actually easier than watermelons once you get the hang of it. The segmented look is what sells the whole effect.
I use white acrylic paint to create the pith (that white part), then fill each segment with different orange shades. Mixing yellow and red creates more realistic orange tones than using straight orange paint.
The key is making each segment slightly different in color intensity. Real oranges aren’t uniform, and neither should your nail art be!
Kiwi Technique That Blew My Mind
My nail tech friend Jessica showed me this kiwi technique that’s absolutely genius. You start with a brown fuzzy base using textured polish.
The inside is where it gets tricky – you need that pale green background with the white center and tiny black seeds in a circle. I use a toothpick for the seeds because dotting tools are too big.
The translucent effect comes from mixing clear polish with green pigment. It took me about eight tries to get the consistency right, but when it works, it’s chef’s kiss perfect.
Strawberry Struggles and Breakthroughs
Strawberries were my nemesis for months! The seed texture is what makes or breaks the whole look.
I finally figured out that using a textured top coat before adding the seeds creates that bumpy strawberry surface. Game changer, seriously.
The green leafy top needs to be proportional – I used to make them way too big. Keep them small and delicate for the most realistic effect.
Sizing for Different Nail Shapes
This is where I made so many mistakes initially. Long almond nails can handle bigger fruit designs, but short square nails need tiny, delicate pieces.
Oval nails work best with curved fruit like orange slices. Square nails look amazing with geometric watermelon triangles.
Never put 3D elements on your dominant hand’s pointer finger – learned this the hard way when I kept accidentally smooshing my beautiful orange slice while texting!
Professional vs DIY: The Real Talk
Getting these done professionally costs about $80-120 depending on your area. I know because I priced it out before deciding to learn myself.
DIY costs maybe $25 in supplies that’ll last you for dozens of manicures. The time investment though? Plan on spending 2-3 hours your first few attempts.
Professional nail artists have better brushes and steadier hands, but honestly, the imperfect DIY look has its own charm. Plus, you can fix mistakes immediately instead of booking another appointment.
The acrylic powder professionals use is higher quality, but craft store versions work fine for practice. Start cheap, upgrade later – that’s my motto!
Want to master a completely different vibe? Hit that “next” button to explore negative space geometric patterns – these minimalist designs are perfect if fruit art feels too overwhelming, and the technique I’m about to share will make you look like a total nail art pro! ✨


GIPHY App Key not set. Please check settings