7. Candy Corn Gradient: Sweet and Spooky
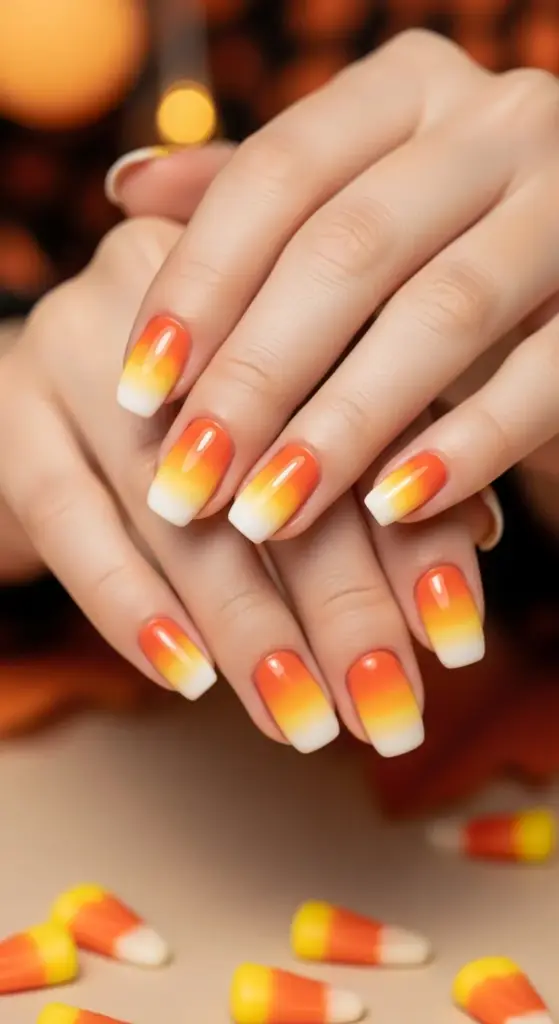
Candy corn nails hold a special place in my heart because they were actually my gateway into serious nail art! I started attempting this design in college when I was homesick during Halloween and craving those nostalgic trick-or-treat vibes.
What I love most about this look is how it perfectly captures that sweet-meets-spooky Halloween energy. It’s playful enough for costume parties but sophisticated enough that I’ve worn variations to work events.
Mastering the Perfect Ombre Technique
The secret to flawless Halloween ombre nails is understanding that candy corn has very specific color proportions. It’s not equal thirds – the white tip is smallest, orange middle is largest, and yellow base falls somewhere between.
I learned this the hard way after creating countless “candy corn” nails that looked more like traffic cones! Real candy corn has that distinctive tapered shape that you need to mimic in your gradient.
Ombre nail techniques for this design work best when you start with the lightest color first. I always begin with white at the tips, then blend down into orange, finishing with yellow at the base.
The key tool here is a makeup sponge – not those cheap foam ones, but a good quality beauty blender type. It makes all the difference in achieving smooth color transitions.
Blending Those Halloween Colors Seamlessly
Getting yellow, orange, and white to blend perfectly took me literally dozens of attempts to master. The trick is working quickly while the polish is still wet and blendable.
Start by painting stripes of each color directly onto your makeup sponge – white at the top, orange in the middle, yellow at the bottom. Then gently dab this onto your nail in a rolling motion.
Seamless color blending requires multiple light layers rather than trying to get perfect coverage in one go. I usually do 3-4 gentle dabbing sessions, letting each dry slightly between applications.
The biggest mistake I made early on was using too much polish on the sponge. Less is definitely more – you want just enough color to transfer without creating a goopy mess.
Adding Realistic Candy Texture
This candy texture technique was a total game-changer for making my nails actually look like edible candy corn! I discovered it while experimenting with different top coat applications.
For that authentic candy corn surface, I use a stippling motion with a small makeup sponge loaded with clear polish. This creates tiny texture bumps that catch light just like real candy.
Realistic candy effects also benefit from strategic highlighting. I add tiny dots of white polish using a dotting tool to mimic those glossy spots you see on actual candy corn.
Sometimes I’ll even add a subtle pearl or iridescent top coat to give that slightly waxy candy appearance. It’s a small detail that makes a huge difference in the overall realism.
Sharp Transitions vs. Soft Blends
Here’s where candy corn nail art gets really interesting – you can go two completely different directions depending on your skill level and desired look.
Sharp color transitions mimic the distinct bands of real candy corn and look incredibly striking. I achieve this by using tape to mask off sections and painting each color separately.
Soft blends give you that dreamy, watercolor candy effect that’s more forgiving for beginners and creates a really ethereal Halloween vibe.
For sharp transitions, I use striping tape positioned exactly where I want each color to end. Paint over the tape, then remove it immediately while the polish is still wet for clean lines.
Creative Accent Nail Ideas
Candy corn accent nails are where you can really let your creativity shine! I love doing four gradient nails with one statement nail that incorporates other Halloween elements.
My go-to accent design is a single candy corn shape painted on a black background – it creates this gorgeous contrast and makes the gradient nails pop even more.
Sometimes I’ll do tiny candy corn scattered across a dark base like they’re floating in a Halloween candy bowl. It’s whimsical and ties the whole look together perfectly.
Halloween accent nail designs that work beautifully with candy corn gradients include black cats, witch hats, or even simple orange and black stripes.
Color Variation Experiments
While traditional candy corn colors are classic, don’t be afraid to experiment! I’ve done gorgeous variations using purple, orange, and white for a more gothic candy vibe.
Halloween gradient variations in pink, orange, and white create this cotton candy meets candy corn effect that’s absolutely adorable for anyone who wants something softer.
My personal favorite twist is adding just a hint of glitter to each color section. It makes the whole design sparkle like sugar crystals and catches light beautifully.
For a more sophisticated approach, try muted versions of the traditional colors – cream instead of bright white, burnt orange instead of neon, and a golden yellow rather than bright canary.
Professional Application Tips
Candy corn manicure techniques require some specific timing to get right. I work on one nail at a time and complete the entire gradient before moving to the next finger.
The key is working while everything is still slightly tacky – not wet enough to smudge, but not so dry that the colors won’t blend together.
Gradient nail timing is crucial – I usually have about 30-45 seconds after applying the colors to the sponge before they start getting too sticky to blend properly.
Keep multiple makeup sponges handy because you’ll need fresh ones for each nail. Trying to reuse a sponge with dried polish leads to patchy, uneven gradients.
Troubleshooting Common Gradient Issues
The most common candy corn nail problems I see are muddy color transitions where all three colors blend into an unappetizing brown mess.
If this happens, you’re probably using too much polish or not working quickly enough. Clean off the nail with remover and start over – trust me, it’s faster than trying to fix a muddy gradient.
Ombre nail fixes for patchy coverage usually involve adding another light layer with the sponge technique. Don’t try to paint over patches with a brush – it’ll ruin the gradient effect.
If your white tips look gray or dingy, you probably need a better quality white polish. Cheap whites often look transparent over other colors.
My Sweet Success Formula
The entire candy corn gradient process takes about 45 minutes for both hands if you’re being careful with drying time between coats.
I always finish with a glossy top coat to give that authentic candy shine. Matte candy corn just doesn’t look right – real candy has that glossy, almost wet appearance.
Halloween nail art timing for this design works best when you plan ahead. I usually do this manicure the day before any Halloween events to ensure everything’s completely cured and chip-free.
The compliments on this design are incredible – there’s something so nostalgic and happy about candy corn nails that makes people smile instantly.
Conclusion
These seven spine-tingling nail designs prove that Halloween manicures don’t have to be complicated to be absolutely stunning! From the classic appeal of blood drip nails to the whimsical charm of ghostly French tips, each design offers its own unique way to celebrate the spookiest season of the year.
Remember, the key to perfect Halloween nails is practice and patience. Don’t be afraid to experiment with different techniques and make each design your own! Start with the simpler designs like candy corn gradients, then work your way up to more intricate graveyard scenes as your confidence grows.
Ready to become the nail art queen of Halloween 2025? Grab your polishes, gather your tools, and let your creativity run wild. Your fingertips are about to become the most haunting accessory in your Halloween arsenal!


GIPHY App Key not set. Please check settings