6. Graveyard Scene Nails: Storytelling Art
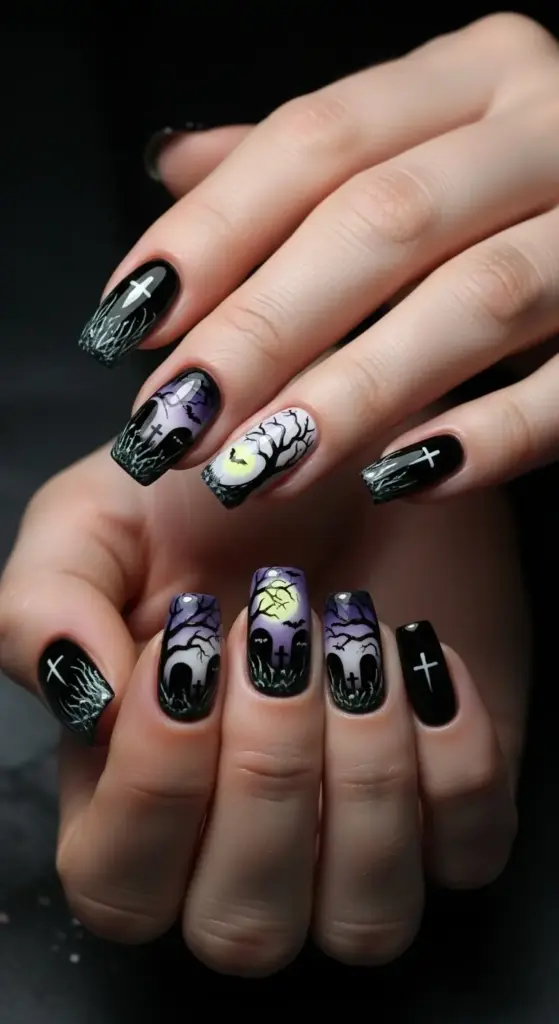
Graveyard scene nails are hands down the most ambitious nail art I’ve ever attempted – and honestly, the first time was a complete disaster! I thought I could just wing it without any planning, and ended up with what looked more like abstract art than a spooky cemetery.
But once I figured out the technique, this became my absolute showstopper design. People literally stop me on the street to ask about these nails – there’s something mesmerizing about having an entire horror scene playing out across your fingertips.
Creating Cohesive Landscape Scenes
The secret to successful landscape nail art is treating your five nails like panels in a comic book. Each nail should contribute to the overall story while still looking good on its own.
I start by sketching the scene on paper first – sounds nerdy, but it saves so much time and frustration later! Plan which elements go on which nails before you even touch the polish.
Multi-nail designs work best when you have a clear focal point. I usually make my ring finger the “hero” nail with the biggest tombstone or most dramatic tree, then build the scene around it.
The biggest mistake I made initially was trying to cram too much detail onto each nail. Real landscapes have areas of rest and areas of interest – your nails should too.
Mastering Silhouette Techniques
Tombstone silhouettes are surprisingly forgiving once you understand that they don’t need to be perfect rectangles. Real headstones have character, chips, and irregular shapes!
I use a small flat brush loaded with black or dark gray polish to create the basic tombstone shapes. Start with simple rectangles, then add personality with curved tops or weathered edges.
For tree silhouettes, the key is making them look gnarled and spooky rather than pretty. I create the main trunk first, then add twisted branches that reach across multiple nails.
Silhouette nail art works best when you vary the heights and shapes. Some tombstones tall and narrow, others short and wide – just like real cemeteries have variety.
Adding Realistic Texture Effects
Creating convincing grass and dirt textures was the technique that took my graveyard nails from amateur to amazing. I discovered this method completely by accident while cleaning my brushes!
For grass texture, I use a fan brush (or a regular brush that I’ve frayed the bristles on) with dark green polish. Dab it vertically along the base of your nails to create that realistic grass effect.
Dirt texture techniques involve layering different shades of brown using a stippling motion. I start with a medium brown base, then add darker brown shadows and lighter brown highlights.
The secret to realistic ground texture is building it up gradually. Don’t try to get the perfect dirt effect in one layer – it takes at least three different shades to look convincing.
Incorporating Spooky Sky Elements
Bat silhouettes are what really bring the whole graveyard scene to life! I use a tiny liner brush to create simple “M” shapes scattered across the sky portions of my nails.
The key to realistic bats is making them different sizes and positions – some flying high, others swooping low, maybe one perched on a tombstone branch.
For the full moon effect, I use a small dotting tool with white or pale yellow polish. Position it behind tree branches or tombstones for that classic horror movie vibe.
Night sky nail art benefits from subtle gradient work. I blend dark purple into black, sometimes adding just a hint of deep blue for that twilight atmosphere.
Advanced Shading and Blending
This is where graveyard nail art gets really technical, but the results are so worth the effort! I use at least four different shades of gray to create realistic tombstone depth.
Advanced nail shading starts with your base color, then adds shadows on one side and highlights on the other. Think about where your imaginary light source is coming from – usually the moon in graveyard scenes.
For blending, I use a small makeup sponge to soften harsh lines between colors. This technique took me months to master, but it’s what makes the difference between flat shapes and dimensional objects.
Dimensional nail effects require patience – I learned this after rushing and ending up with muddy, overblended messes. Let each layer dry completely before adding the next.
My Storytelling Success Formula
Narrative nail designs work best when you establish a clear mood and stick to it. I keep my color palette limited – usually blacks, grays, deep purples, and one accent color like yellow for the moon.
Plan your composition so the eye flows naturally from nail to nail. I usually start the scene on my pinky and let it “read” across to my thumb like a panoramic view.
The most important lesson I learned: cemetery nail art should feel atmospheric, not cluttered. Sometimes the most powerful element is empty space that suggests fog or darkness.
Troubleshooting Common Scene Problems
Landscape nail mistakes usually happen when you try to add too much detail too quickly. I’ve learned to step back frequently and assess the overall composition.
If your silhouettes look too cartoonish, try adding some texture or weathering effects. Real tombstones aren’t smooth – they have chips, stains, and character marks.
Smudged details are fixable! Let everything dry completely, then use a tiny brush with nail polish remover to clean up mistakes. I’ve saved countless graveyard scenes this way.
The biggest technical challenge is color bleeding between elements. Always let each section dry completely before adding adjacent details – patience is everything with this design.
Time Investment Reality Check
Let me be honest: detailed graveyard nails are a serious time commitment. The full design takes me about 2-3 hours when I’m being really careful with all the shading and details.
This is definitely a weekend project, not something you rush through on a weeknight. I usually spread it over two sessions – base colors and main shapes one day, details and finishing touches the next.
But the reactions you get make every minute worth it! I’ve had people ask to take photos of my nails at Halloween parties – there’s something magical about wearing tiny works of art.
Ready for something sweet to balance out all that spookiness? Hit “next” to learn how to create adorable candy corn gradient nails that capture all the nostalgic sweetness of Halloween treats – it’s like wearing your favorite childhood candy!


GIPHY App Key not set. Please check settings