4. Pumpkin Patch Nails: Autumn Vibes
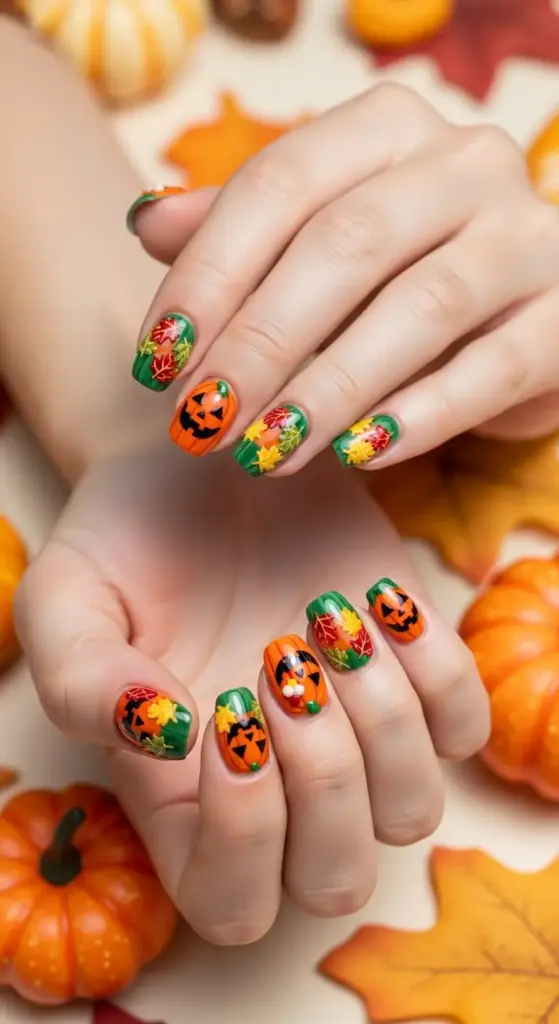
I’ll never forget the first time I attempted pumpkin patch nails – it was for my daughter’s school harvest festival, and I wanted something festive but not too scary. What started as a simple orange manicure turned into my absolute favorite fall nail design!
The best part about this look is how versatile it is. You can go full jack-o’-lantern spooky or keep it sweet and autumn-themed depending on your vibe.
Getting That Perfect Orange Base
Here’s something I learned after way too many orange nail disasters: not all orange polishes are pumpkin-appropriate! Some look more like traffic cones than actual pumpkins.
My go-to pumpkin orange shades are OPI’s “A Great Pumpkin” and Essie’s “Orange It’s Obvious.” These have that perfect warm, earthy tone that actually resembles real pumpkins from the patch.
Don’t skip the base coat with orange polish – I made this mistake once and ended up with stained nails that took weeks to fade. Orange is notorious for leaving behind color residue.
Apply two thin coats rather than one thick one. Thick orange polish tends to get streaky and uneven, which totally ruins that smooth pumpkin skin effect you’re going for.
Creating Realistic Pumpkin Texture
This sponge dabbing technique was a total game-changer for my pumpkin nails! I discovered it by accident when I was trying to clean up a polish spill with a makeup sponge.
Take a small piece of makeup sponge and dab it lightly in a slightly darker orange or even a touch of brown polish. The key is using barely any polish – you want subtle texture, not obvious splotches.
Gently dab the sponge over your dried orange base in random patterns. This creates that natural pumpkin skin texture that makes your nails look incredibly realistic.
I also add tiny vertical lines using a thin brush to mimic those natural pumpkin ridges. Start at the cuticle and drag down toward the tip – don’t worry about making them perfectly straight!
Adding Those Adorable Green Stems
Green stem details are what really sell the pumpkin look. I use a forest green polish and a small flat brush to create little rectangular stems at the base of each nail.
Here’s a pro tip I wish I’d known earlier: make your stems slightly different sizes and angles. Real pumpkins don’t have identical stems, so neither should your nails!
Sometimes I add tiny brown details to the stems using a toothpick. Just a few small dots or lines to give them that weathered, natural appearance.
For extra dimension, I’ll add a tiny highlight to one side of each stem using a lighter green or even a touch of yellow-green. It makes them look more three-dimensional.
Jack-o’-Lantern Face Magic
Creating jack-o’-lantern faces with black polish is where this design gets really fun! I start with simple triangle eyes – they’re forgiving and always look authentically pumpkin-like.
Don’t make all your faces identical – that’s the fastest way to make your nails look amateur. I give each pumpkin a different expression: some happy, some surprised, one or two looking a bit mischievous.
For the mouths, I vary between jagged grins, simple curves, and even some with missing “teeth.” Use a thin liner brush and take your time – rushed jack-o’-lantern faces always look wonky.
The key to realistic pumpkin face designs is keeping the features proportional to your nail size. Tiny nails need tiny faces, while longer nails can handle more elaborate expressions.
Fall Leaves and Vine Accents
Adding fall leaf accents takes this design from simple pumpkins to a whole autumn scene! I use tiny brushes to paint small leaves in reds, yellows, and browns around the pumpkins.
Vine details are surprisingly easy once you get the hang of it. I use a thin green brush to create curvy lines that look like pumpkin vines crawling across my nails.
Sometimes I’ll dedicate one accent nail to a full autumn leaf design while keeping the others as simple pumpkins. It creates a nice focal point without overwhelming the overall look.
Don’t forget about tiny details like leaf veins or vine tendrils – these small touches make such a huge difference in the final result.
Matte vs. Glossy: The Great Debate
I’ve tried this design with both matte and glossy finishes, and honestly, they create completely different vibes. Glossy gives you that fresh, just-picked-from-the-patch look that’s perfect for daytime events.
Matte pumpkin nails have this sophisticated, almost vintage feel that I absolutely love for evening occasions. The matte finish also makes any texture work really pop.
Here’s what I discovered: matte shows imperfections more easily, so your application needs to be cleaner. Glossy is more forgiving if you’re still perfecting your technique.
For the ultimate autumn look, I sometimes do a combination – matte pumpkins with glossy stems and leaves. It creates interesting contrast and dimension.
My Pumpkin Patch Success Tips
Drying time is crucial with this design since you’re layering so many elements. I learned this the hard way after smudging a perfectly good jack-o’-lantern face while reaching for my coffee.
Work on one nail completely before moving to the next. This prevents accidentally messing up previous work and helps you maintain consistency across all your nails.
Keep a small brush dipped in nail polish remover handy for quick cleanup. Those tiny facial features require precision, and mistakes happen even to experienced nail artists.
The whole pumpkin patch manicure takes about an hour if you’re including all the details. It’s definitely a weekend project, but the compliments you’ll get make it totally worth the time investment.
Ready to add some mystical magic to your Halloween repertoire? Hit “next” to learn how to create enchanting witch hat silhouettes that’ll have everyone asking about your mysterious nail artist – spoiler: it’s just you and some clever techniques!


GIPHY App Key not set. Please check settings