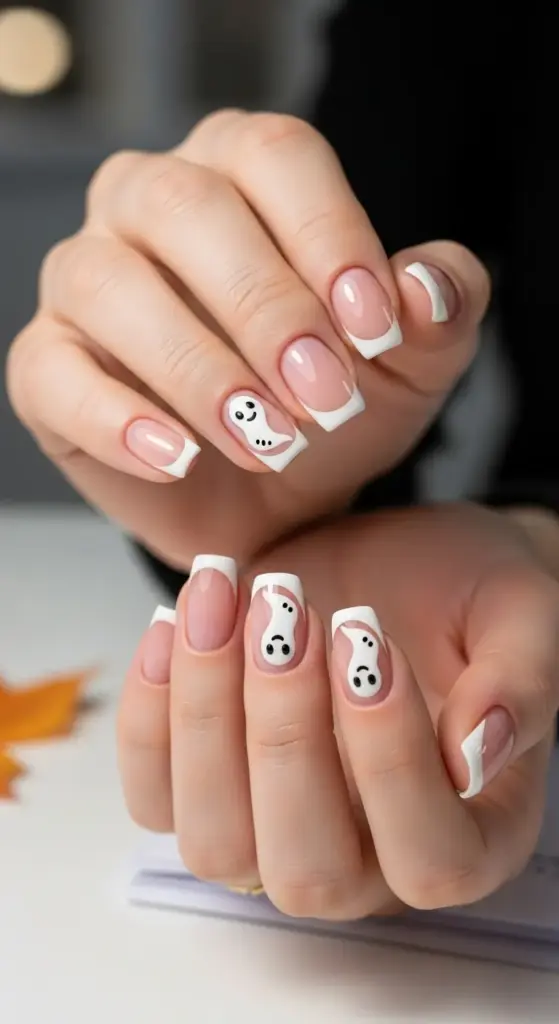
3. Ghostly French Tips: Spooky Meets Elegant
I discovered ghostly French tips completely by accident during a particularly stressful October at work. My boss had made it clear that “inappropriate Halloween decorations” weren’t welcome, but I was determined to show some spooky spirit somehow.
This design became my secret rebellion – professional enough to fly under the radar, but spooky enough to satisfy my Halloween obsession. Plus, I got so many compliments from coworkers who didn’t even realize it was Halloween nail art at first glance!
The Modern French Manicure Twist
Traditional French manicures are pretty, but let’s be honest – they’re also kind of boring. Adding ghost shapes to the tips completely transforms the whole vibe while keeping that classic elegance.
I start with a sheer pink or nude base coat, just like a regular French mani. The key difference is making the white tips slightly thicker than usual to accommodate the ghost shapes.
Here’s what I wish someone had told me earlier: don’t try to make perfect ghost shapes on your first attempt. I spent an entire evening redoing my nails because I was being too much of a perfectionist.
Creating Those Adorable Ghost Shapes
The secret to realistic ghost nail art is understanding that ghosts are basically just wobbly ovals with wavy bottoms. That’s it – no complex shapes required!
I use a small dotting tool loaded with white polish to create the main ghost body. Start with a circle, then drag it downward to create that classic ghost silhouette.
For the wavy bottom edge, I gently wiggle the brush as I pull it across. Don’t overthink this part – the more irregular it looks, the more authentic your ghosts will appear.
The biggest mistake I made initially was trying to make all my ghosts the same size. Real ghosts would totally vary in size, right? Mix it up with some larger ghosts on your ring fingers and smaller ones on your pinkies.
Adding Those Perfect Facial Features
Ghost faces are where this design either looks adorable or completely amateur – there’s really no middle ground. I learned this the hard way after creating what looked more like surprised snowmen than spooky spirits.
Use the tiniest brush you own for the eyes and mouth. I’m talking about a size 00 liner brush – anything bigger and your ghosts will look cartoonish rather than cute.
Two small black dots for eyes, positioned slightly off-center, give the best results. Perfectly centered eyes look too symmetrical and lose that ghostly charm.
For the mouth, I do a tiny curved line or sometimes just a small oval. Some of my ghosts look surprised, others look sad – the variety makes the whole design more interesting.
Gradient Background Magic
This is where ethereal nail effects really come into play. Instead of a solid base color, try creating a subtle gradient that mimics a misty, haunted atmosphere.
I blend a light gray into my nude base using a makeup sponge. The key is keeping it super subtle – you want just a hint of spookiness, not full-on storm clouds.
Gradient techniques for this look work best when you dab rather than drag. I learned this after creating streaky messes that looked more like dirty nails than ethereal backgrounds.
Sometimes I add the tiniest amount of purple or blue to the gradient, especially near the cuticle area. It creates this otherworldly effect that’s absolutely perfect for the ghost theme.
Office-Appropriate Spooky Style
The beauty of professional Halloween nails is that they’re subtle enough for conservative workplaces but still let you celebrate the season. I’ve worn this design to client meetings without anyone batting an eye.
Keep your ghosts small and your colors muted – that’s the golden rule for workplace-appropriate spooky manicures. Bold, bright Halloween colors scream “costume party,” but these soft tones whisper “sophisticated seasonal style.”
I always finish with a glossy top coat to maintain that professional polish look. Matte finishes, while trendy, can look too casual for office environments.
Troubleshooting Common Ghost Problems
Let me save you some frustration: if your ghost shapes look more like blobs than spirits, you’re probably using too much polish on your brush. Less is definitely more with this technique.
Smudged ghost faces are fixable! Let everything dry completely, then use a tiny brush dipped in nail polish remover to clean up any mistakes. I’ve salvaged countless “ghost disasters” this way.
The most common issue I see is ghosts that look too uniform. Real spirits would have personality, right? Make some ghosts taller, others wider, some facing different directions.
Drying time is crucial for this design – I learned this after accidentally smooshing a perfectly good ghost while reaching for my phone. Give each layer at least 10 minutes to set properly.
My Personal Ghost Success Formula
Practice the ghost shapes on paper first using a white pen or marker. This sounds silly, but it genuinely improved my technique and gave me confidence before working on my actual nails.
Work in good lighting – I can’t stress this enough. Those tiny facial features require precision, and poor lighting leads to wonky-eyed ghosts that look more creepy than cute.
The entire ghostly French manicure process takes about 45 minutes if you’re being careful. It’s definitely more time-intensive than regular French tips, but the results are so worth it.
Ready to embrace your inner autumn goddess? Click “next” to discover how to create stunning pumpkin patch nails that capture all those cozy fall vibes – think pumpkin spice latte but for your fingertips!


GIPHY App Key not set. Please check settings