
Halloween is just around the corner, and your nails deserve to be as spooky as your costume! Did you know that 68% of people notice someone’s nails within the first 10 seconds of meeting them?
This Halloween, make those seconds count with nail art that’s absolutely to die for.
Whether you’re heading to a haunted house party or trick-or-treating with the kids, your fingertips can become the perfect canvas for spine-tingling creativity.
From blood-dripping designs to ghostly apparitions, we’ve curated seven hauntingly beautiful nail designs that are surprisingly easy to recreate at home.
Get ready to turn heads and maybe even give someone the chills – in the best way possible!
1. Blood Drip Nails: The Classic Horror Look
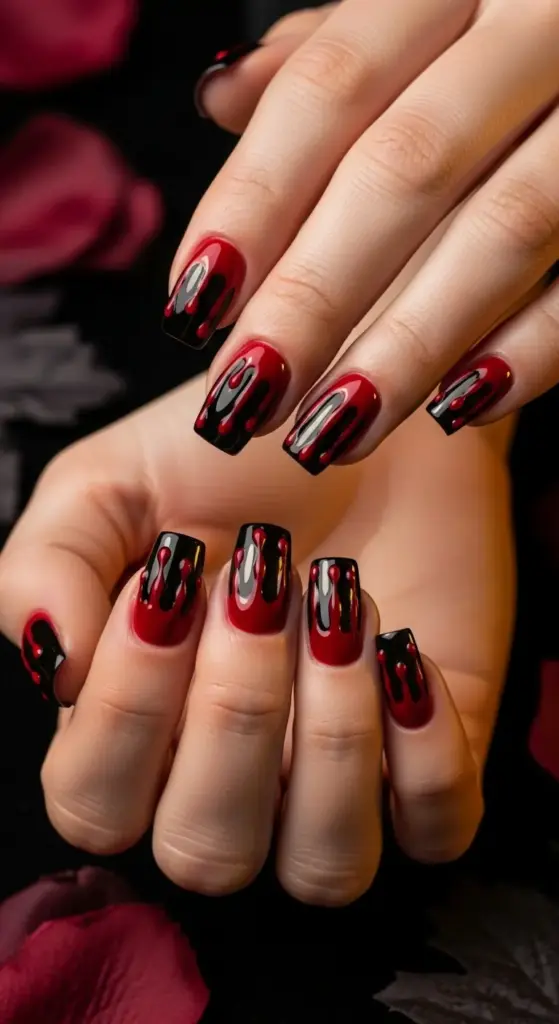
Let me tell you, I’ve been doing blood drip nails for Halloween parties since I was in high school, and wow – the reactions never get old! There’s something so satisfying about watching people do a double-take when they notice your fingertips literally dripping with blood.
The first time I attempted this nail art design, it was a complete disaster. I used whatever red polish I had lying around and ended up with what looked more like ketchup than blood – definitely not the spooky vibe I was going for!
Getting the Blood Color Just Right
Here’s what I learned the hard way: not all reds are created equal when it comes to realistic blood effects. You want that deep, dark crimson that actually looks like it came from a horror movie.
My go-to shades are OPI’s “Big Apple Red” mixed with a tiny drop of black polish. This combo creates that perfect dried blood color that’ll make people genuinely uncomfortable – in the best way possible.
For fresh blood looks, I swear by Essie’s “Really Red” or Sally Hansen’s “Red My Lips.” These have that bright, wet appearance that screams just happened.
Essential Tools for Perfect Drips
Don’t even think about attempting this without the right tools – trust me on this one! I spent way too many Halloweens with wonky, unrealistic drips because I was trying to use a regular nail brush.
You absolutely need dotting tools in at least two sizes. The larger one creates the initial blood pool at your cuticle, while the smaller creates those perfect trailing drips.
Thin nail art brushes are non-negotiable for this look. I use a size 0 liner brush – anything thicker and your drips will look more like paint strokes than blood.
My Step-by-Step Blood Drip Method
Start with a completely dry base coat – I cannot stress this enough! Wet polish will cause your blood drips to blur and lose that sharp, realistic edge.
Apply your base color first. I usually go with black, deep purple, or even nude depending on the overall vibe I’m going for.
Here’s where the magic happens: Load your dotting tool with red polish and place it right at your cuticle line. Don’t overthink the placement – real blood doesn’t follow perfect patterns!
Using your thin brush, drag the polish downward in an irregular line. The key is varying the thickness – start thick at the top and gradually thin it out as you move down the nail.
Pro Tips That Actually Work
Layer your drips! Real blood isn’t just one consistent color, so I always add a second layer with a slightly different red shade. This creates incredible depth and dimension.
Here’s a game-changer: add a tiny dot of clear polish to the “fresh” parts of your drips before they dry completely. This creates that wet, glossy look that’s absolutely convincing.
Don’t make all your drips the same length or thickness. I learned this after creating ten identical drips that looked more like a factory production than realistic blood splatter.
Adding Extra Spooky Elements
Want to take it up a notch? Mix in some red glitter polish for that coagulated blood effect – it’s disturbing in the most perfect way.
For a more subtle approach, try a matte top coat over everything. This gives the blood a dried, older appearance that’s somehow even more unsettling than the glossy version.
I’ve also experimented with adding tiny black dots using a toothpick to mimic blood clots. It’s gross, it’s realistic, and it’s absolutely perfect for Halloween.
The whole process takes about 45 minutes if you’re being careful with drying time between layers. Rush it, and you’ll end up with smudged messes – learned that lesson multiple times!
Ready to move beyond basic blood drips? Click the “next” button below to discover how to create intricate spider web nail designs that’ll have everyone asking if you went to a professional salon – spoiler alert: it’s way easier than it looks!


GIPHY App Key not set. Please check settings