7. Negative Space Artistry
Negative space nail art blew my mind when I first discovered it. The idea that leaving parts of your nail bare could actually make the design more interesting seemed backwards until I tried it.
My first negative space attempt looked like I’d just forgotten to finish painting my nails. Definitely not the chic, minimalist vibe I was going for, but it taught me that placement is everything with this technique.
Creating Windows and Cutouts in Nail Designs
Strategic bare nail placement is like architecture for your fingertips. The empty spaces become just as important as the painted areas.
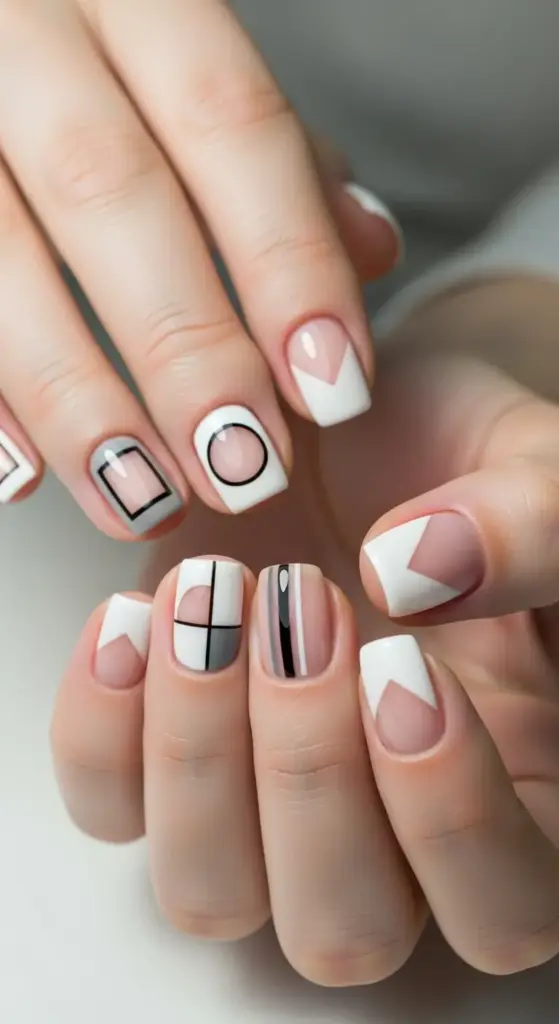
I love creating geometric windows using tape to section off areas before painting. Square and triangle cutouts look incredibly modern and sophisticated.
Circular cutouts using hole reinforcement stickers create these perfect round windows that catch light beautifully. The contrast is absolutely stunning.
Linear windows running vertically down the nail make short nails appear longer. It’s like an optical illusion that actually works.
Using Nail Tape for Clean Negative Space Lines
Striping tape is your best friend for crisp negative space lines. I wasted so much time trying to freehand these designs before discovering proper tape techniques.
Press tape edges down firmly or you’ll get polish bleeding underneath. I use a cuticle pusher to really seal those edges perfectly.
Remove tape while polish is still wet for the cleanest lines. Waiting until it’s dry can cause the polish to peel off with the tape.
Layer different tape widths to create complex negative space patterns. Thin and thick lines together add visual interest and depth.
The Timing Technique That Changed Everything
Here’s my secret for perfect negative space lines: apply base coat, let it dry completely, then apply tape and paint over it.
Work in sections if you’re doing complex designs. Trying to tape an entire intricate pattern at once leads to mistakes and frustration.
Plan your design first by sketching it out or practicing with tape on fake nails. Negative space designs need to be intentional to look good.
Combining Colors with Strategic Bare Nail Areas
Color placement in negative space designs creates different moods and effects. I’ve experimented with every combination imaginable.
Bold colors with bare nail balance create striking contrast without being overwhelming. The negative space keeps bright colors from looking too intense.
Nude polish with strategic bare areas creates subtle, sophisticated designs perfect for professional settings. Very chic and understated.
Metallic accents with negative space add glamour while keeping the overall look clean and modern. Perfect for special occasions.
Advanced Negative Space Patterns and Shapes
Interlocking geometric shapes create these amazing puzzle-like designs where negative and positive space work together perfectly.
I love asymmetrical negative space where each nail has a different pattern but they all work together as a cohesive design.
Curved negative space lines soften the geometric look and create more organic, flowing designs. Perfect for when you want something less structured.
Layered negative space using different opacity levels creates depth and dimension that’s absolutely mesmerizing to look at.
How Negative Space Makes Short Nails Appear Longer
This is the optical illusion magic of negative space design. Strategic bare areas literally trick the eye into seeing longer nails.
Vertical negative space lines running from cuticle to tip create the strongest lengthening effect. The eye follows the line upward.
Diagonal lines pointing toward the tip also create length illusion while adding dynamic movement to the design.
Negative space at the cuticle area makes the colored portion appear to extend further, creating the impression of longer nail beds.
Color Theory for Negative Space Success
High contrast combinations work best for negative space designs. The difference between painted and bare areas needs to be obvious.
Monochromatic schemes with different shades of the same color create subtle negative space that’s perfect for everyday wear.
Complementary colors in negative space designs create vibrant, eye-catching looks that photograph beautifully for social media.
Tools That Make Negative Space Easier
Vinyl nail stencils create perfect shapes every time. Way more precise than trying to cut your own stencils from tape.
Tweezers for tape placement give you much better control than trying to position tape with your fingers. Essential for intricate designs.
Small scissors for cutting custom tape shapes expand your design possibilities beyond basic straight lines.
Common Negative Space Mistakes to Avoid
Overcomplicated designs on short nails look cluttered instead of chic. Keep negative space patterns simple and clean for best results.
Poor tape adhesion ruins the entire look. Always press tape edges down firmly and check for gaps before painting.
Inconsistent negative space sizing across nails makes the design look unintentional. Plan your proportions carefully.
Advanced Negative Space Techniques
Double negative space using two different tape applications creates incredibly complex-looking designs that are actually quite simple.
Textured negative space combining matte and glossy finishes in the same design adds dimension without adding color.
Gradient negative space where the bare areas fade into colored areas creates this dreamy, artistic effect.
Maintenance Tips for Negative Space Designs
Touch-ups are tricky with negative space designs because you can’t just paint over chips. Plan for shorter wear time.
Protect edges carefully because the transition between painted and bare areas shows wear more obviously than solid color manicures.
Use quality base coat on bare nail areas to prevent staining and maintain the clean contrast that makes these designs work.
Creative Negative Space Ideas
Seasonal negative space using holiday-themed cutouts keeps designs festive without being overwhelming. Think snowflakes or hearts.
Negative space French tips modernize the classic manicure by leaving strategic areas bare instead of painting white tips.
Abstract negative space with organic, flowing shapes creates artistic designs that look like tiny masterpieces on your fingertips.
Conclusion
These seven short nail ideas prove that size doesn’t matter when it comes to stunning manicures! From geometric magic to delicate florals, you now have a arsenal of designs that’ll have people asking for your nail artist’s number (even if you did them yourself).
The best part? Each of these techniques works beautifully on short nails and can be customized to match your personal style. Don’t let another day go by watching others get all the nail compliments – it’s time to become the person everyone’s asking about their gorgeous nails!
Ready to transform your short nails into conversation starters? Pick one technique from this list and try it this weekend. Trust me, by Monday, you’ll be fielding compliments left and right!

GIPHY App Key not set. Please check settings