5. Delicate Floral Accents
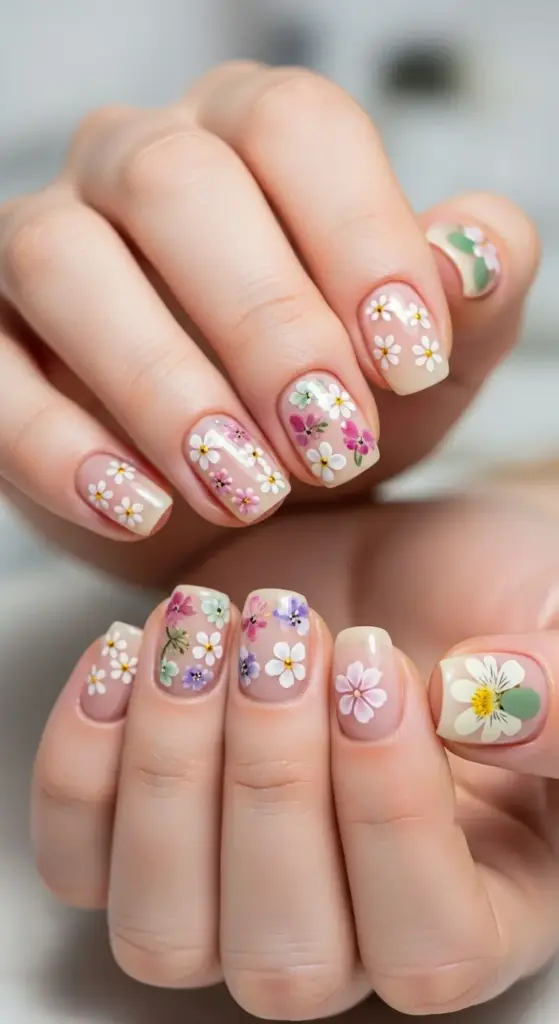
Floral nail art seemed way too complicated until I discovered that tiny flowers actually look better than big, elaborate ones on short nails. Who knew that less really is more?
My first attempt at flower nail designs looked like I’d sneezed paint onto my nails. Definitely not the delicate garden vibe I was going for, but it taught me everything about proportion and placement.
Simple Flower Designs Using Dotting Tools
Dotting tools are absolute game-changers for floral nail art. I used to try painting flowers with tiny brushes and it was a disaster every single time.
The five-dot flower technique is foolproof – make four dots in a circle, then one dot in the center. Instant flower that looks intentional instead of accidental.
Vary your dot sizes for more realistic flowers. I use different sized dotting tools or even bobby pins for tiny accent flowers.
Layering different colored dots creates depth and dimension. Start with lighter colors, then add darker centers or details on top.
The Toothpick Method That Changed Everything
Here’s my secret weapon for delicate flower petals: use a toothpick to drag polish from the center dot outward. Creates these gorgeous petal shapes.
Work while the polish is still wet for the best petal effect. Once it starts drying, you’ll get choppy lines instead of smooth petals.
Clean your toothpick between colors or you’ll muddy up your beautiful flower design. I learned this after ruining several perfect flowers.
Pressed Flower Nail Art Techniques
Real pressed flowers on nails sound fancy, but they’re actually easier than painting flowers. Plus, they look incredibly professional and unique.
I buy dried flowers from craft stores – way cheaper than nail art suppliers and you get more variety. Baby’s breath and small daisies work perfectly.
Apply flowers over wet base coat for better adhesion. They’ll stick better and won’t lift when you apply topcoat.
Seal with multiple thin topcoat layers instead of one thick layer. Thick topcoat can cause the flowers to move or bubble.
Watercolor Floral Effects with Gel Polish
Watercolor flower techniques create this dreamy, artistic effect that looks way more complicated than it actually is. The key is working with translucent colors.
Use sheer gel polishes diluted with a tiny bit of gel medium. This creates that watercolor transparency that makes flowers look painted.
Blend colors while they’re still wet using a clean brush. The colors flow together naturally, creating realistic flower gradients.
Cure between each color layer to prevent muddy mixing. Build up the watercolor effect gradually for the most realistic results.
Seasonal Flower Inspirations for Year-Round Appeal
Spring flowers like cherry blossoms and tulips in soft pinks and whites never go out of style. Perfect for that fresh, romantic look.
Summer florals in bright yellows, corals, and oranges capture that sunny, happy vibe. Sunflowers and daisies work beautifully on short nails.
Fall flower designs using deep burgundies, oranges, and golds feel cozy and sophisticated. Think mums and autumn leaves.
Winter florals in whites, silvers, and deep reds create elegant holiday looks. Poinsettias and winter roses are gorgeous options.
Placement Strategies for Maximum Impact on Short Nails
Strategic flower placement makes all the difference on short nails. Random scattered flowers can look messy instead of intentional.
I love placing one statement flower near the cuticle area with tiny accent flowers trailing toward the tip. Creates movement and visual interest.
Corner placement works beautifully – put your main flower in one corner with smaller elements balancing the design.
Accent nail focus lets you go bigger with floral designs. Do detailed flowers on one nail, simple dots on the others.
Color Combinations That Actually Work
Monochromatic floral schemes using different shades of the same color look incredibly sophisticated. Pink flowers on nude base, for example.
Complementary color flowers create striking contrast. Purple flowers on yellow base, or orange flowers on blue base.
Neutral base with colorful flowers is foolproof and works for any occasion. White or nude base lets the flowers be the star.
Tools That Make Floral Art Easier
Fine detail brushes are essential for adding stems, leaves, and tiny details. I use size 0 and 00 liner brushes most often.
Dotting tools in multiple sizes create variety in your flower designs. I have a set with five different sizes.
Cleanup brushes are crucial because floral art gets messy. Small angled brushes work perfectly for precise cleanup.
Common Floral Art Mistakes to Avoid
Overcrowding flowers is the biggest mistake I see. Short nails need breathing room between design elements or they look cluttered.
Making flowers too big for the nail size throws off the proportions. Keep flowers small and delicate on short nails.
Forgetting about balance creates lopsided designs. Step back and look at the overall composition before adding more elements.
Advanced Floral Techniques
Layered flower petals using different opacity levels create realistic depth. Start with light colors, build up darker details.
Mixed media florals combining painted elements with pressed flowers or decals add texture and interest.
Negative space floral designs where flowers frame bare nail areas look modern and sophisticated.
Ready to discover how chrome and metallic finishes can make your short nails look like expensive jewelry? The next section reveals the application secrets that create that perfect mirror shine every single time!

GIPHY App Key not set. Please check settings