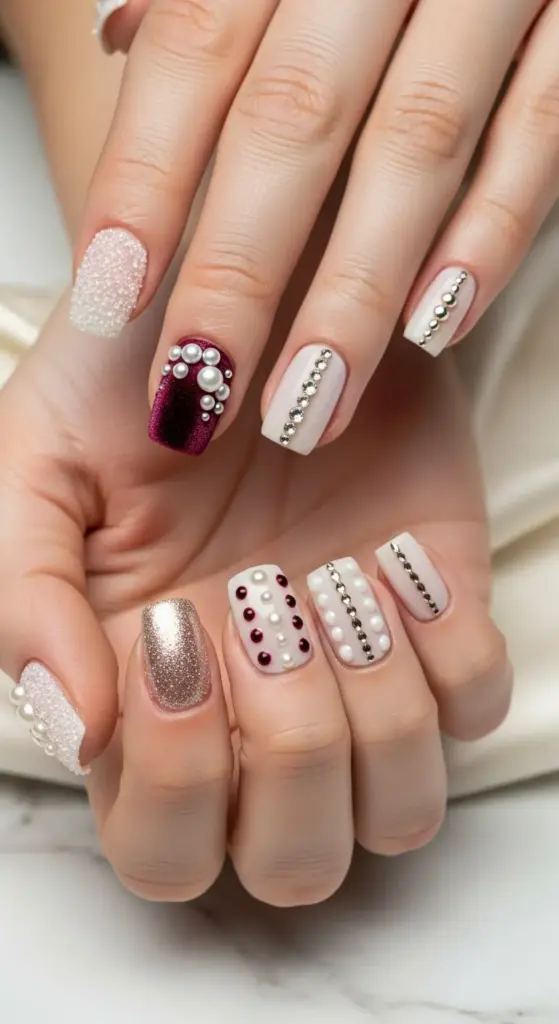
7. Textured and 3D Elements
The first time I tried textured nail art, I was honestly just bored with regular polish. I had no idea I was about to discover the most addictive nail technique ever!
3D nail designs completely changed how I think about manicures. They’re like tiny sculptures on your fingertips, and trust me, people notice the difference immediately.
Sugar Effect and Velvet Magic
Sugar nail effect happened by accident when I spilled actual sugar on wet polish. The texture was so cool that I researched how to do it properly!
Velvet powder nails feel exactly like they sound – soft and luxurious. I apply regular polish, then dip my nails in velvet powder while it’s still tacky. The result is incredible.
Textured nail techniques using sugar or sand give you this matte, grainy finish that’s surprisingly elegant. It’s perfect for fall and winter events when you want something cozy-feeling.
The key with powder nail applications is working quickly. Once your base starts to dry, the powder won’t stick properly, and you’ll get patchy coverage.
Pearl and Rhinestone Perfection
Pearl nail embellishments are my weakness – I probably own every size of nail pearl available. They add instant elegance without being too flashy.
I learned that small rhinestone applications work better on short nails than large stones. Big crystals overwhelm the limited space and look disproportionate.
Strategic pearl placement makes all the difference. I usually place them at the base of the nail or create simple patterns rather than covering the entire surface.
Crystal nail art requires good adhesive. I use nail glue specifically designed for embellishments – regular topcoat just doesn’t hold them securely enough.
Raised Patterns That Pop
Raised dot nail art using acrylic paint creates amazing texture. I make tiny dots in patterns or gradients that you can actually feel when you run your finger over them.
3D line work is trickier but so worth it. I use a thick brush to create raised lines that follow geometric patterns or create abstract designs.
Dimensional nail designs work best when you plan the height carefully. Too much texture makes your nails catch on everything – learned that lesson quickly!
Textured nail patterns should complement your nail shape. Vertical lines elongate short nails, while horizontal patterns can make them appear wider.
Combining Textures Like a Pro
Mixed texture manicures are where things get really interesting. I love combining smooth glitter with matte velvet sections on the same nail.
Layered nail effects require patience. I’ll do a velvet base, add some smooth rhinestones, then finish with raised dots. Each layer needs to be completely set before adding the next.
Contrasting textures create visual interest. Smooth and rough, matte and shiny, flat and raised – the combinations are endless once you start experimenting.
Texture placement strategy matters more than I initially realized. I keep the most textured elements away from areas that get the most wear, like fingertips.
Durability Reality Check
Here’s the truth about textured nail durability – it’s not great for everyday wear. These designs are special occasion nails, not your weekly manicure.
3D nail maintenance requires extra care. I avoid activities that might snag or damage the raised elements, especially in the first 24 hours after application.
Embellishment longevity depends heavily on your lifestyle. If you’re constantly typing or doing hands-on work, textured nails probably aren’t practical for you.
Protective topcoat application is crucial but tricky with textured designs. You need enough to seal everything without flattening the texture completely.
Application Tips for Success
Textured nail preparation starts with a perfectly smooth base. Any imperfections get magnified when you add texture on top.
I always do texture work in good lighting with all my tools laid out beforehand. Once you start, you need to work quickly and efficiently.
Curing time is longer for textured designs. I give each layer extra time to set completely – rushing this step ruins everything.
Quality materials make a huge difference with 3D work. Cheap rhinestones fall off, low-quality powders look patchy, and poor adhesives fail quickly.
When Textured Nails Shine
Special event nails are perfect for texture experiments. Weddings, galas, holiday parties – these are when textured designs really make sense.
Photography sessions love textured nails because they catch light in interesting ways. The dimension shows up beautifully in professional photos.
Conversation starter nails – that’s what textured designs really are. People will ask about them, so be prepared to explain your technique!
Short-term wear is ideal for these designs. Plan them for events where you’ll only need them to last a few days rather than weeks.
Conclusion
These seven short acrylic nail ideas prove that you don’t need length to make a lasting impression! From timeless French tips to bold geometric patterns, each design offers its own unique charm for special occasions.
The beauty of short acrylics lies in their versatility – they’re elegant enough for formal events yet practical for everyday wear. Next time you have an important event coming up, bookmark this guide and choose the design that speaks to your personal style.
Remember, confidence is your best accessory, and perfectly polished short acrylics will have you feeling unstoppable! Ready to book your next nail appointment?


GIPHY App Key not set. Please check settings