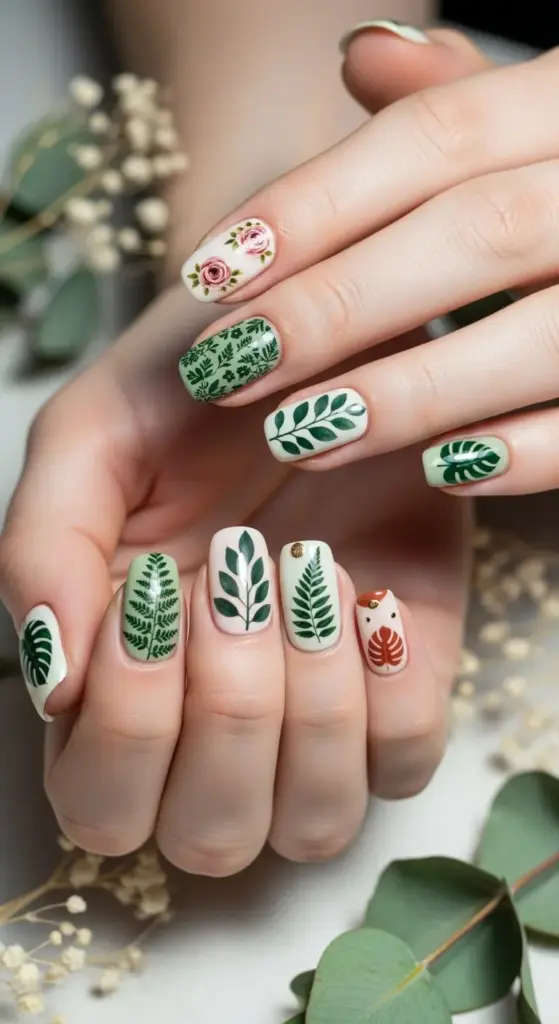
6. Delicate Floral and Nature-Inspired Art
My first attempt at floral nail art looked like I’d sneezed while holding a paintbrush. Seriously, it was that messy.
I thought I could just wing it and create these gorgeous botanical masterpieces without any practice. Spoiler alert: delicate floral designs require way more skill and patience than I initially realized!
Hand-Painted vs. Stamped: The Great Debate
Let me be real with you – I spent months trying to perfect hand-painted flowers before admitting that maybe stamping wasn’t “cheating” after all.
Hand-painted florals give you complete creative control and that authentic, artistic look. But on short acrylics? The margin for error is basically zero.
I finally mastered tiny roses using a detail brush and the “dot and drag” technique. Start with a small dot of color, then drag outward to create petals. Simple but effective once you get the hang of it.
Stamped floral designs became my saving grace for intricate patterns. The detail you can achieve with a good stamping plate is absolutely incredible, especially for complex botanical motifs.
Pro tip: combine both techniques! Use stamping for the base floral pattern, then add hand-painted details like tiny leaves or accent dots.
The key with stamping on short nails is choosing appropriately sized designs. Those huge, elaborate patterns just won’t fit properly on shorter nail beds.
Seasonal Flower Power
Here’s where I got obsessed with matching my nails to nature’s calendar. Seasonal floral motifs keep your manicure feeling fresh and relevant year-round.
Spring calls for cherry blossoms and tiny daisies. I love using soft pinks and whites with delicate green accents. These designs make me feel optimistic and renewed.
Summer florals are all about bold, tropical vibes. Hibiscus flowers, palm leaves, and bright sunflowers work beautifully on short acrylics when scaled appropriately.
Fall botanical designs focus on leaves and berries. Think maple leaves in burnt orange, tiny acorns, or delicate fern patterns. The earthy color palette is absolutely gorgeous.
Winter florals might seem counterintuitive, but evergreen sprigs and holly berries create stunning holiday-appropriate designs that aren’t too over-the-top.
Leaf Patterns and Botanical Elements
This is where I discovered my true nail art calling. Leaf patterns are so much more forgiving than flowers, especially when you’re working with limited space.
Simple fern fronds are perfect for beginners. Use a thin brush to create the main stem, then add tiny diagonal lines for the leaflets. Easy but incredibly elegant.
Eucalyptus branches became my signature design. The oval leaves are simple to paint, and the silvery-green color works with almost any base shade.
Monstera leaves are trendy right now, and their distinctive split pattern looks amazing as an accent on one or two nails. Don’t try to fit the whole leaf – just a portion creates beautiful negative space.
Botanical silhouettes work wonderfully too. Paint your base color, then use black or dark green to create simple leaf outlines. The minimalist approach is perfect for professional settings.
Color Palettes That Actually Work
After countless experiments (and some serious color clashes), I’ve figured out which color combinations enhance natural designs without overwhelming short nails.
Sage green and cream is my go-to palette. It’s sophisticated, calming, and works beautifully with both painted and stamped botanical elements.
Dusty rose with forest green creates this vintage botanical vibe that’s absolutely stunning. The muted tones feel expensive and refined.
Terracotta and gold accents give off major autumn vibes. Perfect for leaf patterns and harvest-inspired designs.
Here’s what I learned the hard way: avoid neon colors with delicate florals. The contrast is too harsh and makes the artwork look cheap rather than elegant.
Monochromatic palettes work beautifully too. Different shades of green for an all-botanical look, or various pinks for a romantic floral theme.
Placement Strategies for Maximum Impact
This is crucial on short acrylic nails – where you place your design can make or break the entire look.
Single accent nails work best for detailed floral art. I usually choose the ring finger and keep the other nails in a complementary solid color.
Diagonal placement creates visual interest without overwhelming the nail bed. A small flower positioned at the upper right corner draws the eye upward, making nails appear longer.
Cuticle area designs are gorgeous but tricky. Tiny flowers or leaves near the cuticle create this delicate, feminine look, but they require serious precision to avoid looking messy.
Tip placement works well for simple botanical elements. A small leaf or flower at the nail tip creates a subtle accent that’s perfect for professional environments.
The golden rule: less is more on short nails. One well-placed botanical element looks infinitely better than cramming multiple designs onto a small surface.
Negative space incorporation makes designs appear larger and more impactful. Let parts of your natural nail show through to create breathing room in the design.
Ready to add some serious glamour and shine to your short acrylics? Hit “next” to discover how bold metallic and chrome accents can transform your nails into eye-catching statement pieces that catch light from every angle!


GIPHY App Key not set. Please check settings