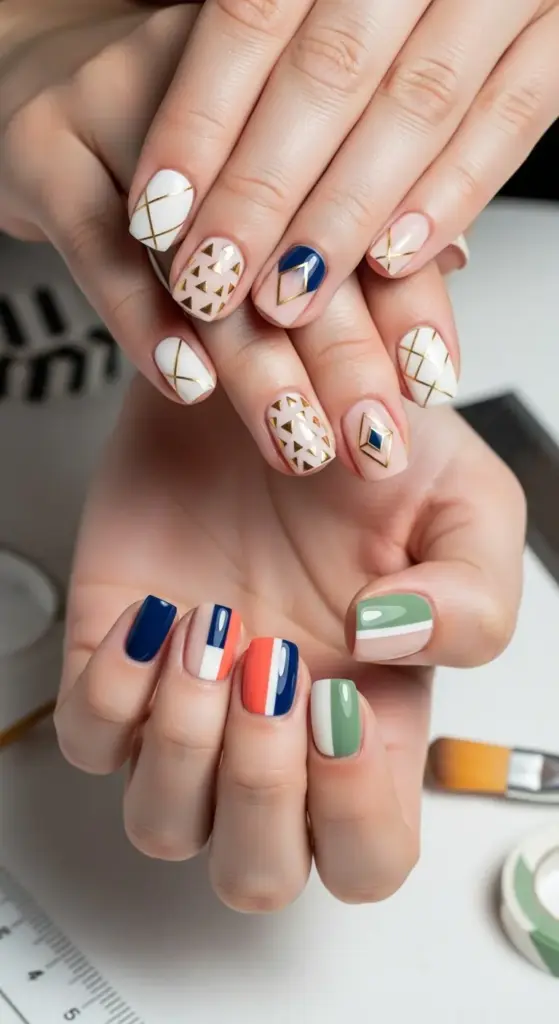
3. Geometric Patterns and Negative Space Designs
I’ll be honest – my first attempt at geometric nail art looked like I’d let a kindergartner loose with a nail brush. What a hot mess that was!
But here’s the thing about geometric designs on short nails: when done right, they’re absolutely game-changing. They add this modern, artistic vibe that makes people do double-takes.
Simple Line Art That Actually Works
Let me save you from my early mistakes here. I used to think more lines meant better design – wrong, so very wrong.
Single accent lines are your best friend on short acrylics. A thin gold line running diagonally across one nail? Pure elegance. Two intersecting lines creating a simple “X”? Chic as heck.
The key is using striping tape or nail art brushes with steady hands. I cannot stress this enough – freehand lines on short nails will drive you absolutely crazy.
Start with just one accent nail per hand. Trust the process – sometimes less really is more, especially when you’re working with limited nail real estate.
Triangle and Diamond Magic
Here’s where I got obsessed (maybe a little too obsessed). Triangle patterns are perfect for short nails because they create this upward movement that makes your nails look longer.
My favorite technique? Paint your base color, then use nail vinyls to create perfect triangular shapes. Remove the vinyl while the polish is still slightly wet for crisp, clean lines.
Diamond accents work beautifully too, but here’s what I learned the hard way: keep them small! A tiny diamond shape near the cuticle or at the tip creates visual interest without overwhelming the nail.
Pro tip: Metallic outlines around your geometric shapes add definition and make the design pop against any base color.
Negative Space: The Length Illusion
This technique literally changed my nail game forever. Negative space designs use the natural nail as part of the pattern, and they’re incredibly flattering on shorter lengths.
My go-to design? A half-moon negative space at the cuticle with colored tips. It creates this elongating effect that makes my stubby nails look like elegant ovals.
Vertical negative space strips are another winner. Paint your nails, then use tape to create thin vertical lines and remove the polish. The exposed natural nail creates length illusions that are absolutely stunning.
The trick is keeping your natural nails healthy and well-buffed since they’re part of the design. Nobody wants to see ridges or discoloration peeking through!
Color Blocking for Bold Statements
Okay, this is where I went a bit wild initially. My first color blocking attempt involved five different neon colors that looked like a highlighter explosion.
Learn from my mistakes – stick to 2-3 colors max for short nails. Complementary colors work beautifully, like navy and coral, or sage green and cream.
Horizontal color blocking can make short nails appear wider, so I prefer diagonal or vertical blocks that create movement and length.
The half-and-half technique is foolproof: divide each nail diagonally and use two contrasting colors. Simple, modern, and incredibly chic.
DIY Tools That Actually Matter
After wasting money on countless “nail art kits,” here are the tools that actually work for geometric designs:
Striping tape – absolute game-changer for clean lines. Get the thin stuff, not the thick vinyl.
Nail art brushes – invest in a good detail brush and a flat shader. These two will handle 90% of your geometric needs.
Dotting tools – perfect for creating small circles or cleaning up wobbly lines.
Nail vinyls – pre-cut shapes save so much time and frustration. Worth every penny.
Here’s my biggest DIY tip: practice on fake nails first. I cannot tell you how many manicures I ruined trying to perfect a technique on my actual nails.
Ready to dive into something completely dreamy? Click “next” to discover how soft pastel ombré effects can transform your short acrylics into pure cotton candy perfection!


GIPHY App Key not set. Please check settings