5. The “Textured Red Caviar” Application
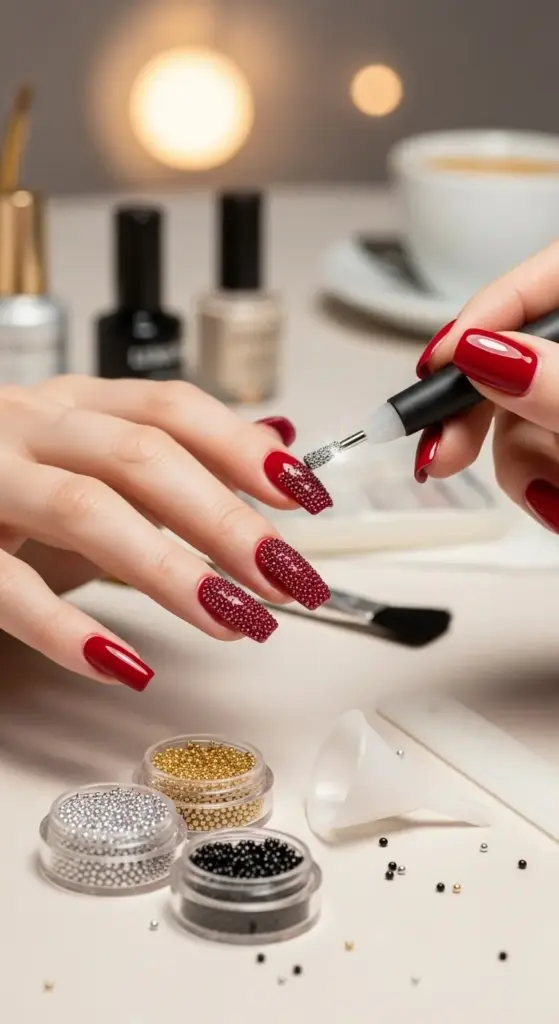
The first time I saw caviar nails in person, I literally stopped mid-conversation to stare. This woman at a coffee shop had these incredible textured red nails that looked like tiny pearls embedded in rich crimson polish.
I had to know how she did it. Turns out, it’s way easier than it looks – but there are definitely some tricks that separate amateur attempts from professional-looking results.
Professional Caviar Bead Application Secrets
Here’s what most tutorials don’t tell you: timing is absolutely everything. You have about 45 seconds after applying your red base coat to get those beads on properly.
I learned this the hard way after wasting an entire bottle of micro caviar beads trying to apply them to dry polish. They just bounced right off and scattered all over my bathroom floor.
Professional manicurists work one nail at a time – never try to do multiple nails simultaneously. The polish needs to be wet enough for the beads to sink in slightly but not so wet that they disappear completely.
Color Coordination That Actually Works
Silver caviar beads over classic red polish is your safest bet – it’s timeless and works with any skin tone. I’ve tried this combination dozens of times and it never fails to look expensive.
Gold beads create this gorgeous vintage Hollywood glamour effect, especially over deeper reds like burgundy or wine shades. Rose gold beads are my personal favorite over coral-reds – it’s feminine without being too sweet.
Black caviar beads might sound weird, but they create incredible depth over bright reds. It’s dramatic and edgy – perfect for evening events or when you want to make a statement.
My Step-by-Step Application Process
Start with a quality base coat and let it dry completely. This protects your natural nails and helps the red polish adhere better.
Apply your red base color in thin, even coats. Two coats usually give you the opacity you need without being too thick for the beads to adhere properly.
While the second coat is still wet, pour the caviar beads over your nail using a small spoon. Don’t sprinkle – pour generously so the entire nail is covered.
Pressing Technique for Perfect Adhesion
Here’s the secret: gentle pressing with a silicone tool. I use a cuticle pusher with a silicone tip to lightly press the beads into the polish.
Don’t use too much pressure – you want the beads to nestle into the polish, not disappear completely. Think of it like pressing pearls into soft clay.
Work systematically from cuticle to tip, making sure every bead makes contact with the wet polish underneath. Missing spots will cause beads to fall off within hours.
Longevity Secrets for Textured Manicures
The biggest mistake people make is skipping the top coat. You absolutely need a thick, glossy top coat to seal everything in place.
I use two coats of top coat – the first one to lock the beads down, then a second coat after 24 hours to create that smooth, professional finish.
Cuticle oil is your enemy with caviar nails. It breaks down the adhesion and causes beads to pop off. Skip your usual nail care routine while wearing this look.
When Celebrities Choose This Dramatic Look
Rihanna wore incredible gold caviar nails to the Met Gala – they photographed beautifully under all those camera flashes and complemented her gold gown perfectly.
Fashion Week events are where you see this technique most often. Models and fashion editors love how it adds texture and interest without competing with the clothing.
Award show red carpets are perfect for caviar nails because they create this luxurious, high-fashion effect that looks expensive in photos.
Cost-Effective DIY Alternatives
Professional caviar nail kits cost $40-60, but you can create the same effect for under $15. I buy micro glass beads from craft stores – they’re identical to expensive nail caviar.
Steel shot beads from jewelry supply stores work amazingly well too. They’re perfectly round and come in tons of colors for about $8 per container.
My secret weapon? Crushed glass glitter creates a similar textured effect and costs about $3. It’s not exactly the same, but it photographs beautifully and lasts longer.
Application Tools That Make the Difference
A small funnel makes bead application so much easier and less wasteful. I made one from rolled paper when I first started – it works perfectly.
Tweezers with fine tips are essential for placing individual beads in sparse areas or fixing gaps. Don’t try to do this with your fingers – you’ll mess up the wet polish.
Silicone nail art tools are worth the investment. They don’t scratch the beads and give you way more control than metal tools.
Common Mistakes That Ruin the Look
Over-pressing the beads is probably the most common error. You want texture, not a completely smooth surface where the beads disappear into the polish.
Applying beads to polish that’s too dry results in poor adhesion and beads falling off constantly. The polish should still be slightly tacky when you add the texture.
Skipping the cleanup step makes your manicure look messy. Use a small brush to remove excess beads from your cuticle area before the top coat.
Professional Finishing Touches
Edge cleanup is crucial for a professional look. Use a small angled brush dipped in acetone to clean up any beads that wandered onto your skin.
Let everything cure for at least 2 hours before doing anything with your hands. Caviar nails need more drying time than regular polish.
Maintenance is key – carry a small container of matching beads for quick touch-ups. A few strategic replacements can extend your manicure by days.
Ready to learn the technique that creates the most ethereal, dreamy red nails you’ve ever seen? Click next to discover the “Ombré to Clear” Fade Technique – the advanced blending method that makes your nails look like they’re dissolving into thin air and costs absolutely nothing extra to master!

GIPHY App Key not set. Please check settings