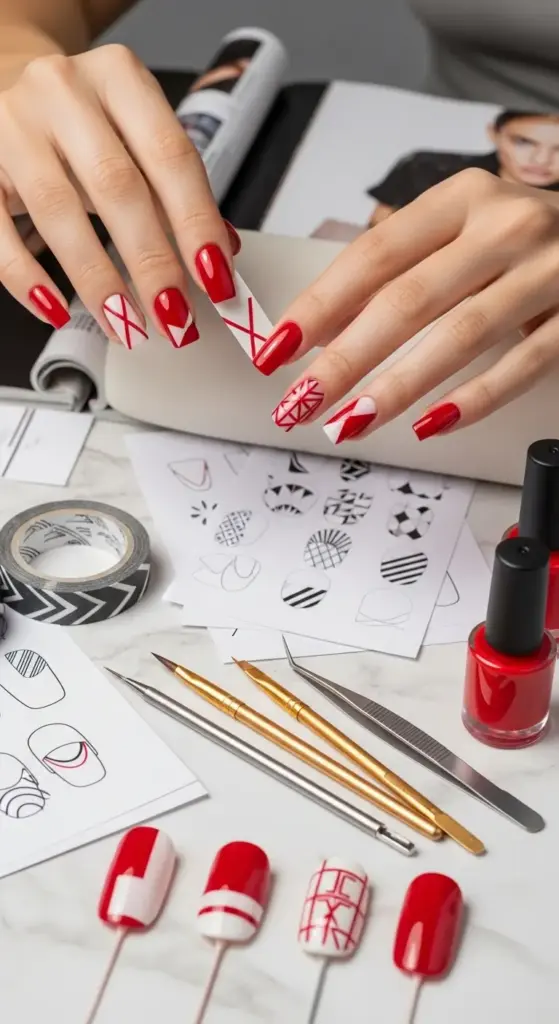
4. The “Negative Space Geometry” Design
I used to think geometric nail art was way too complicated for someone like me. Boy, was I intimidated by those perfect Instagram photos showing flawless triangles and precise lines.
My first attempt looked like a toddler had attacked my nails with red polish and tape. But after months of practice (and many failed manicures), I finally cracked the code to professional-looking geometric designs.
Understanding Advanced Geometric Patterns
The secret to negative space geometry isn’t just about leaving parts of your nail unpainted. It’s about creating intentional shapes that complement your nail’s natural curve and length.
Triangular cutouts work best on longer nails, while rectangular strips are perfect for shorter nail beds. I learned this after trying to force triangle designs on my stubby nails – it looked absolutely terrible.
The key is working with your nail shape, not against it. Oval nails look stunning with curved geometric patterns, while square nails can handle sharp, angular designs.
Tape and Stencil Techniques That Actually Work
Here’s where most tutorials fail you: they don’t tell you about tape quality. Regular scotch tape bleeds polish like crazy and creates fuzzy lines.
Striping tape is your best friend – it’s thin, flexible, and removes cleanly without taking your base coat with it. I buy mine in bulk from nail supply stores for about $2 per roll.
For curved designs, vinyl stencils are game-changers. You can cut custom shapes with an X-acto knife or buy pre-made geometric stencils online.
My Foolproof Application Method
Start with a clear base coat and let it cure completely. This protects your natural nail and makes cleanup easier if you mess up.
Apply your tape or stencils while the base is still slightly tacky – they’ll adhere better and create sharper lines. Press down the edges firmly using a cuticle pusher to prevent bleeding.
Two thin coats of red polish work better than one thick coat. Thick polish seeps under tape and ruins those crisp geometric lines you’re working so hard to achieve.
Color Theory for Perfect Red Selection
Not all reds work for geometric designs. High-contrast shades are essential – you want your red to pop against your natural nail color.
If you have pale skin tones, go for true reds or blue-based reds. They create maximum contrast against pink nail beds. Darker skin tones look incredible with orange-reds or coral-based shades.
Opacity matters too – you need a red that covers completely in two coats. Sheer formulas look muddy in geometric designs and ruin the clean, modern aesthetic.
Making Designs Look Intentional (Not Accidental)
The difference between professional and amateur geometric nails comes down to planning. I sketch my designs on paper first – sounds nerdy, but it works.
Symmetry is crucial but doesn’t have to be perfect. Slight variations actually look more hand-crafted and expensive than machine-perfect lines.
Balance is everything – if you have a bold geometric shape on your ring finger, keep the other nails simpler. One statement nail with subtle accents on the others creates cohesion.
Professional Tips for Crisp Lines
Remove tape while the polish is still slightly wet – about 80% dry. If you wait too long, the polish peels off with the tape.
Use a small angled brush dipped in acetone to clean up any bleeding immediately. Don’t wait until everything’s dry – fresh mistakes are easier to fix.
Seal everything with a quality top coat but avoid the tape lines on the first coat. Apply top coat, let it dry, then do a second coat over the entire nail for smoothness.
Celebrity Red Carpet Inspiration
Zendaya’s geometric red nails at the Spider-Man premiere were absolutely iconic. Her manicurist used triangular negative space with classic red polish – simple but stunning.
Emma Watson frequently wears linear geometric designs with red accents. The clean lines complement her minimalist style perfectly and photograph beautifully.
Lupita Nyong’o took this trend to the next level with curved geometric patterns that followed her nail’s natural shape. It looked like modern art on her fingertips.
Advanced Pattern Combinations
Once you master basic shapes, try overlapping triangles for a more complex look. I create this by applying multiple strips of tape at different angles.
Half-moon designs combined with geometric cutouts create this gorgeous vintage-modern hybrid. It’s like art deco meets contemporary minimalism on your fingertips.
Linear patterns work incredibly well for everyday wear. Simple parallel lines or chevron shapes give you that geometric edge without being too bold for the office.
Tools That Make All the Difference
Invest in a good pair of tweezers for precise tape placement. I use curved tweezers from a beauty supply store – they give you way more control than straight ones.
Nail art brushes in sizes 0, 2, and 4 cover all your geometric needs. Don’t buy expensive sets – individual brushes from art supply stores work just as well.
A steady hand rest changed my entire technique. I use a small pillow on my lap to stabilize my working hand – it eliminates those shaky lines that scream “amateur.”
Ready to add some serious texture and glamour to your red nails? Hit next to discover the “Textured Red Caviar” Application – the luxurious technique that makes your manicure look like it belongs on a runway and creates the most Instagram-worthy texture you’ve ever seen!

GIPHY App Key not set. Please check settings