3. The “Chrome Accent Underlay” Secret
This technique literally changed my entire nail game. I discovered it by complete accident when I forgot to remove my chrome base coat before applying red polish on top.
The result was absolutely stunning – my nails looked like they had this inner glow that I couldn’t explain. Turns out, I’d stumbled onto one of the most guarded secrets in professional nail art.
The Hidden Chrome Base That Changes Everything
Most people think chrome and regular polish don’t mix. They’re completely wrong. When you apply chrome strategically under red polish, it creates this incredible depth that makes your nails look three-dimensional.
The key is using mirror chrome powder in specific areas, not all over the nail. I learned this after ruining three manicures trying to chrome my entire nail surface.
Think of it like highlighting and contouring – you’re creating light reflection points that make the red appear richer and more expensive.
Strategic Placement for Maximum Impact
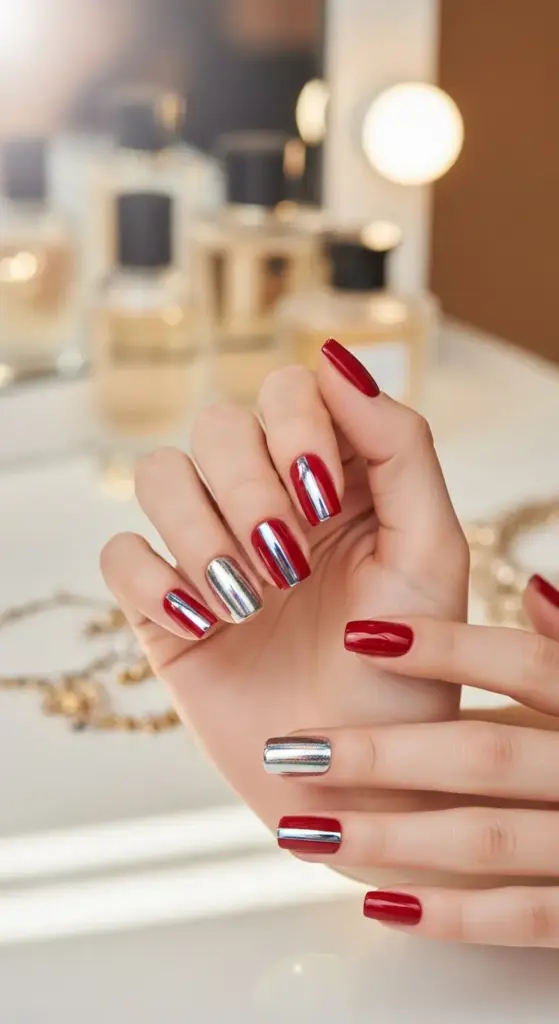
Here’s where most people mess up: they put chrome everywhere. Don’t do that. You want chrome only on the center third of each nail – from about 2mm below the cuticle to 2mm above the tip.
I use a thin striping brush to apply the chrome base in a narrow vertical strip down the middle. This creates a subtle light-catching effect without looking overdone.
The sides of your nails should remain chrome-free – this contrast is what makes the technique work so beautifully.
Chrome Shade Combinations That Actually Work
After testing dozens of combinations, here are the chrome shades that work best under different reds:
Silver chrome under classic true reds – this is your safest bet and looks incredible under any lighting. Rose gold chrome under burgundy or wine reds creates this gorgeous warm undertone that photographs like a dream.
Gold chrome works amazingly under orange-reds and coral shades. Holographic chrome is my secret weapon under darker reds – it adds this subtle rainbow flash that’s absolutely mesmerizing.
Professional Tools You Actually Need
Forget expensive chrome application kits. All you need is a small synthetic brush (size 2 works perfectly) and high-quality chrome powder.
I get my chrome powder from nail supply stores – it’s the same stuff professionals use but costs about 70% less. Beetles brand has been my go-to for over two years.
The application sponge matters too – those cheap makeup sponges don’t work. You need dense foam applicators that won’t absorb all your product.
My Step-by-Step Application Process
Start with a black gel base coat only in your target chrome area. This makes the chrome way more reflective and vibrant.
Cure the black base, then buff the surface lightly with a 240-grit file. The chrome needs slight texture to adhere properly.
Apply the chrome powder using gentle pressing motions – never rub or drag. Work in thin layers until you get that perfect mirror finish.
Lighting Photography Magic
Under natural daylight, this technique creates subtle depth that looks expensive but not flashy. Perfect for professional settings or daytime events.
Indoor lighting is where it really shines – literally. The chrome catches artificial light and creates these gorgeous highlight streaks that make your nails look professionally done.
Camera flash photography is incredible with this technique. While regular red polish can look flat in photos, the chrome underlay creates dimension that translates beautifully on camera.
Common Mistakes I Made (So You Don’t Have To)
My biggest error was applying too much chrome powder. Less is definitely more – you want subtle enhancement, not disco ball nails.
Never skip the black base coat – I tried applying chrome directly over clear base and it looked muddy and dull. The black makes all the difference.
Another mistake: using cheap chrome powder. I learned this lesson after spending hours on a manicure that looked amazing for exactly one day before the chrome started flaking off.
Celebrity Manicurist Secrets
Jennifer Lopez’s manicurist uses this exact technique but with platinum chrome under deep red shades. It creates that signature “expensive” look she’s known for.
I’ve seen Rihanna wear this combination multiple times – rose gold chrome under burgundy red. It photographs incredibly well under stage lights and camera flashes.
The technique works so well because it mimics how high-end jewelry reflects light – creating depth and richness that flat color simply can’t achieve.
Ready to learn the geometric technique that’s taking Instagram by storm? Click next to discover the “Negative Space Geometry” Design – the mathematical approach to red nail art that makes everyone think you spent hours at an expensive salon!

GIPHY App Key not set. Please check settings