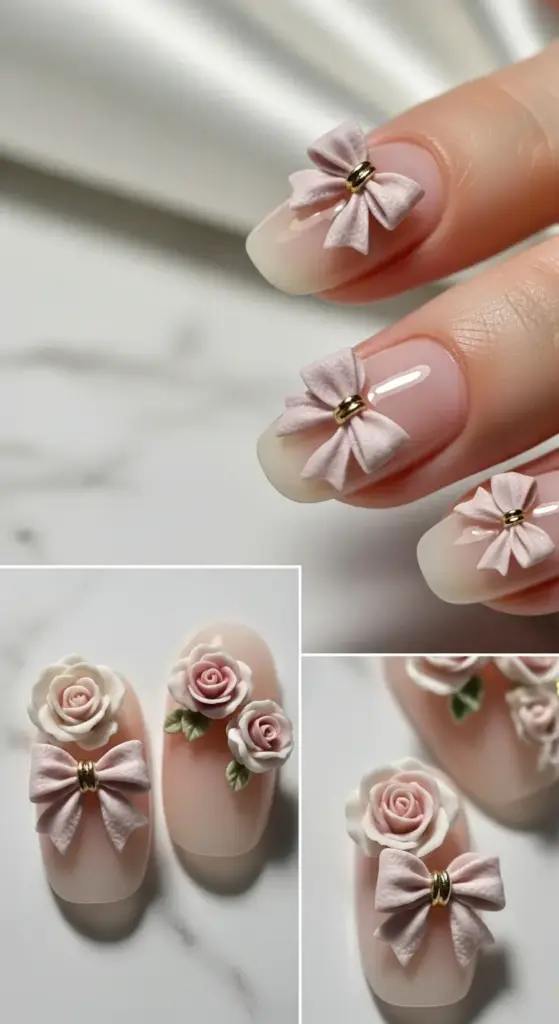
7. 3D French Tips with Sculpted Elements
The first time I attempted 3D nail art, I ended up with what looked like tiny Play-Doh disasters glued to my fingertips. My “roses” resembled lumpy potatoes, and my bows looked like someone had sneezed on my nails.
But when 3D nail art is done right? It’s absolutely stunning – like wearing tiny sculptures on your hands that catch light and create shadows just like real jewelry.
My 3D Sculpting Reality Check (It Was Humbling)
I thought acrylic sculpting would be just like working with clay in art class. Wrong! Acrylic has a working time of maybe 2-3 minutes before it starts hardening, which means no time for perfectionist tendencies.
Working quickly became my biggest challenge. I’d spend so much time trying to perfect one petal that the entire rose would harden into an unusable mess before I could finish it.
Temperature affects everything with 3D materials. Hot days make the acrylic set faster, cold days slow it down. I learned to adjust my workspace temperature for consistent results.
Essential 3D Materials That Actually Work
Acrylic powder and liquid are the foundation of most 3D nail art, but not all brands work equally well for sculpting. Some set too fast, others never seem to harden properly.
I use a slow-setting acrylic system specifically designed for nail art. It gives me about 5 minutes of working time, which is just enough for detailed sculpting work.
Sculpting tools make all the difference. I have a collection of different shaped tools – some for shaping petals, others for creating texture, and tiny ones for fine details.
Basic Sculpting Techniques I Had to Master
Bead control is fundamental to 3D work. You need to create the perfect consistency – not too wet (it’ll run everywhere) and not too dry (it won’t shape properly).
The pick-up technique took me weeks to master. You dip your brush in liquid, then pick up powder to create a workable bead. Too much liquid and it’s soupy, too little and it’s crumbly.
Placement is everything. Once you place that acrylic bead on the nail, you have seconds to position it correctly before it starts setting up.
Creating Roses That Don’t Look Like Blobs
Start with the center of your rose using a small, tight bead of acrylic. This becomes your guide for the rest of the petals.
Build petals by placing small beads around the center and gently shaping them with your sculpting tool while the acrylic is still workable.
Work in layers rather than trying to create the entire rose at once. I build the inner petals first, let them cure, then add outer petals for a more natural look.
Bow Sculpting Technique (After Many Disasters)
Symmetry is crucial for bows, which makes them trickier than flowers. I create a template on paper first to guide my placement.
Start with two equal-sized beads for the bow loops, shaping them while the acrylic is still soft. The key is making them look full and dimensional, not flat.
The center knot is what makes or breaks a bow design. I use a tiny bead and shape it to look like fabric gathered in the middle.
Balancing Beauty with Wearability
Height limitations are real with 3D nail art. Go too tall and you’ll knock your sculptures off on everything you touch.
I keep my 3D elements under 3mm in height for everyday wear. Any taller and they become impractical for normal activities like typing or getting dressed.
Strategic placement matters too. I put the most dimensional elements toward the center of the nail where they’re less likely to catch on things.
Advanced Sculpting for Realistic Effects
Texture techniques add realism to 3D elements. I use different tools to create the appearance of fabric on bows or natural petal texture on flowers.
Color variation within single elements creates depth. I mix different shades of pink for roses or add darker edges to bow loops for dimension.
Layering different materials can create interesting effects. I sometimes add rhinestones or glitter to 3D elements for extra sparkle.
Curing Process That Prevents Disasters
Air drying is usually sufficient for acrylic 3D elements, but timing is critical. Rush the process and they’ll be fragile; wait too long and you can’t make adjustments.
I test the cure level by gently touching the element with a clean tool. It should feel firm but not rock-hard before I add additional layers.
Environmental factors affect curing time. Humidity slows it down, dry air speeds it up. I keep notes about conditions and timing for consistent results.
Tools That Make 3D Sculpting Possible
Kolinsky brushes are worth the investment for 3D work. They hold the perfect amount of liquid and maintain their shape through multiple uses.
A variety of sculpting tools gives you options for different effects. I use everything from dental tools to homemade implements for specific textures.
Good lighting and magnification are essential for detailed 3D work. I can’t create realistic petals if I can’t see what I’m doing clearly.
Color Mixing for Dimensional Elements
Custom color mixing creates more realistic 3D elements than using straight colors from the bottle. Real roses aren’t uniform pink – they have variations and depth.
I mix multiple shades of each color I’m using and apply them strategically to create natural-looking shadows and highlights.
Metallic accents can add luxury appeal to 3D elements. A touch of gold on rose edges or silver on bow centers creates expensive-looking details.
Common 3D Sculpting Mistakes
Working too slowly is probably the biggest mistake beginners make. You have to commit to your design and work confidently within the time limits.
Over-manipulating the acrylic once it starts setting creates rough, unprofessional textures. Sometimes you have to accept imperfections rather than making them worse.
Inconsistent sizing makes 3D elements look amateur. If you’re doing roses on multiple nails, they should be roughly the same size and style.
Finishing Techniques for Professional Results
Gentle filing can refine 3D elements after they’re fully cured. I use a fine-grit file to smooth any rough edges or imperfections.
Strategic top coating protects 3D elements without flattening their dimensional effect. I apply it carefully around the base of each element.
Final inspection under different lighting conditions helps catch any issues before the client sees them. What looks good under my work light might show flaws in natural sunlight.
Why Salons Charge $400+ for 3D Nail Art
Time investment is enormous for quality 3D work. Each sculpted element can take 10-15 minutes to create and cure properly.
Material costs add up quickly with 3D work. Quality acrylic systems, specialized tools, and the waste from learning curves make it expensive.
Skill level required is advanced. Not every nail technician can create convincing 3D sculptures – it requires artistic ability beyond basic nail techniques.
Maintenance for 3D Nail Art
Gentle handling is essential for the first 48 hours while 3D elements fully cure and bond to the nail surface.
Regular inspection helps catch small chips or lifting before they become major problems requiring complete removal.
Professional removal is usually necessary for heavily sculpted 3D work. Trying to remove it yourself can damage your natural nails.
Building Your 3D Sculpting Skills
Practice on nail tips before working on actual nails. This lets you experiment with techniques and timing without the pressure of a live manicure.
Start simple with basic shapes like dots and lines before attempting complex flowers or bows. Master the fundamentals first.
Study real objects for reference when creating 3D elements. Understanding how light hits a real rose helps you sculpt a more convincing one.
The Future of 3D Nail Art
New materials are constantly being developed that make 3D sculpting easier and more durable. Gel-based sculpting mediums offer longer working times.
Technology integration like 3D printing for nail art is emerging, though hand-sculpted elements still have that artisanal appeal that clients love.
Wearable art is becoming more mainstream, and 3D nails are leading that trend. People want their manicures to be conversation starters and Instagram-worthy art pieces.
Conclusion
These seven insider French tip techniques prove that luxury nail art isn’t just about expensive salon visits – it’s about mastering the right techniques and using quality materials.
Each of these designs commands premium prices at high-end salons because they require skill, creativity, and attention to detail that goes far beyond basic manicures.
The best part? Now you have the insider knowledge to recreate these stunning looks at home! Start with one technique that speaks to you, practice the fundamentals, and gradually build your skills.
Remember, even professional nail artists didn’t master these techniques overnight. With patience and practice, you’ll be creating $200+ nail art in your own space.
Ready to transform your nail game? Pick your favorite technique from this list and give it a try this weekend. Your nails (and your wallet) will thank you!


GIPHY App Key not set. Please check settings