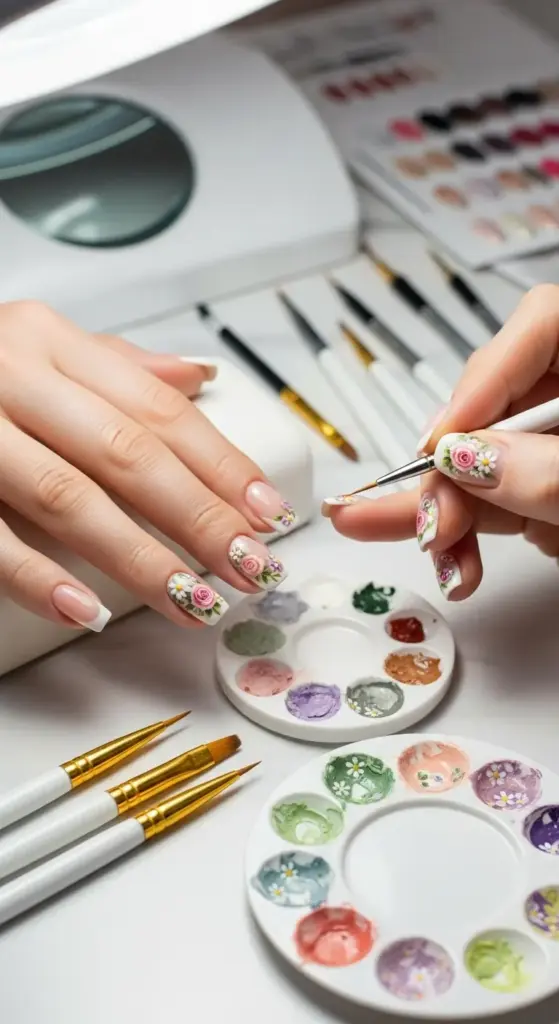
6. Hand-Painted Floral French Tips with Micro Details
I still remember the first time I attempted hand-painted nail art – it looked like a kindergartner had attacked my nails with watercolors during an earthquake. My “roses” looked more like abstract blobs, and don’t even ask about the leaves.
But here’s the thing about floral nail art – once you nail the technique (pun intended), it’s absolutely addictive. There’s something magical about creating tiny masterpieces on such a small canvas.
My Epic Floral Painting Fails (And What They Taught Me)
The biggest mistake I made was trying to paint detailed flowers with a regular nail polish brush. It’s like trying to write calligraphy with a house painting brush – technically possible, but you’re setting yourself up for frustration.
Brush quality makes or breaks micro nail art. I wasted weeks trying to create delicate petals with cheap brushes that had bristles going in every direction.
Patience was my biggest learning curve. I wanted to rush through each flower, but micro details require slow, deliberate movements. One shaky hand and your perfect rose becomes an abstract mess.
Essential Brushes That Changed My Nail Art Game
Size 0 liner brushes are absolutely non-negotiable for floral details. I keep three of them – one for light colors, one for dark colors, and one just for cleanup work.
A flat shader brush (size 2 or 4) is perfect for creating flower petals with that natural curved shape. You can’t achieve the same effect with a round brush.
Dotting tools aren’t just for dots – they’re amazing for creating flower centers, small buds, and adding texture to leaves. I use different sizes for various effects.
Basic Floral Techniques That Actually Work
Start with simple five-petal flowers before attempting roses or complex blooms. I learned this after frustrating myself trying to paint realistic roses on my first attempt.
The secret to natural-looking petals is varying the pressure on your brush. Light pressure creates thin, delicate lines while heavier pressure gives you fuller, more dramatic strokes.
Work from light to dark when building up your floral design. It’s much easier to add depth with darker colors than to try to lighten areas that are too dark.
My Rose Painting Technique (After Many Disasters)
Start with a small spiral in the center using your liner brush. This becomes the heart of your rose and guides the rest of the petals.
Add petals by painting curved C-shapes around the center spiral, gradually making them larger as you work outward. Each petal should slightly overlap the previous one.
The key is imperfection. Real roses aren’t perfectly symmetrical, so don’t stress if your petals are slightly different sizes or shapes.
Advanced Shading That Creates Depth
Two-tone shading transformed my flat-looking flowers into dimensional masterpieces. I use a lighter base color and add darker edges to each petal.
Wet-on-wet blending creates the most natural shading effects. Apply your base petal color, then immediately add the darker shade while the base is still wet.
Highlighting with tiny dots of white or light pink adds that realistic sparkle that makes flowers look fresh and dewy.
Color Mixing for Realistic Floral Effects
Acrylic paints work better than nail polish for detailed floral work. They stay workable longer and blend more smoothly than quick-drying polish.
I mix my own custom flower colors rather than using straight-from-the-bottle shades. Real flowers have subtle color variations that make them look alive.
Warm and cool versions of the same color create natural depth. For pink roses, I use a warm pink base with cool pink shadows.
The Leaf Painting Technique I Perfected
Simple leaf shapes start with a single brushstroke using a flat shader brush. Press down, drag, and lift to create that natural leaf shape.
Add leaf veining with a liner brush using a slightly darker green. The main vein runs down the center, with smaller veins branching off at angles.
Vary your leaf sizes and directions to create natural-looking foliage. All leaves pointing the same way looks artificial and stiff.
Protecting Your Delicate Artwork
Sealing hand-painted designs requires extra care because the paint layers can be fragile. I learned this when my beautiful roses smudged during top coat application.
Apply your first top coat layer very lightly, almost floating it over the design rather than brushing it on. This prevents disturbing the delicate paint layers.
Multiple thin top coats provide better protection than one thick coat. I usually apply 2-3 thin layers, letting each dry completely.
Tools for Micro Detail Work
A magnifying glass might seem excessive, but it’s a game-changer for tiny details like flower stamens or leaf textures. I use a hands-free magnifying lamp.
Good lighting is crucial for detailed work. I use a daylight desk lamp positioned to eliminate shadows on my work area.
Steady hand support makes precise work possible. I rest my painting hand on my other hand or use a small cushion to minimize shaking.
Color Theory for Floral Designs
Complementary colors create vibrant, eye-catching floral designs. Purple flowers with yellow centers, or orange blooms with blue-green leaves.
Analogous color schemes (colors next to each other on the color wheel) create more subtle, sophisticated looks. Think pink flowers with purple and red accents.
Monochromatic designs using different shades of the same color family can be incredibly elegant and modern-looking.
Common Mistakes That Ruin Floral Nail Art
Overworking the paint is probably the biggest mistake I see. Once you’ve placed a brushstroke, leave it alone. Trying to “fix” it usually makes it worse.
Using too much paint on your brush creates thick, gloppy strokes that look amateur. Less paint gives you more control and cleaner lines.
Rushing the drying process between layers leads to smudged details and muddy colors. Patience is absolutely essential for clean floral work.
Advanced Techniques for Realistic Effects
Dry brushing creates texture on flower petals and leaves. Use a brush with very little paint to add subtle texture and depth.
Stippling techniques with a small sponge or brush create realistic flower centers and add texture to backgrounds.
Negative space flowers where you paint around the flower shape rather than filling it in can create stunning, modern effects.
Why Salons Charge $300+ for Hand-Painted Florals
Time investment is enormous for detailed floral work. A full set with intricate hand-painted flowers can take 4-5 hours to complete properly.
Artistic skill required for realistic floral painting takes years to develop. Not every nail technician can create convincing hand-painted flowers.
Premium materials like high-quality brushes and professional acrylic paints add to the cost but are essential for professional results.
Maintenance for Hand-Painted Designs
Cuticle oil helps preserve the flexibility of painted designs and prevents cracking at the nail edges where detailed work is most vulnerable.
Gentle handling is essential for the first 24 hours while the paint fully cures. Avoid activities that might bump or scrape your nails.
Touch-up supplies should include your custom mixed colors because matching them later can be nearly impossible.
Building Your Floral Painting Skills
Practice on nail wheels or fake nails before attempting detailed work on your actual nails. This lets you experiment without the pressure of ruining a manicure.
Start simple with basic flower shapes and gradually work up to more complex blooms. Master daisies before attempting roses or peonies.
Study real flowers for inspiration and reference. Photos help you understand how light hits petals and creates natural shadows and highlights.
Think hand-painted flowers are impressive? Get ready to discover 3D French tips with sculpted elements that literally add another dimension to your nails! Click “next” to learn how to create roses, bows, and other sculptural elements that make your nails look like wearable art pieces.


GIPHY App Key not set. Please check settings