5. Holographic French Tips with Color-Shifting Effects
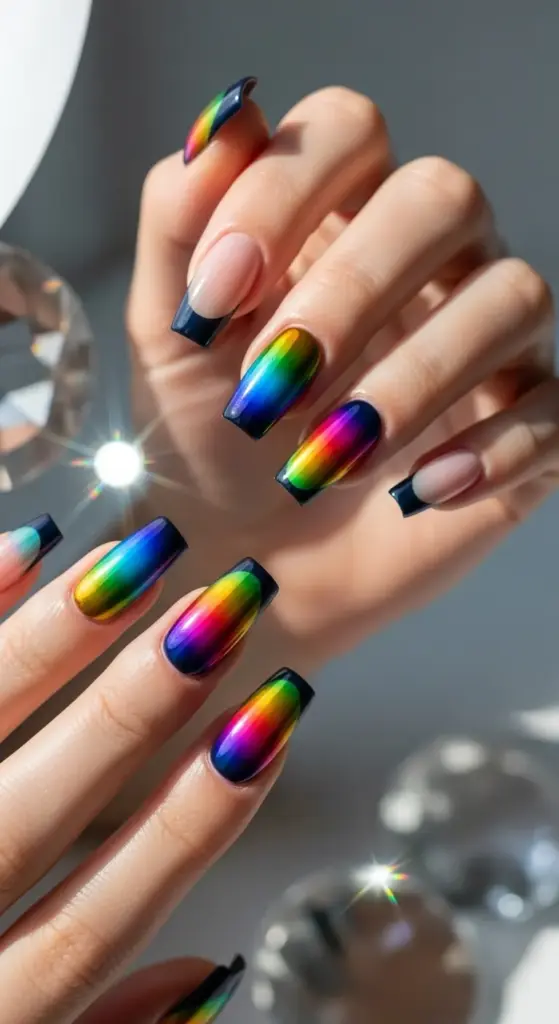
The first time I saw holographic nails in person, I literally stopped mid-conversation to stare at someone’s hands. The way the colors shifted and danced in the light was absolutely mesmerizing – like having tiny rainbows on your fingertips.
Naturally, I rushed home to try it myself and created what can only be described as a glittery mess. Holographic nail art is way more complex than it looks.
My First Holographic Disaster (And the Lessons Learned)
I thought holographic polish was just regular polish with extra sparkle. Boy, was I wrong about that assumption!
Real holographic effects come from special pigments that actually bend light, creating that rainbow spectrum shift. Regular glitter polish just sits there looking pretty – holographic polish literally changes colors as you move your hands.
I wasted so much money buying “holographic” polishes that were really just chunky glitters. The real deal costs more, but the effect is completely different.
Understanding Chrome Powder vs. Holographic Polish
Chrome powder was a game-changer for me, but it requires a completely different application technique than traditional polish. You can’t just brush it on like regular nail color.
The powder needs to be rubbed into a tacky gel base using a silicone tool or your finger. I learned this after trying to apply it with a brush and ending up with streaky, patchy coverage.
Timing is everything with chrome powder. Apply it when the base gel is at that perfect tacky stage – not wet, but still slightly sticky to the touch.
Creating Seamless Color Transitions (The Hard Way)
My first attempt at color-shifting French tips looked like I’d drawn a harsh line between two different nail polishes. There was nothing seamless about it!
Gradient application is the secret to smooth transitions. I use a makeup sponge to blend the holographic effect from intense at the tip to subtle near the cuticle.
The trick is working in thin layers and building up the effect gradually. One thick application creates an obvious line that screams “amateur hour.”
Base Colors That Make Holographic Effects Pop
Black bases create the most dramatic holographic effects, but they can be overwhelming for everyday wear. The contrast makes every color shift super intense.
Dark navy or deep purple gives you that dramatic effect while being more wearable than straight black. These darker bases make the rainbow shifts really stand out.
White or light gray bases create softer, more subtle holographic effects that work better for professional settings. The color shifts are still visible but less in-your-face.
My Layering Technique for Maximum Impact
Base coat application is crucial for holographic designs. I use a ridge-filling base to create the smoothest possible surface for the holographic layers.
Apply your base color in thin, even coats. Thick coats create texture that interferes with the smooth holographic finish you’re trying to achieve.
Here’s my secret: I apply holographic top coat over regular polish, then add chrome powder on top for double the effect. It’s extra work but creates incredible depth.
The Chrome Powder Application That Changed Everything
Silicone brushes are essential for chrome powder application. Regular brushes just push the powder around without actually burnishing it into the base.
I apply the powder in small circular motions, really working it into the tacky gel base. Light pressure works better than heavy rubbing – you want to burnish, not scrub.
Excess powder removal is critical. I use a soft brush to gently sweep away loose powder before applying the top coat. Leftover powder creates a gritty finish.
Color-Shifting Combinations That Look Expensive
Blue to purple shifts are absolutely stunning and photograph beautifully under different lighting conditions. This combination works on any skin tone.
Green to gold shifts create that expensive, luxury jewelry look. It’s bold but sophisticated, perfect for special occasions.
Pink to orange shifts are surprisingly wearable and create a warm, sunset effect that’s perfect for summer or fall looks.
Sealing Holographic Designs (The Tricky Part)
Regular top coat can actually dull holographic effects if it’s not formulated correctly. I learned this when my gorgeous holographic design turned into a muddy mess after top coating.
Gel top coat works better for preserving holographic effects, but it requires UV curing. The extra step is worth it for the longevity and clarity.
Multiple thin coats preserve the holographic effect better than one thick coat. I apply 2-3 thin layers, curing between each one.
Understanding Light and Holographic Effects
Indoor lighting versus natural sunlight creates completely different holographic effects. What looks subtle indoors can be blindingly bright in direct sunlight.
LED lights tend to enhance holographic effects more than incandescent bulbs. This is why your nails might look different at home versus at work.
Camera flash can either enhance or completely wash out holographic effects, depending on the angle. I’ve learned to position my hands carefully for photos.
Common Mistakes That Ruin Holographic Nails
Over-applying chrome powder is probably the most common mistake. More isn’t better – you want just enough to create the effect without building up texture.
Skipping the base color is another error I see often. Chrome powder needs something to reflect off of – applied over clear base, it just looks metallic, not holographic.
Using the wrong top coat can completely kill your holographic effect. Always test your top coat on a practice nail first.
Tools That Make Holographic Nails Possible
A UV lamp is essential if you’re using gel bases and top coats. The curing process is what makes the holographic effect permanent and durable.
Silicone brushes in different sizes give you control over powder application. I use small ones for detail work and larger ones for full coverage.
Good lighting is crucial for seeing what you’re doing. I use a daylight lamp to see the true colors while working.
Why Salons Charge $250+ for This Look
Professional holographic applications require expensive materials and specialized equipment. Quality chrome powders and holographic polishes aren’t cheap.
The technique takes practice to master. One mistake and you have to remove everything and start over, which adds time and material costs.
Proper curing equipment is essential for long-lasting results. Professional UV lamps cure more evenly than home versions, creating better durability.
Maintenance Tips for Holographic French Tips
Cuticle oil is your friend with holographic nails. It keeps the nail bed healthy and prevents lifting at the edges where the effect is most concentrated.
Avoid harsh chemicals that can dull the holographic finish. Wear gloves when cleaning or doing dishes to preserve the effect.
Touch-up kits are essential for maintaining holographic nails. Keep a small amount of your chrome powder and top coat for quick repairs.
The Science Behind the Magic
Holographic pigments work by diffracting light into its component colors. It’s the same principle that creates rainbows in soap bubbles or oil slicks.
Particle size in the pigments determines the intensity of the color shift. Finer particles create subtler effects, while larger particles create more dramatic shifts.
Viewing angle affects what colors you see. This is why holographic nails look different when you move your hands – you’re literally changing the angle of light reflection.
Ready to create nail art that looks like it was painted by a master artist? Click “next” to discover hand-painted floral French tips with micro details – the technique that transforms your nails into tiny canvases worth hundreds of dollars!


GIPHY App Key not set. Please check settings