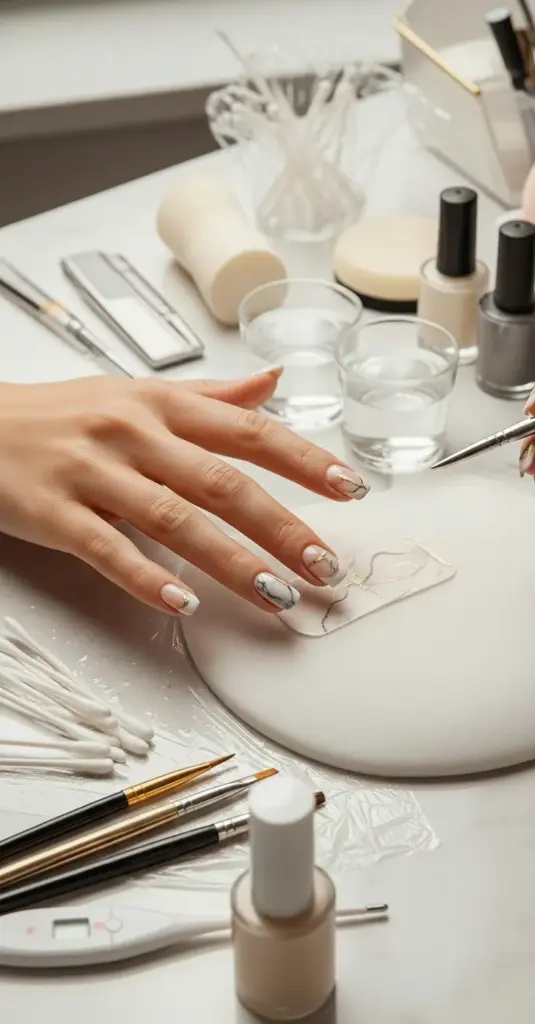
4. Marble French Tips with Metallic Veining
Let me tell you about the time I tried water marble nail art for the first time and ended up with what looked like muddy puddles on my fingertips. I was so confident it would be easy – just drop some polish in water and dip, right?
So very wrong. My kitchen looked like a nail polish bomb had exploded, and my nails looked nothing like the gorgeous marble I’d seen on Pinterest.
My Water Marble Disaster (And What I Learned)
The biggest mistake I made was using room temperature water. Turns out, water temperature is absolutely critical for marble techniques – too hot and the polish sinks, too cold and it doesn’t spread properly.
Lukewarm water (around 70-75°F) is the sweet spot I discovered after ruining about six manicures. I actually keep a thermometer in my nail kit now because I’m that serious about getting it right.
I also learned that not all nail polish brands work for water marbling. Some formulas are too thick, others too thin, and some just refuse to spread no matter what you do.
The French Tip Marble Adaptation That Actually Works
Traditional water marble techniques cover the entire nail, but adapting it for French tips requires a completely different approach. You can’t just dip the tip and expect clean lines.
I use tape barriers to section off the area I want marbled. This keeps the marble effect contained to just the tip area while protecting the rest of the nail.
The key is working in small sections. I marble one or two nails at a time rather than trying to do all ten at once. This prevents the polish from forming a skin on the water surface before I can use it.
Creating Realistic Marble Patterns (Without the Mess)
Dry marble techniques changed my entire approach to this nail art. Instead of water, I use a makeup sponge and multiple polish colors to create marble-like veining.
Apply your base color first – I usually go with a light neutral like cream or soft gray. While it’s still slightly tacky, I dab different shades onto a damp makeup sponge.
The magic happens in the blending. I gently press and roll the sponge across the nail tip, creating those natural marble variations without the unpredictability of water marbling.
Metallic Veining That Looks Expensive
Here’s where metallic nail polish becomes your best friend. But not just any metallic – you need one with actual metallic particles, not just shimmer.
I use a thin liner brush to add veining after the base marble pattern is completely dry. The trick is following the natural flow of your marble base rather than creating random lines.
Gold veining works beautifully with gray and white marble bases. Silver looks stunning with cooler tones like blues and purples. Rose gold is perfect for warmer marble combinations.
Color Combinations That Scream Luxury
Carrara marble (white with gray veining and gold accents) is my go-to for that expensive, classic look. It photographs beautifully and goes with everything.
Black marble with silver veining creates drama that’s perfect for evening looks. I add just a touch of deep purple or navy to the black base for extra depth.
Green marble (think expensive malachite) with gold veining is absolutely stunning but requires confidence to pull off. I use forest green, sage, and cream as my base colors.
The Polish Consistency Problem I Had to Solve
Not all nail polish formulas work equally well for marble techniques. I learned this after wasting expensive polish that just wouldn’t cooperate.
Cream finishes work better than shimmers for the base marble effect. Shimmers can muddy the pattern and make it look less realistic.
Slightly thinned polish spreads better for water marbling, but be careful – too much thinner and it becomes unworkable. I add just one drop of thinner per bottle.
My Foolproof Water Marble Setup
Preparation is everything for successful water marbling. I cover my entire work area with plastic wrap and have cotton swabs ready for immediate cleanup.
I use a small disposable cup filled with lukewarm filtered water. Tap water sometimes has chemicals that interfere with polish spreading.
Work quickly but don’t rush. Once you drop the first color, you have maybe 30 seconds before the polish starts forming a skin on the water surface.
Troubleshooting Common Marble Disasters
Polish sinking to the bottom usually means your water is too warm or the polish is too old. I test each color in a separate cup before committing to the full design.
Muddy, unclear patterns happen when you over-mix the colors. Less is more when it comes to creating the marble swirl pattern.
Uneven coverage on the nail tip often means you didn’t dip straight down or you hesitated during the dipping process. Confidence and steady hands are key.
The Metallic Application Technique That Changed Everything
Timing is crucial for metallic veining. Apply it after your marble base is completely dry but before your top coat. This prevents the metallic from bleeding into the base colors.
I use a detail brush loaded with just a tiny amount of metallic polish. Too much and the lines become thick and unnatural-looking.
Follow natural stone patterns when adding veining. Look at actual marble photos for inspiration – the veining should look organic, not geometric.
Sealing Marble Designs for Longevity
Multiple thin top coats work better than one thick coat for marble designs. The first coat can sometimes react with the underlying colors if applied too heavily.
I wait at least 10 minutes between top coat layers to prevent any color bleeding or smudging of the delicate marble pattern.
Edge sealing is extra important with marble French tips since the design ends abruptly at the tape line. I carefully paint the nail edge to prevent chipping.
Why This Look Commands Premium Salon Prices
Professional marble nail art can take 2-3 hours per set because each nail needs individual attention. No two marble patterns should look identical – that’s what makes it look realistic.
The skill required to create convincing marble patterns takes years to develop. One wrong move and the entire nail needs to be redone from scratch.
Quality materials make a huge difference in the final result. Professional salons use premium polishes and tools that aren’t available to most DIY enthusiasts.
Tools That Make Marble Nails Possible
A temperature gun might seem excessive, but consistent water temperature is that important for successful water marbling.
High-quality liner brushes are essential for metallic veining. Cheap brushes leave streaky, uneven lines that ruin the luxury effect.
Good ventilation is crucial when doing marble techniques. You’re working with a lot of polish in a short time, and the fumes can be overwhelming.
Think marble nails are impressive? Wait until you discover holographic French tips with color-shifting effects that literally change colors as you move your hands! Click “next” to learn the techniques that create this mesmerizing, futuristic nail art.


GIPHY App Key not set. Please check settings