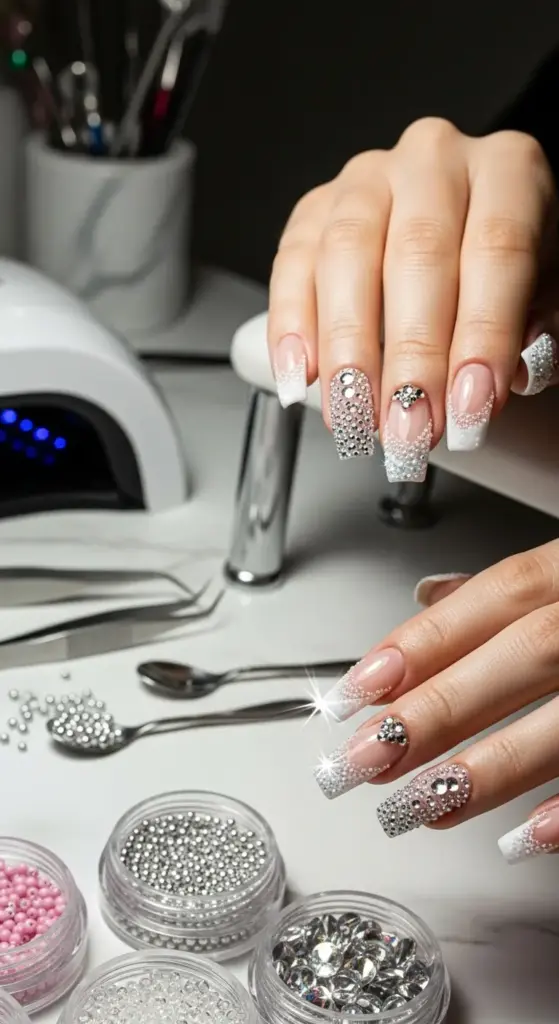
3. Textured French Tips with Caviar Beads and Crystals
The first time I tried caviar bead nail art, I looked like I’d dipped my fingers in a craft store explosion. Beads everywhere, crystals falling off within hours, and a texture so bumpy I couldn’t even button my jeans properly.
But man, when you get it right? This technique creates the most stunning, jewelry-like nails that literally catch light from across the room.
My Caviar Bead Learning Curve (It Was Steep)
I thought bigger beads meant more impact, so I went straight for the largest caviar beads I could find. Big mistake – they looked chunky and fell off constantly because they couldn’t adhere properly to the curved nail surface.
Size matters tremendously with caviar beads, and it’s not what you’d expect. Smaller beads actually create more luxurious-looking texture because they conform better to your nail shape.
For short nails, I stick with 0.6mm to 0.8mm beads. Anything larger overwhelms the nail bed and looks disproportionate.
The Right Bead Size for Your Nail Length
Medium-length nails (about 1/4 inch of free edge) can handle 0.8mm to 1.0mm beads beautifully. This creates that perfect caviar texture without being too overwhelming.
Long nails are where you can really go wild. I use 1.0mm to 1.2mm beads on longer nails, and sometimes mix sizes for added dimension.
Here’s something I learned the hard way – nail shape affects bead placement too. Square nails hold beads better at the corners, while round nails need extra attention at the side walls where beads tend to slide off.
Crystal Placement That Actually Stays Put
My first crystal nail art attempt was a disaster. I placed crystals randomly, used way too much glue, and they looked like I’d bedazzled my nails with a hot glue gun.
Strategic crystal placement is everything. I now follow the rule of odd numbers – groups of 3 or 5 crystals look more natural and balanced than even numbers.
The secret to long-lasting crystal application? Less is more with the adhesive. A tiny drop of nail glue on the crystal base, not the nail, prevents that messy overflow look.
Creating Texture Without the Bulk
The biggest challenge with textured French tips is making them wearable. Nobody wants nails so bumpy they can’t function normally.
Gradient texture is my go-to solution. I apply the heaviest texture at the tip and gradually decrease it toward the cuticle. This creates visual impact without making the entire nail unwearable.
Strategic bare spots within the textured area prevent that “sandpaper nail” feeling. I leave small channels between bead clusters so the texture doesn’t feel overwhelming.
My Layering Technique for Maximum Impact
Base layer preparation is crucial for textured designs. I use a slightly tacky base coat that gives the beads something to grip onto initially.
Apply your base color first and let it get to that perfect tacky stage – not wet, but still slightly sticky. This is when you sprinkle your caviar beads.
Here’s my secret weapon: I use a small spoon to sprinkle beads evenly rather than trying to place them individually. Way faster and more natural-looking.
The Crystal Application Process That Changed Everything
Tweezers are non-negotiable for crystal placement. I tried using my fingers initially and ended up with glue everywhere and crooked crystals.
I place crystals while the base is still slightly tacky, then secure them with a tiny drop of nail glue applied with a toothpick. This double-security method keeps them in place for weeks.
Size variation creates visual interest. I use 2mm crystals as focal points and fill in with smaller 1mm stones for sparkle without overwhelming the design.
Sealing Textured Designs (The Tricky Part)
Regular top coat doesn’t work with heavily textured nails – it just pools in the low spots and leaves the high points unprotected. I learned this when my beautiful caviar design started chipping after two days.
Multiple thin coats of a self-leveling top coat work better. I apply the first coat very lightly, just to tack everything down, then build up protection with additional layers.
For extra durability, I use a gel top coat and cure it under a UV lamp. This creates a glass-like finish that protects the texture while maintaining the dimensional effect.
Maintenance Secrets for Long-Lasting Texture
Daily cuticle oil is essential with textured nails. The beads and crystals can catch on things and create lifting if the nail bed isn’t properly moisturized.
I carry a small nail file everywhere because textured nails are more prone to snagging. Quick touch-ups prevent small issues from becoming big problems.
Avoid harsh chemicals like bleach or strong cleaning products. They can dissolve the adhesive holding your beads and crystals in place.
Why Salons Charge $300+ for This Look
Professional application of textured French tips takes 3-4 hours when done properly. Each bead and crystal needs individual attention for proper placement and adhesion.
The materials aren’t cheap either. Quality Swarovski crystals and premium caviar beads can cost $50+ just for supplies, before you factor in the labor time.
Skill level matters tremendously. One poorly placed crystal or uneven bead distribution can ruin the entire look, which is why experienced nail techs command premium prices.
Common Mistakes That’ll Ruin Your Textured Manicure
Over-applying adhesive is the biggest rookie mistake. Too much glue creates a messy, unprofessional look and can actually weaken the bond.
Rushing the drying process between layers leads to smudged beads and shifted crystals. I learned to plan for a full afternoon when doing textured nails.
Ignoring nail shape when placing texture is another common error. The texture should follow and enhance your natural nail shape, not fight against it.
Tools That Make Textured Nails Possible
A bead picker tool (or tweezers) is essential for precise placement. I also use a small funnel to control bead application and minimize waste.
UV lamp for curing gel top coats isn’t optional if you want professional results. The extra investment pays off in durability and finish quality.
Good lighting is crucial for this detailed work. I use a desk lamp with daylight bulbs to see exactly where I’m placing each element.
Ready to create nails that look like expensive marble countertops? Click “next” to discover how marble French tips with metallic veining can give you that luxury stone effect that’s taking Instagram by storm!


GIPHY App Key not set. Please check settings