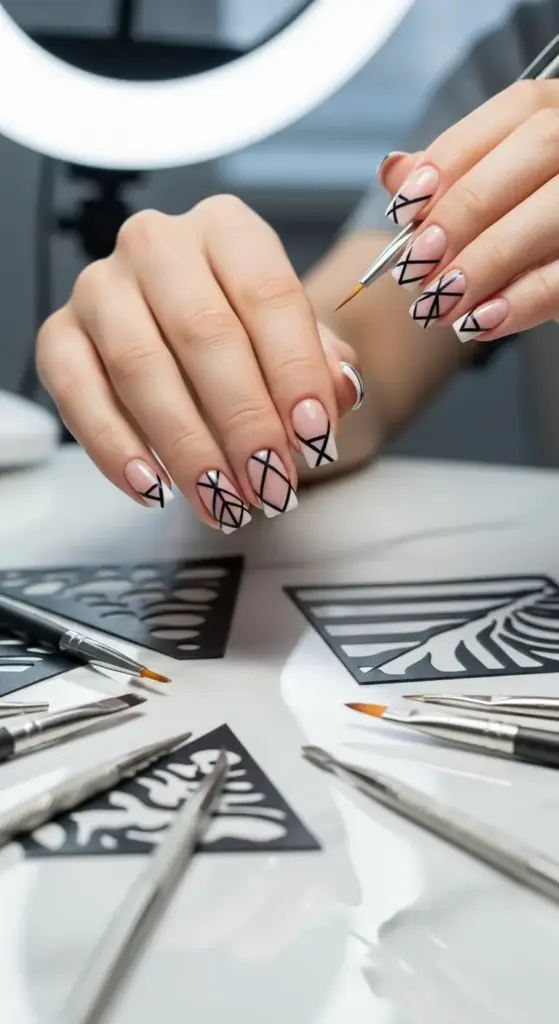
2. Geometric French Tips with Negative Space Design
I’ll be honest – when I first heard about negative space nail art, I thought it was just a fancy way of saying “incomplete manicure.” How wrong I was!
My first attempt at geometric French tips looked like a toddler had gotten hold of some tape and nail polish. The lines were crooked, the spacing was all wrong, and don’t even get me started on the cleanup process.
What Negative Space Actually Means (And Why I Was Confused)
Negative space design isn’t about leaving parts of your nails bare because you’re lazy. It’s a deliberate artistic choice where the natural nail color becomes part of the design itself.
Think of it like this – instead of covering every inch of your nail with polish, you’re strategically leaving certain areas exposed. These bare spots work with the colored sections to create patterns that are way more interesting than traditional solid colors.
The key is making those exposed areas look intentional, not accidental.
My Tape Disaster (And What I Learned From It)
Picture me, armed with regular Scotch tape from my office drawer, thinking I could create salon-quality geometric nail designs. The result was a sticky mess that took forever to remove and left residue all over my nails.
Regular tape is your enemy when it comes to nail art. It’s too sticky and will pull off your base color when you remove it.
Striping tape changed everything for me. It’s specifically designed for nail art – thin, flexible, and removes cleanly without damaging your polish underneath.
The Right Way to Create Sharp, Clean Lines
After ruining about three manicures, I finally figured out the secret to professional-looking geometric lines. It’s all about the prep work and timing.
Start with completely dry base polish – and I mean bone dry, not just “feels dry to the touch.” Wait at least 30 minutes after your last coat before applying any tape.
Apply your striping tape firmly but don’t press so hard that you can’t remove it later. I use a cuticle pusher to smooth down the edges and prevent polish from bleeding underneath.
Here’s the game-changer: remove the tape while your top polish is still slightly wet. This prevents that annoying peeling effect that can ruin your clean lines.
Stencil Techniques That Actually Work
Nail stencils seemed like cheating at first, but honestly? They’re a lifesaver for complex geometric patterns.
I tried those cheap vinyl stencils from online and they were terrible – they wouldn’t stick properly and the edges lifted during application. Quality matters here.
Reusable silicone stencils are worth the investment. They conform to your nail shape better and create much sharper edges than the disposable ones.
The trick with stencils is using just enough polish to cover the area without flooding underneath. I learned this after creating several blob-like disasters.
Color Theory That Makes Your Design Pop
This is where I really nerded out and started studying color combinations like I was back in art class. The wrong colors can make your geometric design look muddy or confusing.
High contrast combinations work best for negative space designs. Think black and nude, deep navy and clear, or burgundy with natural nail color showing through.
Monochromatic schemes can be stunning too, but they require more skill to pull off. Using different shades of the same color family creates subtle sophistication.
My biggest discovery? Metallic accents in geometric patterns photograph amazingly well. A thin line of gold or silver can elevate the entire look from DIY to designer.
The Tools That Changed My Nail Art Game
Precision brushes are absolutely essential for touch-ups and detail work. I use a size 00 liner brush for fixing any wobbly lines or filling in small gaps.
A good cleanup brush dipped in acetone is your best friend. I keep one handy throughout the entire process because mistakes happen, and quick cleanup prevents bigger problems.
Dotting tools aren’t just for dots – they’re perfect for creating small geometric shapes and cleaning up tight corners where brushes can’t reach.
Sealing Your Design for Maximum Longevity
Here’s where I made my biggest mistake initially – I thought one coat of top coat would be enough to protect my intricate geometric design. Wrong.
Multiple thin coats of top coat work better than one thick coat. I apply the first coat very carefully to avoid disturbing the design, then add a second coat for extra protection.
Pay special attention to the nail tips and edges where geometric designs tend to chip first. I actually apply an extra layer of top coat just to these high-wear areas.
Why This Look Commands Premium Salon Prices
Professional nail technicians charge $150-300 for geometric negative space designs because they require serious precision and artistic skill. One shaky hand or poorly placed line can ruin the entire look.
The time investment is huge too. A complex geometric pattern can take 2-3 hours to complete properly, which explains those hefty salon prices.
Common Mistakes That’ll Ruin Your Design
Don’t rush the drying process between steps. I learned this lesson when I smudged a perfectly executed triangle pattern because I was impatient.
Overcomplicating the design is another trap I fell into. Sometimes simple geometric shapes create more impact than complex patterns that look busy and confusing.
And please, test your tape adhesion on a practice nail first. Different brands stick differently, and you don’t want to discover this halfway through your manicure.
Think geometric designs are impressive? Wait until you see how textured French tips with caviar beads and crystals can transform your nails into actual jewelry! Click “next” to discover the techniques that make celebrities pay $300+ for this dimensional nail art.


GIPHY App Key not set. Please check settings