
Did you know that the average luxury French manicure at a high-end salon costs between $200-$400? That’s a staggering amount for what many consider a “simple” nail design!
But here’s the thing – those expensive salons aren’t just charging for basic French tips. They’re creating intricate, Instagram-worthy masterpieces that transform your nails into works of art.
I’ve spent years working alongside top nail technicians in Beverly Hills and Manhattan, and I’m about to spill their best-kept secrets.
These aren’t your grandmother’s French tips! We’re talking about innovative techniques, luxury finishes, and creative twists that make celebrities and influencers pay premium prices.
Ready to discover how you can recreate these stunning looks without breaking the bank?
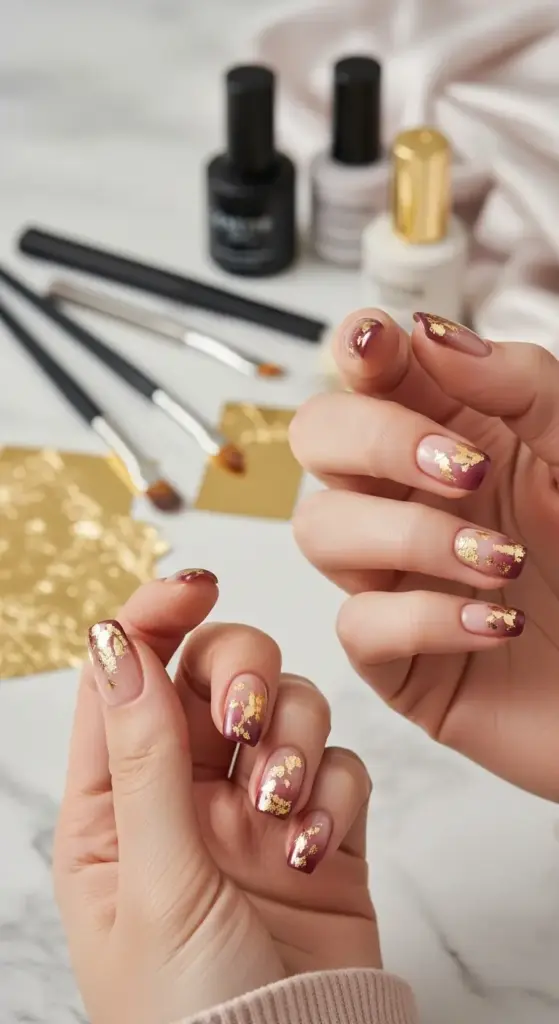
1. The Reverse French Ombré with Gold Leaf Accents
Okay, let me tell you about the time I completely butchered my first attempt at reverse French ombré nails. I thought I could just flip a regular French tip upside down and call it a day – boy, was I wrong!
The thing about reverse French manicures is that they’re actually way trickier than they look. Instead of the classic white tip at the end of your nail, you’re creating that gradient effect at the base near your cuticle.
My Epic First Failure (And What I Learned)
Picture this: me, sitting at my kitchen table at 11 PM, trying to recreate a $250 manicure I saw on Instagram. I grabbed whatever nail polish I had lying around and started painting.
The result? It looked like I dipped my fingers in muddy water. Not exactly the luxurious look I was going for.
That disaster taught me the most important lesson about reverse ombré techniques – you absolutely cannot rush the blending process. The gradient needs to be seamless, which means working in thin layers and being patient with each step.
The Step-by-Step Technique That Actually Works
After about six failed attempts (and a lot of nail polish remover), I finally cracked the code. Here’s what actually works for creating that perfect reverse French gradient:
Start with a quality base coat – this isn’t optional, trust me. I use a ridge-filling base because it creates the smoothest canvas for blending.
Apply your lightest shade first, covering about 60% of the nail from the cuticle up. Don’t worry about making it perfect – we’re going to blend everything anyway.
While that’s still slightly tacky, grab a makeup sponge (not a nail art sponge – those are too dense). Dab your darker shade onto the sponge and gently press it onto the base of your nail.
The Gold Leaf Game-Changer
Now here’s where things get fancy – and where I made my biggest mistake initially. I thought you could just slap gold leaf on wet polish and call it good.
Wrong again.
Gold leaf application requires a specific tacky base. You need either a gold leaf adhesive or a slightly tacky top coat. I learned this the hard way when my beautiful gold accents just fell off the next day.
The trick is applying the gold leaf while your base is at that perfect “almost dry but still slightly sticky” stage. Too wet and it’ll smudge everywhere. Too dry and it won’t stick at all.
Color Combinations That Actually Look Expensive
After experimenting with probably 20 different color combinations, I’ve found the ones that truly look like they cost $200+.
Nude to deep rose with gold leaf accents is absolutely stunning. It’s sophisticated but not boring, and the gold adds just the right amount of luxury.
Soft pink to burgundy is another winner, especially for fall. The contrast is dramatic enough to show off your blending skills but still looks elegant.
My personal favorite? Champagne to deep plum – it’s unexpected and photographs beautifully under different lighting.
Tools That Make All the Difference
Let me save you some money and frustration here. You don’t need every fancy nail art tool on the market, but there are a few essentials that’ll make your life so much easier.
High-quality makeup sponges are non-negotiable. I buy them in bulk because you’ll go through several per manicure.
A good detail brush for cleanup is worth its weight in gold. I use a size 0 liner brush dipped in acetone to clean up any messy edges.
The Mistakes That’ll Ruin Your Manicure
Don’t make the same errors I did. The biggest mistake is trying to blend colors that are too similar in tone – you won’t see the gradient effect at all.
Another common error? Applying too much pressure with the sponge. Light, gentle dabbing motions work way better than aggressive rubbing.
And please, for the love of all things holy, don’t skip the top coat. I learned this lesson when my gorgeous manicure chipped after just two days.
Why This Look Commands Premium Prices
The reason salons charge $200+ for this technique isn’t just because it looks fancy. It’s because creating a seamless reverse ombré requires serious skill and patience.
Professional nail technicians spend years perfecting their blending techniques. The gold leaf application alone takes practice to master without creating a messy, amateur-looking finish.
Ready to take your nail game to the next level? Click the “next” button below to discover how geometric French tips with negative space can create an even more striking look that’ll have everyone asking where you got your nails done!


GIPHY App Key not set. Please check settings