6. Textured and 3D French Tip Creations
I’ll never forget the first time I tried 3D nail art – I was so excited about adding dimension to my French tips that I went completely overboard. We’re talking rhinestones, studs, raised flowers, and textured polish all on one nail.
It looked like a craft store had exploded on my fingertips. But that disaster taught me everything about balancing texture and functionality. Now I know how to create stunning textured French tips that are both gorgeous and actually wearable.
Adding Dimension with Raised Designs
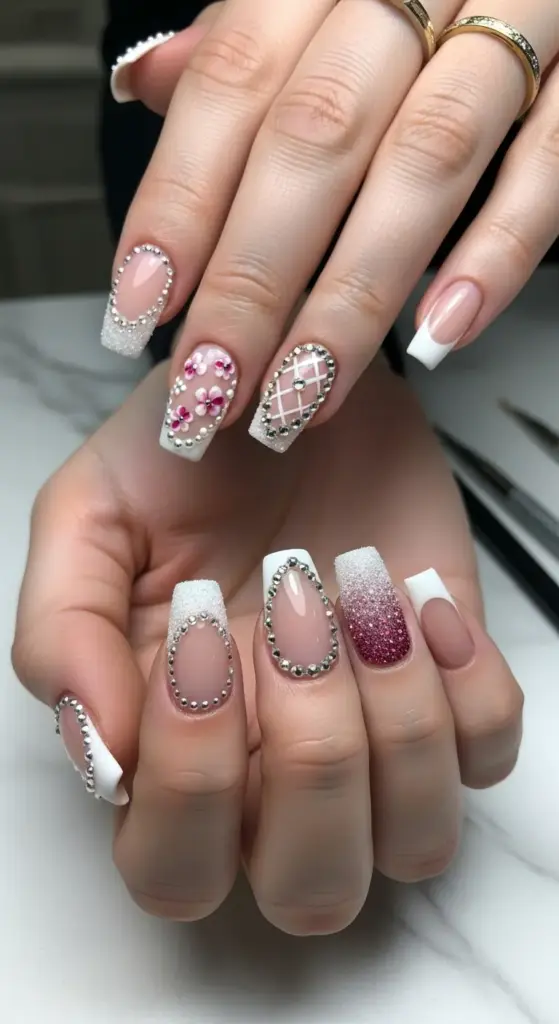
Acrylic paint is my secret weapon for creating raised designs on French tips. I use a small detail brush to paint tiny flowers, dots, or geometric patterns that dry with actual height and dimension.
The key is building up layers gradually. I start with a thin base design, let it dry completely, then add more paint to create that raised effect. Patience is everything with 3D work.
Nail art pens with thick formulas work amazingly for raised dots and lines. I love creating polka dot patterns on my French tips where each dot has actual texture you can feel.
Gel polish can be built up to create raised elements too. I apply multiple thick coats in specific areas, curing between each layer to build height without spreading.
Rhinestone and Stud Placement That Works
Here’s what I learned the hard way – placement is everything when it comes to rhinestones on French tips. Put them in the wrong spot and you’ll be catching them on everything.
Along the smile line is the safest placement for rhinestones. They follow the natural curve of your French tip and don’t interfere with daily activities like typing or texting.
Small rhinestones work better than large ones for everyday wear. I use 2mm stones maximum – anything bigger becomes a hazard and looks overwhelming on the nail.
Crystal placement tools make precise application so much easier. I used to try placing rhinestones with tweezers and constantly dropped them or put them crooked.
Nail glue specifically designed for rhinestones lasts way longer than trying to embed them in wet polish. I learned this after losing expensive crystals within days of application.
Textured Finishes That Add Interest
Velvet nail polish was a game-changer for my French tip designs. The soft, fuzzy texture feels amazing and looks incredibly luxurious, especially in deep jewel tones.
The application technique is totally different from regular polish – you have to work quickly because velvet polish sets fast and doesn’t self-level like normal formulas.
Sand texture polish creates this amazing gritty finish that’s surprisingly sophisticated. I love using it for French tips in neutral colors – it adds interest without being flashy.
Matte topcoats can transform any French tip design instantly. The same bright pink that looks loud in glossy finish becomes elegant and modern when mattified.
Sugar effect polish gives you texture that looks like tiny crystals. It’s perfect for winter French tips or when you want sparkle without actual glitter.
3D Nail Art Techniques
Dotting tools aren’t just for flat designs – I use them to create raised bubble effects by applying thick dots of polish and letting them cure with dimension.
Stamping with thick polish creates raised patterns that you can actually feel. I stamp my design, then go over it with additional coats to build up the height.
Nail art brushes in different sizes let me paint everything from tiny raised flowers to bold geometric shapes. The key is using polish that’s thick enough to hold its shape.
Silicone molds are amazing for creating identical 3D elements. I make tiny roses or bows, then attach them to my French tips with nail glue.
Balancing Texture and Functionality
This was my biggest learning curve – textured nails look amazing but can be completely impractical if you go overboard. I’ve ruined so many pairs of pantyhose with overly textured nails.
Height limitations are real. Anything raised more than 2-3mm becomes problematic for daily tasks. I learned this after creating beautiful 3D flowers that I couldn’t even put gloves on over.
Strategic placement makes all the difference. I put textured elements on my ring fingers or just the tips of my nails, leaving the rest smooth for functionality.
Edge sealing is crucial for textured designs. I always apply extra topcoat around raised elements to prevent them from catching and lifting off.
Textured French Tip Combinations
Smooth base with textured tips is my go-to formula. I’ll do a classic nude base with sand-textured white tips – it’s interesting but not overwhelming.
Alternating textures across nails creates visual interest without being too much. Maybe velvet tips on two nails, smooth on the others.
Gradient textures are stunning – I’ll start with smooth polish at the base and gradually add texture toward the tips using stippling techniques with a makeup sponge.
Mixed media approaches combine different textural elements. I might use matte base, glossy tips, and a few strategically placed rhinestones for contrast.
Maintenance and Longevity
Textured nails require different care than smooth manicures. I’m extra gentle with them and always wear gloves for cleaning or rough work.
Touch-ups are trickier with textured finishes. I keep small amounts of the original textured polish for repairs, but sometimes it’s easier to redo the whole nail.
Removal can be challenging depending on the texture type. Velvet polish peels off easily, but sand textures need extra soaking time with acetone.
Protective topcoats help extend the life of textured designs, but they can also flatten some textures. I test on practice nails first to see how different topcoats affect the finish.
Common Textured Nail Mistakes
Over-texturing is the biggest mistake I see. Less is definitely more when it comes to adding dimension to your nails.
Ignoring nail length when planning textured designs. Short nails can’t handle as much texture as longer ones without looking cluttered.
Poor base preparation shows more with textured finishes. Any imperfections in your base coat will be magnified by the added texture.
Mixing too many texture types in one design creates chaos instead of interest. I stick to 2-3 different textures maximum per manicure.
Ready for Clean Simplicity?
While textured and 3D designs are fun for special occasions, sometimes you want something that’s effortlessly chic and perfectly polished. What if the most impactful design is actually the most minimal one?
Click “next” below to discover minimalist and negative space French tips – including my favorite techniques for creating maximum visual impact with the least amount of effort, plus why sometimes less really is more!


GIPHY App Key not set. Please check settings