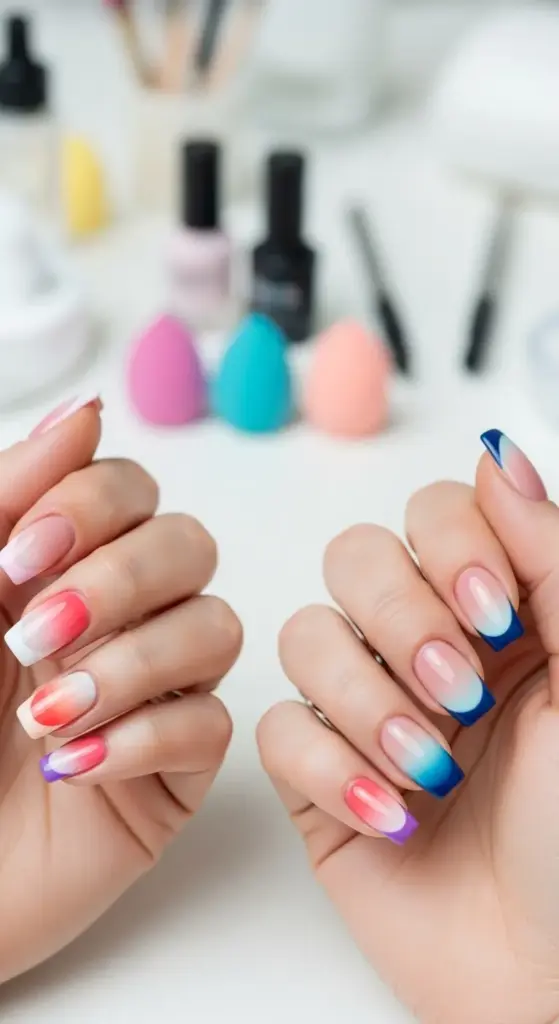
5. Ombré and Gradient French Tip Effects
The first time I saw ombré French tips on Instagram, I was convinced they were impossible to recreate at home. The smooth color transitions looked so professional and dreamy – there was no way I could pull that off, right?
Wrong! After countless failed attempts and YouTube tutorials, I finally cracked the code. Now gradient French tips are my absolute favorite technique, and I get asked constantly how I achieve those buttery-smooth color transitions.
Creating Smooth Color Transitions
The secret to perfect ombré French tips isn’t expensive equipment or years of training – it’s all about timing and the right tools. I wish someone had told me this before I wasted so much polish practicing.
Makeup sponges are your best friend for gradient effects. But not just any sponge – I use dense, fine-textured ones that don’t have huge pores. Cheap sponges will give you a bumpy, textured finish that looks amateur.
The key is working while your base color is still slightly tacky. Not wet, but not completely dry either. This gives you about a 2-3 minute window to blend your gradient before everything sets.
I always prep my sponge by dabbing it on a paper towel first to remove excess moisture. A damp sponge will dilute your polish and ruin the color intensity.
Color Combinations That Actually Work
Pink to white gradients are classic and flattering on everyone. I start with a soft pink base and blend to pure white at the tips – it’s romantic and sophisticated without being too bold.
Coral to peach transitions give you that perfect summer sunset vibe. This combination photographs beautifully and complements most skin tones amazingly well.
Navy to light blue ombré is my go-to for a more dramatic look. It reminds me of ocean depths and always gets compliments from strangers.
Purple to lavender gradients are unexpectedly wearable. I was nervous about purple nails at first, but the soft gradient makes it elegant rather than overwhelming.
For something neutral but interesting, try beige to champagne or gray to silver gradients. These work perfectly in professional settings while still showing your creative side.
Techniques for Perfect Gradient Effects
Here’s my foolproof ombré method that took me months to perfect: Apply your lightest color as the base coat and let it dry completely. This prevents muddy mixing later.
Paint both colors onto your makeup sponge in overlapping stripes. Don’t worry about being precise – you want the colors to touch and blend on the sponge itself.
Dab, don’t drag the sponge across your nail. Dragging creates streaks and uneven coverage. Light dabbing motions build up the gradient gradually and smoothly.
Work quickly but don’t panic. You have about 30 seconds per nail before the polish on the sponge starts to get tacky. I usually do one hand completely before moving to the other.
Multiple thin layers work better than trying to achieve the perfect gradient in one go. I typically do 2-3 light applications, letting each dry slightly between coats.
Sunset and Sunrise Inspired Designs
Sunset ombré French tips are absolutely stunning and easier than they look. I use yellow at the base, blend to orange in the middle, then finish with pink or coral at the tips.
The trick is using three colors maximum for sunset effects. More colors just muddy together and lose that beautiful sky-like transition.
Sunrise gradients start with soft pink or peach at the base and blend to golden yellow at the tips. It’s more subtle than sunset colors but equally gorgeous.
Purple sunset effects are my secret weapon for evening events. I blend deep purple to pink to orange – it’s dramatic but sophisticated and looks incredible under artificial lighting.
For tropical sunset vibes, try blending turquoise to coral to yellow. It’s bold but surprisingly wearable, especially during summer months.
Advanced Gradient Techniques
Reverse ombré flips the traditional gradient – darker colors at the base blending to lighter at the tips. This creates a completely different visual effect that’s modern and unexpected.
Horizontal gradients run parallel to the cuticle instead of from base to tip. I use striping tape to section off areas and create bands of blended color.
Glitter gradients combine sparkle with smooth color transitions. I apply the color gradient first, then add glitter that fades from dense at the tips to sparse at the base.
Multi-nail gradients create one large gradient effect across all five nails. Each nail is a different shade that blends into the next – it’s like wearing a rainbow on your fingertips.
Maintaining Gradient Integrity
Topcoat application can make or break your gradient effect. I use thin, even coats and avoid going back over areas that are starting to set. Overworking the topcoat will disturb your gradient.
Cuticle cleanup is crucial for gradient designs because any mistakes are super obvious against the smooth color transition. I use a small cleanup brush with acetone to perfect the edges.
Touch-ups on gradient nails are tricky but possible. I keep the original colors handy and use a small sponge to blend any chips back into the existing gradient.
Wear gloves religiously when doing anything that might damage your nails. Gradient effects show wear more obviously than solid colors, so protection is essential.
Preventing Common Gradient Mistakes
Don’t use too much polish on your sponge – it creates a thick, gloopy mess instead of smooth blending. Less is definitely more with gradient techniques.
Avoid overblending – sometimes I get carried away trying to make the transition perfect and end up with muddy colors instead of distinct gradients.
Work in good lighting so you can see the color transitions clearly. I learned this after doing beautiful gradients that looked terrible in natural light the next day.
Let each layer dry properly between applications. Rushing this step leads to smudging and uneven color distribution that ruins the whole effect.
Ready for Some Texture?
While smooth gradients are gorgeous, sometimes you want to add dimension and texture to your French tips for maximum impact. What happens when you combine height, sparkle, and artistic elements?
Click “next” below to explore textured and 3D French tip creations – including my favorite techniques for adding rhinestones, raised designs, and textural elements that transform your nails into tiny works of art!


GIPHY App Key not set. Please check settings