4. Geometric and Abstract French Tip Designs
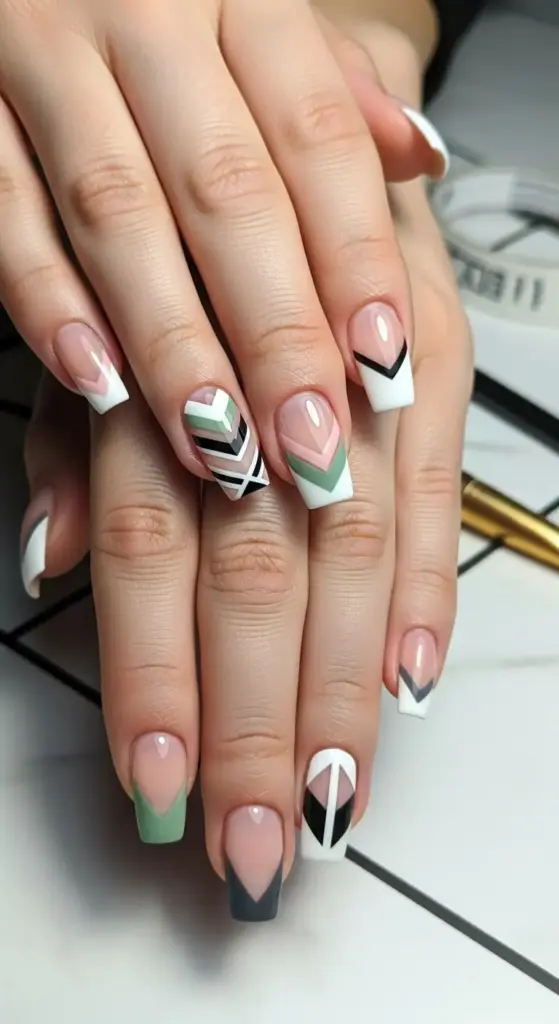
I never considered myself artistic until I discovered geometric French tips. Seriously, I can barely draw a straight line with a ruler, but something about the clean angles and precise shapes just clicked for me.
My first attempt was a simple diagonal French tip instead of the traditional curved line, and I felt like a nail art genius. Now geometric designs are my signature look, and people always ask if I went to some fancy nail salon.
Angular and Asymmetrical Patterns That Work
Diagonal French tips were my gateway drug into geometric nail art. Instead of the classic curved smile line, I create a sharp diagonal cut across each nail – it’s modern and surprisingly easy to achieve.
The trick is using striping tape to create perfectly straight lines. I place the tape at different angles on each nail for an asymmetrical look that’s intentionally imperfect but still polished.
Chevron patterns are another favorite – I create V-shaped tips that point toward the cuticle instead of following the traditional tip line. It completely changes the whole vibe of a French manicure.
Triangle tips sound complicated but they’re actually simpler than curved ones. I use the corner of a makeup sponge to create sharp triangular points – no steady hand required.
Negative Space Magic
This is where things get really interesting – negative space French tips use the natural nail as part of the design instead of covering it completely. It’s like optical illusion nail art.
My go-to technique involves using nail vinyls to block out sections while I paint. I’ll cover half the tip area, paint the exposed part, then remove the vinyl to reveal clean negative space.
Cutout French tips are stunning – imagine traditional white tips but with geometric shapes cut out to show your natural nail underneath. I use tiny hole punch stickers to create perfect circles or diamonds.
The key is making sure your natural nails look perfect since they’re part of the design. I always buff and shape carefully before starting any negative space work.
Incorporating Geometric Shapes
Square within square designs blow people’s minds but they’re surprisingly straightforward. I create a traditional square French tip, then add a smaller square inside using contrasting colors.
Hexagon tips are my current obsession – I use hexagon-shaped nail vinyls to create perfectly geometric tips that look like modern art. The precision makes me feel so sophisticated.
Linear patterns work beautifully too – thin parallel lines running vertically or horizontally across the tip area. I use striping brushes to create multiple lines in different colors.
Circle and dot patterns add playful geometry without being too serious. I use dotting tools to create perfect circles within the French tip area, sometimes overlapping for a bubble effect.
Tools That Make Precision Possible
Let me save you some frustration – good tools are absolutely essential for geometric nail art. I learned this after trying to create straight lines with a regular nail brush and wanting to throw everything across the room.
Striping tape is my holy grail for any straight-line work. It’s thin, flexible, and removes cleanly without pulling up your base color. I buy it in bulk because I use it constantly.
Nail vinyls come in every shape imaginable – circles, squares, triangles, even complex patterns. They’re like stencils for your nails and make professional-looking designs totally achievable.
A good striping brush is worth the investment. I use a size 0 or 00 for the thinnest, most precise lines. The difference between cheap and quality brushes is night and day.
Dotting tools in various sizes let you create perfect circles and dots every time. I have a set with five different sizes and use them constantly for geometric accents.
Balancing Bold with Wearable
The biggest challenge with geometric French tips is making them statement-making but not overwhelming. I’ve definitely crossed that line a few times.
Color choice is everything – I stick to two or three colors maximum to keep designs from looking chaotic. Neutral bases with one bold geometric accent work beautifully.
Scale matters more than I initially realized. Tiny geometric details can look busy, while larger, simpler shapes make more impact and are easier to execute cleanly.
I learned to vary the complexity across my nails – maybe geometric tips on just the ring fingers with simple French tips on the others. This creates interest without being too much.
Matte finishes can tone down bold geometric designs significantly. The same pattern that looks loud in glossy finish becomes sophisticated and modern in matte.
Making Complex Designs Simple
Planning is crucial for geometric nail art. I always sketch my design on paper first, especially when I’m trying something new or complex.
Work one nail at a time instead of trying to do all ten simultaneously. Geometric designs require focus and precision that’s impossible when you’re rushing.
Start with simple shapes and build complexity gradually. My first geometric French tips were just diagonal lines – now I’m creating intricate patterns, but it took practice.
Practice on nail wheels before attempting designs on your actual nails. I have a collection of practice wheels where I test new techniques and color combinations.
Ready for Smooth Transitions?
While geometric designs are amazing for making bold statements, sometimes you want something that flows more naturally. What if you could create French tips that literally blend into each other?
Click “next” below to discover ombré and gradient French tip effects – including my foolproof technique for creating those dreamy sunset transitions that look impossibly difficult but are actually totally achievable at home!


GIPHY App Key not set. Please check settings