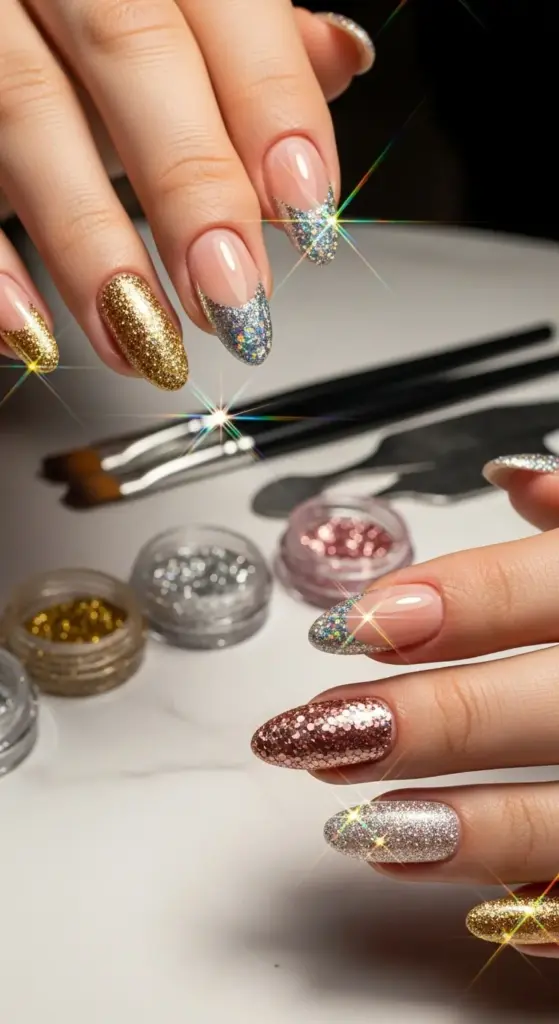
3. Glitter and Sparkle French Tip Variations
I’ll be honest – my first attempt at glitter French tips was a complete disaster. I thought I could just slap some chunky craft glitter over wet polish and call it a day. Big mistake.
The result looked like I’d stuck my fingers in a kindergarten art project, and don’t even get me started on the removal process. But once I learned the right techniques, sparkly French tips became my absolute favorite way to add glamour to any look.
Understanding Different Glitter Finishes
Fine glitter is your best friend for everyday sparkle that doesn’t look over-the-top. I use brands like OPI or Essie that have those tiny, uniform particles that catch light beautifully without being chunky.
Holographic glitter is pure magic – it shifts colors depending on the angle and lighting. This stuff makes me feel like a mermaid every time I move my hands.
Chunky hex glitter is for when you want maximum drama. I save this for special occasions because it’s definitely not subtle, but wow does it make a statement.
Micro-fine glitter gives you that subtle shimmer that’s perfect for professional settings. It’s like having tiny diamonds on your nail tips without screaming “look at me.”
Application Techniques That Actually Work
Here’s what I wish someone had told me from the beginning – layering is everything when it comes to glitter French tips. You can’t just dump glitter on and hope for the best.
Start with your base color completely dry. I learned this after ruining countless manicures by being impatient and applying glitter over tacky polish.
For even glitter distribution, I use a small makeup brush to pat the glitter onto the wet topcoat. This gives you way more control than just dipping your nail into a glitter pot.
The sandwich method changed my life – apply base coat, cure, apply your tip color, add glitter while wet, then seal with topcoat. This prevents the glitter from feeling gritty or catching on everything.
Matte and Glitter Contrast Magic
The first time I tried matte base with glitter tips, I couldn’t stop staring at my nails. The contrast is absolutely stunning and so unexpected.
Matte nude base with fine gold glitter tips is my go-to for events where I want to look elegant but still have some sparkle. It’s sophisticated without being flashy.
For something more dramatic, try matte black base with silver holographic tips. This combination looks like expensive nail art but is surprisingly easy to achieve at home.
The key is making sure your matte topcoat doesn’t touch the glitter area. I use a small brush to apply matte topcoat only to the base, leaving the glittery tips with regular glossy finish.
Holiday and Special Occasion Ideas
New Year’s Eve calls for maximum sparkle – I do gold or silver holographic tips that literally light up the room. Add some champagne-colored base and you’re ready to party.
For Christmas, I love deep red bases with gold glitter tips, or forest green with silver sparkle. These combinations scream holiday elegance without looking like costume jewelry.
Valentine’s Day is perfect for pink bases with rose gold glitter tips. I add tiny heart-shaped glitter pieces for extra romance – cheesy but so cute.
Birthday celebrations deserve rainbow glitter tips over a clear base. It’s fun, festive, and photographs amazingly well for all those birthday selfies.
Wedding season calls for subtle elegance – try champagne or pearl glitter tips over a soft pink base. It’s bridal-appropriate but still special enough for the occasion.
Removal Without Destroying Your Nails
Let me save you from the trauma I experienced trying to remove glitter polish – regular nail polish remover is not enough. You’ll sit there scrubbing forever and still have sparkles embedded in your nails.
Acetone-based remover is absolutely necessary for glitter removal. I soak cotton balls in acetone, place them on each nail, then wrap with foil for 10-15 minutes.
This soaking method is a game-changer – the glitter practically slides off instead of requiring aggressive scrubbing that damages your nail bed.
Always moisturize heavily after glitter removal. Acetone is harsh, so I immediately apply cuticle oil and hand cream to prevent my nails from becoming brittle.
Maintenance Tips for Long-Lasting Sparkle
Glitter French tips actually last longer than regular polish because the glitter helps hide small chips and wear. But there are still tricks to maximize their lifespan.
Apply extra topcoat over glitter areas – I usually do two thin coats instead of one thick one. This seals everything in and prevents glitter from shedding.
Wear gloves religiously when cleaning or doing dishes. Glitter polish shows water damage more obviously than regular colors, so protection is key.
For quick touch-ups, keep a small bottle of clear topcoat handy. Most glitter wear happens at the topcoat level, so a fresh layer can make your manicure look brand new.
Ready for Something Completely Different?
While glitter adds amazing sparkle, sometimes you want to make a statement through shape and design rather than just shine. What if your French tips could be works of art?
Click “next” below to explore geometric and abstract French tip designs that will completely change how you think about nail art – plus the surprisingly simple techniques I use to create complex-looking patterns that always get compliments!


GIPHY App Key not set. Please check settings