7. Dark Red with Embedded Dried Flowers
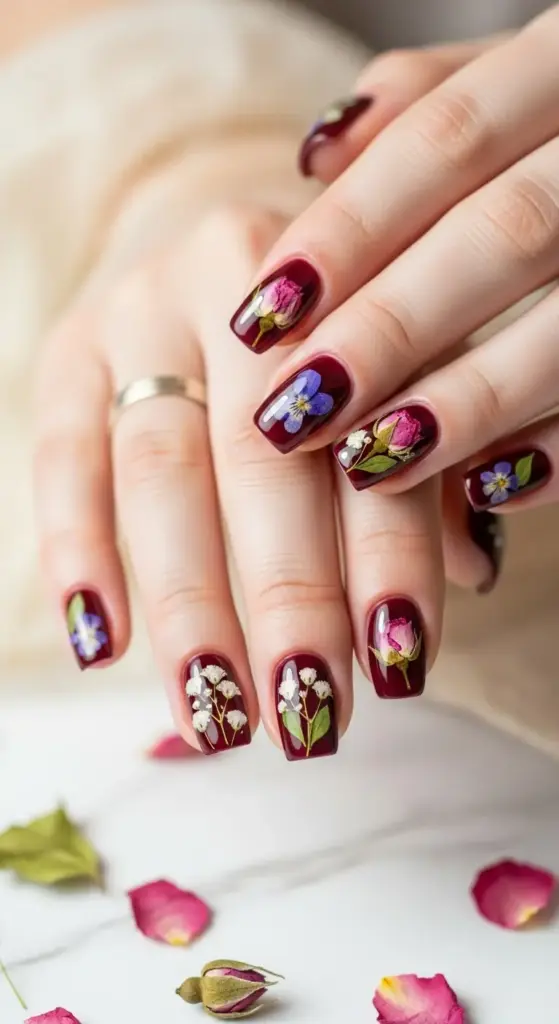
Dried flower nail art seemed like such a romantic, Pinterest-perfect idea until I tried it myself. My first attempt looked like I’d glued random plant debris to my nails – definitely not the delicate botanical look I was going for!
The flowers turned brown within hours, the petals were sticking up everywhere, and the whole thing just looked messy. I was ready to give up until I learned the proper preparation techniques.
Choosing and Preparing Flowers That Stay Beautiful
Baby’s breath is hands down the easiest flower for beginners. The tiny white blooms look gorgeous against dark red polish and they’re naturally small enough to fit on nails without trimming.
Real dried flowers from craft stores often contain chemicals that react badly with nail polish. I learned to dry my own flowers using silica gel packets – it takes 3-4 days but the colors stay vibrant.
Pressed violets and small rose petals work beautifully, but you need to flatten them completely first. I use a flower press (or heavy books) for at least two weeks to get them paper-thin.
The key is removing all moisture before application. Even slightly damp flowers will turn brown or black under polish, and there’s no fixing that once it happens.
Placement Techniques for Instagram-Worthy Results
Less is definitely more with floral nail art. I place 2-3 small flowers per nail maximum – any more and it looks cluttered instead of elegant.
Asymmetrical placement looks more natural and artistic. I avoid centering flowers perfectly – instead, I place them slightly off-center or create a diagonal flow across the nail.
Tweezers are essential for precise placement. I use the pointed kind to gently position each flower exactly where I want it before sealing with clear coat.
Create visual balance across all five nails – if one nail has flowers near the cuticle, place them near the tip on another nail. This creates movement and keeps the eye interested.
Clear Coat Application That Actually Works
Here’s where most people mess up – regular top coat will dissolve delicate flower petals. I use gel clear coat applied with a small detail brush to avoid disturbing the flowers.
Build up the clear coat gradually in thin layers. First coat goes around the flowers, second coat goes over them, third coat smooths everything out.
Cure each layer for exactly 45 seconds under LED light. Over-curing can cause the flowers to shrink or change color, which ruins the whole effect.
The final layer should be thick enough to completely encapsulate the flowers so they’re smooth to the touch. If you can still feel the flower edges, add another thin coat.
Dark Red Shades That Make Flowers Pop
OPI Big Apple Red provides the perfect contrast for white and pale pink flowers. The true red tone doesn’t compete with delicate flower colors.
Essie Bordeaux is gorgeous with purple flowers like tiny violets or lavender sprigs. The wine undertones create this sophisticated, vintage-inspired look.
Sally Hansen Red Carpet works beautifully with yellow flowers – the slight orange undertones complement warm flower colors without clashing.
For a more dramatic look, I love Zoya Rekha with white flowers. The deep wine color makes white petals look like they’re glowing against the dark background.
Making Floral Nails Last Without Disasters
Cuticle oil is your enemy with floral nail art. The oil can seep under the clear coat and cause the flowers to shift or discolor over time.
Wear gloves for cleaning and gardening – harsh chemicals and rough surfaces can chip the clear coat and expose the delicate flowers underneath.
Touch-up clear coat every few days helps maintain the smooth surface. I keep a small bottle of gel clear coat just for maintenance touch-ups.
If one flower starts to lift or discolor, remove just that nail’s polish and redo it. Don’t try to patch it – it never looks seamless.
Advanced Techniques for Show-Stopping Results
Layering different flower sizes creates incredible depth. I place larger flowers first, then add tiny baby’s breath or small buds on top for dimension.
Color-coordinated flowers look more intentional than random mixes. I stick to flowers in the same color family – all whites and creams, or all purples and pinks.
Gradient flower placement from dense at the cuticle to sparse at the tip creates movement and draws the eye along the nail length.
My favorite advanced technique? Mixing dried flowers with gold leaf accents – tiny pieces of gold leaf scattered among the flowers look absolutely magical.
Troubleshooting Common Floral Failures
When flowers turn brown after application, it’s usually moisture trapped underneath. Remove everything and start over – there’s no saving discolored flowers.
Flowers sticking up means your clear coat wasn’t thick enough. Add more thin layers until the surface is completely smooth.
Petals falling off during wear means they weren’t properly dried before application. Always test flower dryness by gently pressing – they should feel crisp, not flexible.
If the design looks too busy, use a small brush with acetone to carefully remove some flowers while the clear coat is still workable.
Pro Tips That Transformed My Floral Game
Seasonal flower choices make your nail art feel current and fresh. Spring violets, summer baby’s breath, fall leaves, winter evergreen sprigs.
Store prepared flowers in airtight containers with silica gel packets to keep them perfectly dry until you’re ready to use them.
Practice placement on fake nails first – you can perfect your design and timing before working on your actual nails.
Work in a dust-free environment because any particles that get trapped under the clear coat will show up and ruin the smooth finish.
Conclusion
These seven game-changing dark red nail ideas prove that there’s so much more to explore beyond traditional solid colors!
From luxurious velvet textures to stunning dimensional effects, each technique offers a unique way to elevate your manicure game. The beauty of dark red lies in its versatility – it’s sophisticated enough for professional settings yet bold enough to make a statement.
Ready to try these looks? Start with the technique that speaks to you most, and don’t be afraid to experiment with your own creative twists.
Your nails are your canvas, and these ideas are just the beginning of your artistic journey!


GIPHY App Key not set. Please check settings