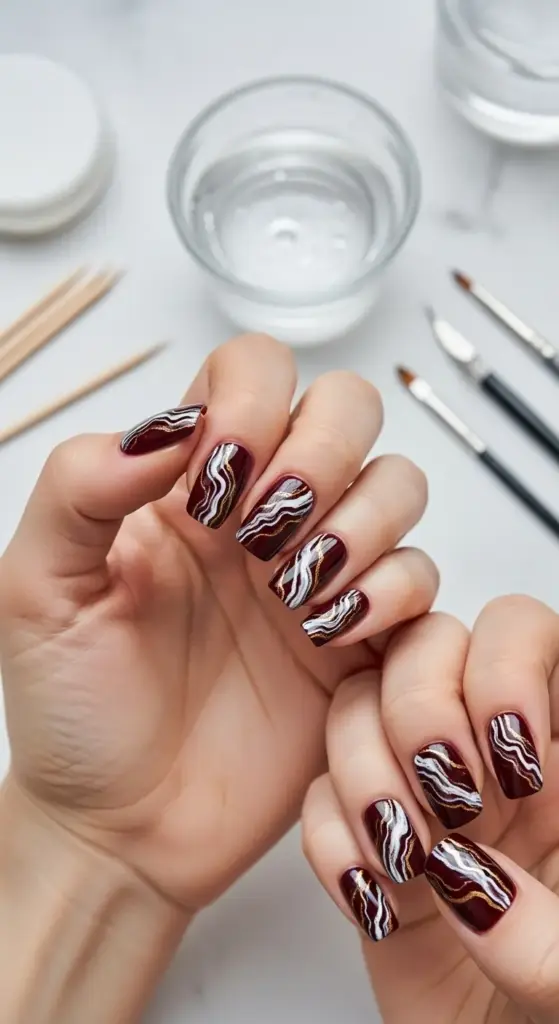
6. Dark Red Marble Effect with White and Gold Veining
Water marbling looked like pure magic when I first saw it on YouTube. Then I tried it myself and my bathroom looked like a crime scene – there was dark red polish everywhere except on my nails!
My first marble attempt was a disaster. The colors didn’t spread right, the pattern looked more like muddy swirls than elegant marble, and I wasted half a bottle of expensive polish. But once I figured out the tricks, it became my absolute favorite technique.
Water Marbling That Actually Creates Stone Patterns
Room temperature water is crucial – I use filtered water in a small glass bowl. Tap water has chemicals that can mess with how the polish spreads, and I learned this after several failed attempts.
Drop your base burgundy polish into the center of the water, then immediately add white polish to the center of that circle. The timing is everything – wait too long and the polish starts to skin over.
Use a toothpick to drag from the center outward, creating those natural marble veins. Don’t overwork it – three or four gentle drags create the most realistic patterns.
Tape around your cuticles before dipping your nail into the water. Trust me on this one – cleanup is a nightmare without proper protection, and acetone around your cuticles burns like crazy.
Alternative Methods When Water Marbling Fails
Plastic wrap technique is my backup when water marbling isn’t cooperating. Apply your dark red base coat, then dab white and gold polish randomly on the nail while it’s still wet.
Press crumpled plastic wrap gently over the wet polish, then lift straight up. The plastic creates these amazing organic patterns that look just like natural marble veining.
Makeup sponges work great too – I dab different colors onto a damp beauty sponge, then press it onto the wet base color. The sponge texture creates subtle marble-like variations.
For more control, I use a fan brush to drag white polish through the wet red base. This creates those long, flowing veins that make marble look so elegant.
Color Combinations That Look Expensive
Deep burgundy with cream white and rose gold is my signature combination. The warm tones work beautifully together and look sophisticated enough for any occasion.
Crimson red with pure white and yellow gold creates this dramatic, luxurious look that’s perfect for special events. The contrast is striking but not overwhelming.
Wine red with off-white and copper gives a more subtle, earthy marble effect. I love this combination for fall – it’s rich and warm without being too bold.
My secret weapon? Adding just a tiny drop of black polish to create depth in the veining. It makes the marble look more realistic and three-dimensional.
Sealing Techniques for Long-Lasting Results
Fast-dry top coat is essential because marble effects use multiple polish layers that take forever to dry naturally. I use Seche Vite for its glossy finish and quick drying time.
Apply the top coat in thin layers – thick application can drag the delicate marble pattern and ruin all your hard work. I learned this lesson the hard way multiple times.
Two coats of top coat give the best protection and depth. The first coat seals the pattern, the second adds that gorgeous glossy finish that makes the marble really pop.
Wait at least 5 minutes between top coat applications. Rushing this step causes bubbling and can disturb the marble pattern underneath.
Fixing Marble Disasters Before They Dry
When your marble looks muddy instead of elegant, don’t panic! Use a clean toothpick to gently separate the colors while they’re still wet – sometimes you can salvage the pattern.
Too much veining is a common mistake. If your marble looks busy, use a cotton swab dipped in acetone to gently remove some of the white lines while the polish is still workable.
Pattern too subtle? Add more white polish with a detail brush while the base is still tacky. You can actually build up the marble effect in layers for more dramatic results.
If one nail is completely ruined, clean it off immediately with acetone and start over. Don’t try to fix a bad marble – it never looks intentional.
Pro Tips That Changed My Marble Game
Polish consistency matters – thin your polish with a drop of thinner if it’s too thick. Thick polish doesn’t spread properly in water and creates clunky patterns.
Work in good lighting so you can see the subtle color variations as you create them. I do my marble nails near a window during the day for the best visibility.
Practice the pattern on paper first – seriously! Drip polish onto wax paper and practice your toothpick technique before committing to your nails.
Keep acetone and cleanup brushes within arm’s reach. Marble effects are messy, and quick cleanup prevents staining your skin and cuticles.
Ready for the final stunning technique? Click “next” to discover dark red with embedded dried flowers – I’ll show you the flower preparation method that keeps petals vibrant and prevents them from turning brown under polish!


GIPHY App Key not set. Please check settings