4. Dark Red Chrome with Holographic Topcoat
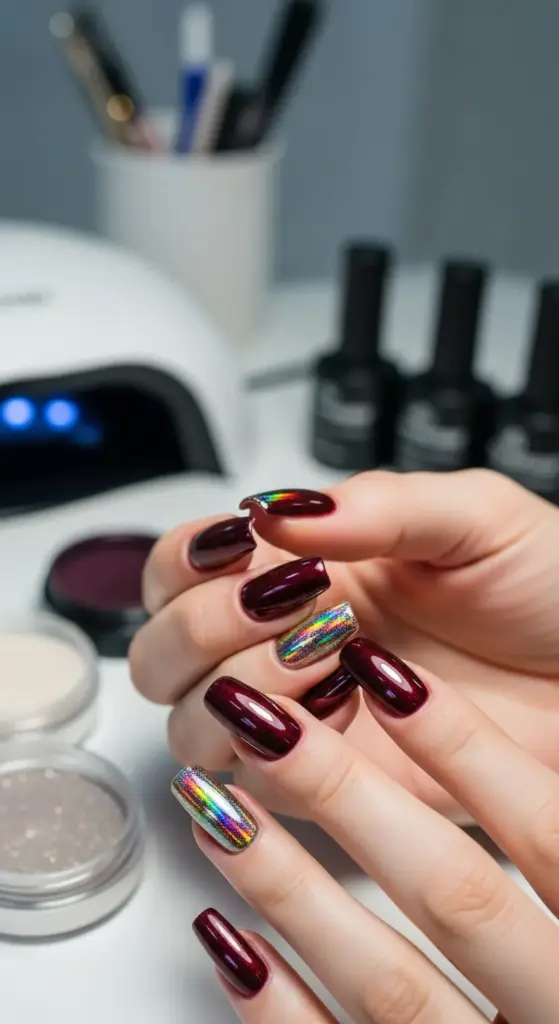
Okay, so chrome powder nails seemed impossible when I first tried them. I watched YouTube tutorials for hours, bought all the supplies, and my nails ended up looking like I’d rolled them in glitter from a craft store!
The problem wasn’t the technique – it was my impatience. Chrome powder is finicky as heck, and if you rush even one step, the whole thing falls apart.
Chrome Powder Application That Actually Creates Mirror Effects
First things first – your gel base coat needs to be completely smooth. Any tiny bubble or ridge will show up magnified under chrome powder, and trust me, it’s not cute.
Apply your dark red gel polish in two thin coats, curing each layer for exactly 60 seconds under LED light. Don’t over-cure – I learned this when my chrome powder wouldn’t stick properly because the gel was too hard.
Here’s the magic part: apply your no-wipe gel top coat and cure for just 30 seconds. The surface should still feel slightly tacky – that’s what the chrome powder grabs onto.
Work fast but gently when applying the powder. I use a silicone brush to pat the chrome powder onto the tacky surface, not rub or drag it. Rubbing creates those awful streaky patches that ruin the mirror effect.
Base Colors That Make Chrome Pop
Black gel polish under chrome gives the most intense mirror finish, but for dark red chrome, I actually prefer a deep burgundy base. It adds warmth that pure black can’t achieve.
Here’s my secret weapon – OPI Lincoln Park After Dark as a base creates this incredible depth under chrome powder. The purple undertones make the final result look almost liquid.
For a more dramatic effect, I sometimes use Essie Wicked as my base. It’s this gorgeous deep plum that makes the chrome look like molten metal when the light hits it.
Holographic Topcoats That Don’t Disappoint
Holo Taco Scattered Holo is hands down the best I’ve tried. It doesn’t dull the chrome effect but adds this incredible rainbow dimension that changes with every movement.
ILNP Mega is my second choice – it’s got larger holographic particles that create more dramatic color shifts. Perfect for special occasions when you want maximum impact.
Cirque Colors Vice gives a more subtle holo effect if you want something wearable for everyday. I use this when I want the chrome to be the star but still have that extra sparkle.
Curing Times and Equipment That Matter
Your LED lamp needs to be at least 36 watts for proper chrome adhesion. I wasted so much product using a cheap 6-watt lamp that barely cured anything!
Chrome powder application doesn’t need curing – that’s a rookie mistake I made early on. You apply the powder, brush off excess, then seal with gel top coat.
The final cure time is crucial: exactly 2 minutes under LED light. Less time and the holo topcoat won’t bond properly, more time and you risk over-curing which makes removal a nightmare.
Layering for Maximum Wow Factor
Thin layers are everything with this technique. I apply my holo topcoat in two super thin coats rather than one thick one – it prevents bubbling and gives better color payoff.
Between each layer, I do a quick 30-second cure just to set the surface. This prevents the layers from mixing and creating that muddy look.
The final step? One more thin layer of regular gel top coat to lock everything in. This protects the holo particles and keeps that mirror shine intact for weeks.
Pro Tips That Saved My Sanity
Work in a dust-free environment – even tiny particles will show up under chrome. I actually do my chrome nails in my bathroom with the fan off because it’s the cleanest space in my house!
Keep your chrome powder sealed tight between uses. Moisture will ruin it faster than you’d think, and good chrome powder isn’t cheap.
If you mess up one nail, don’t try to fix it – just remove the chrome powder with a lint-free wipe and start over. Trust me, patches never look intentional.
Ready to add some serious texture to your nail game? Click “next” to discover textured dark red with caviar beads – I’ll show you the application trick that prevents those annoying bald spots everyone struggles with!


GIPHY App Key not set. Please check settings