3. Glossy Dark Red with Negative Space Geometric Patterns
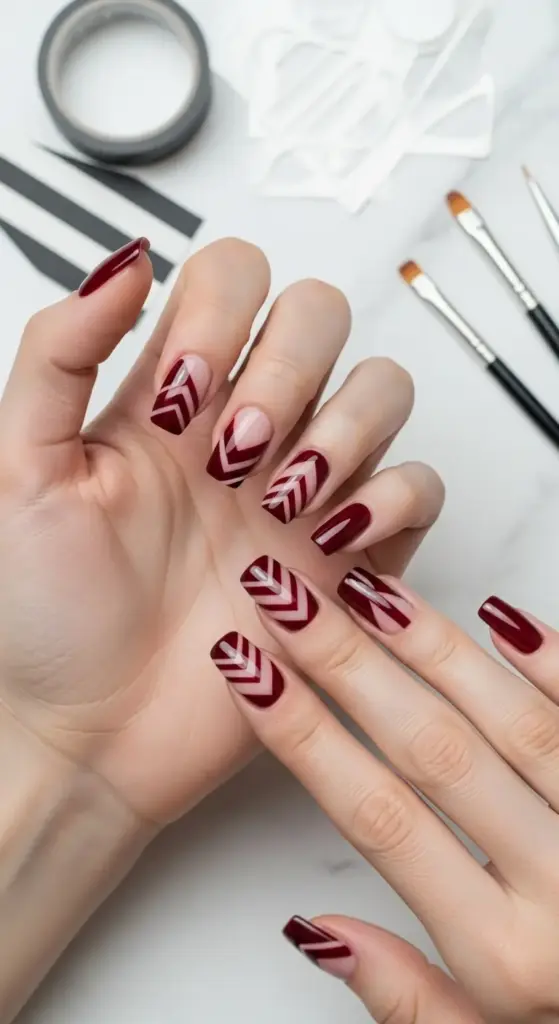
The first time I saw negative space nail art on Instagram, I thought it was some kind of Photoshop magic. Turns out, it’s totally doable at home – but man, did I learn some hard lessons along the way!
My first attempt looked like a kindergarten art project gone wrong. The lines were wobbly, the polish bled everywhere, and I ended up with more red on my cuticles than on my actual nails.
Creating Razor-Sharp Geometric Shapes
Striping tape is your best friend for geometric designs. I buy the super thin kind (1mm width) because it gives you way more flexibility than regular nail tape.
Here’s the trick nobody tells you – press down the tape edges with a cuticle pusher before applying polish. If you skip this step, polish will seep underneath and ruin those crisp lines you’re going for.
For triangular patterns, I use vinyl nail stencils from Amazon. They’re reusable and give you perfect angles every single time. Way better than trying to cut your own shapes with scissors!
Apply your base coat, let it cure, then place your tape or stencils. Paint over everything with your glossy dark red polish, then immediately remove the tape while the polish is still wet.
The Best High-Gloss Dark Red Polishes
After testing probably thirty different brands, OPI Big Apple Red gives the most mirror-like finish. It’s got this incredible depth that makes the negative space really pop.
Essie Bordeaux is my second choice – it’s got these subtle purple undertones that look amazing against bare nail. Plus it applies super evenly, which is crucial for geometric designs.
Sally Hansen Miracle Gel in Red Eye doesn’t need a UV lamp but still gives that gel-like glossy finish. Perfect if you don’t have professional equipment but want professional results.
Negative Space Ideas That Actually Work
Diagonal stripes are foolproof for beginners. I use three strips of tape to create uneven diagonal sections – it looks intentional and hides any minor imperfections.
Triangle cutouts at the cuticle area create this modern, edgy look that’s surprisingly wearable. The key is keeping the triangles small – about 3mm at the base.
My favorite design uses chevron patterns with the point facing toward the cuticle. It elongates your nails and the burgundy polish against natural nail color looks incredibly sophisticated.
Half-moon designs with geometric twists work beautifully too. Instead of a regular curve, I create angular half-moons using tape – it’s like a modern take on classic French tips.
Tools for Professional-Looking Lines
Invest in a nail art brush set – specifically the liner brush and detail brush. I use the liner for cleanup and the detail brush for tiny geometric accents.
Cuticle scissors are essential for cutting tape to exact lengths. Regular scissors are too bulky and you’ll end up with uneven pieces that mess up your design.
Acetone and a small cleanup brush are non-negotiable. I keep a tiny dish of acetone next to me while working – any mistakes get fixed immediately before they dry.
A dotting tool helps with precise tape placement. I use the pointed end to push down tape edges and create sharp corners.
Sealing and Protecting Your Geometric Masterpiece
This is where I used to mess everything up! Fast-dry top coat seems like a good idea, but it can actually drag your design if you’re not careful.
I use Seche Vite but apply it in super thin layers. The first coat should barely touch the surface – just enough to seal the design without disturbing the polish underneath.
Wait exactly 2 minutes between top coat layers. I learned this timing through trial and error – too soon and you’ll get drag marks, too late and the layers won’t bond properly.
Cuticle oil around the nail (not on it!) helps the geometric lines stay crisp longer. It prevents the skin from drying out and pulling at the polish edges.
Pro Tips That Make All the Difference
Remove tape at a 45-degree angle, not straight up. This prevents the polish from peeling off with the tape – learned this one the hard way!
If polish bleeds under the tape, don’t panic. Use a small angled brush dipped in acetone to clean up the lines after everything’s dry.
Ready for something completely different? Click “next” to discover the mesmerizing world of dark red chrome with holographic topcoat – I’ll show you the mirror powder technique that creates the most incredible dimensional effects!


GIPHY App Key not set. Please check settings