6. Autumn Leaves and Branches
Autumn leaf nail art seemed like it would be the most natural design for me to master. I mean, I’ve been looking at leaves my whole life, right?
Wrong. Turns out there’s a huge difference between recognizing a leaf and actually painting one that looks realistic.
My First Leaf Painting Reality Check
My initial attempts at hand-painting realistic leaf shapes were honestly embarrassing. They looked more like abstract blobs in fall colors than actual foliage.
I was trying to paint perfect maple leaf shapes with all those intricate points and curves. What a disaster that was.
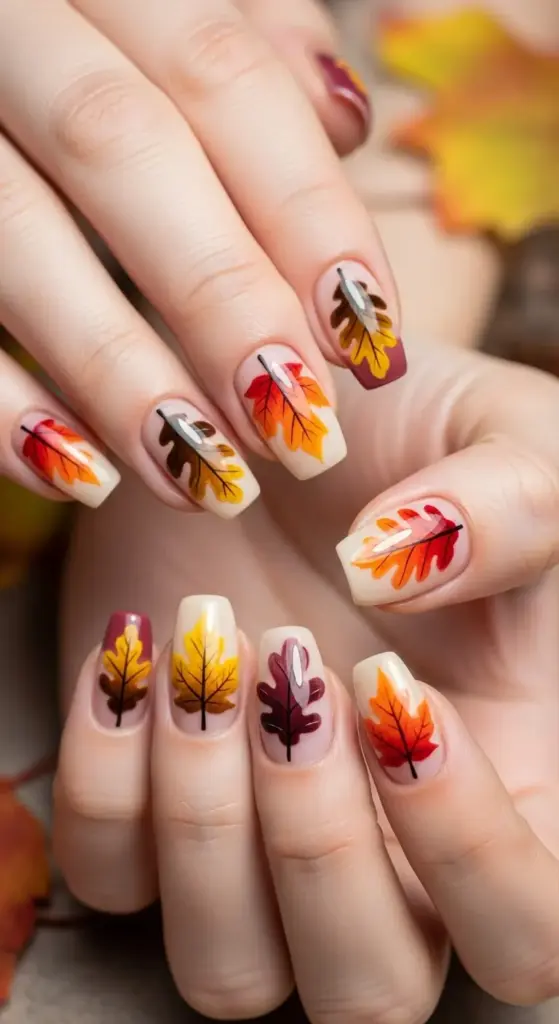
The breakthrough came when I stopped trying to be botanically accurate and started focusing on the essence of leaves – the basic shapes and color variations that make them recognizable.
Simple oval shapes with pointed ends work for most leaf types. I add a center vein line and maybe one or two side veins, and suddenly it actually looks like a leaf!
The Color Palette That Changed Everything
Here’s what I learned about fall colors the hard way: not all oranges and reds work together. Some combinations look muddy instead of autumnal.
My go-to palette now includes Essie’s “Orange, It’s Obvious!” for bright maple leaves, OPI’s “I’m Getting a Tan-gerine” for deeper orange tones, and China Glaze’s “Mahogany Magic” for those rich burgundy leaves.
The secret is varying your colors within each leaf. Real autumn leaves aren’t solid colors – they have gradients and color variations that make them interesting.
I’ll start with a base color, then while it’s still wet, I’ll dab in a second color with a small brush. The colors blend naturally, creating that realistic leaf effect.
Layering Techniques That Add Real Depth
Layering techniques were a game-changer for my autumn nail art. Instead of painting flat, single-layer leaves, I started building up depth and dimension.
I paint the background leaves first in lighter, more muted colors. Then I add foreground leaves in brighter, more saturated tones. This creates natural depth without any complicated shading techniques.
The key is overlapping some leaves while leaving others separate. Real fallen leaves don’t arrange themselves in perfect patterns – they’re scattered and layered randomly.
I also vary the opacity of my leaves. Some are painted with full coverage, others are more translucent, like they’re backlit by autumn sunlight.
Gold Foil: My Luxury Obsession
Gold foil accents took my autumn nails from pretty to absolutely stunning. I wish I’d discovered this technique sooner!
I use Sally Hansen’s Foil Effects – it comes with special base polish and foil sheets. The effect is way more dramatic than regular gold polish.
The trick is knowing where to place the foil. I add it to leaf edges to simulate sunlight catching the leaves, or create gold veining through the center of select leaves.
Sometimes I’ll do an entire accent nail in gold foil, then paint autumn leaves over it. The gold shows through in places, creating this gorgeous luxury autumn vibe.
Bare Branch Silhouettes: The Detail That Matters
Thin liner brushes became essential once I started adding bare branch silhouettes to my autumn designs. This detail really sells the seasonal look.
I use a size 0 liner brush – any bigger and the branches look too thick and cartoonish. Delicate, realistic branches require the right tools.
The technique is all in the brush pressure. I start with light pressure for thin twigs, then press harder for thicker main branches. Varying the pressure creates natural-looking branch thickness.
I paint branches in dark brown or black, usually starting from one corner and branching out across the nail. Some branches extend beyond the nail edge, like they’re part of a larger tree.
The Watercolor Technique That Blew My Mind
I accidentally discovered this watercolor leaf effect when I was trying to clean up a mistake. Now it’s my favorite technique for creating realistic autumn foliage.
I paint the basic leaf shape with regular polish, then while it’s still wet, I use a damp brush to pull some of the color outward. This creates soft, blended edges that look incredibly natural.
For multi-colored leaves, I’ll drop different colors into the wet base and let them blend naturally. The results are always unique and organic-looking.
This technique works especially well for oak leaves and other varieties with softer, more rounded edges.
Combining Leaves with Halloween Elements
Autumn leaves with Halloween elements became my signature look once I figured out the right balance. The key is not overwhelming the design.
I’ll do autumn leaves on most nails, then add one Halloween accent nail – maybe a small pumpkin nestled among the leaves, or a tiny black cat silhouette.
Spider webs work beautifully with autumn branches. I’ll paint the branch structure first, then add web details between the branches. It looks like a real outdoor scene.
Sometimes I’ll incorporate tiny bats flying among the leaves, or add a small moon behind the branch silhouettes.
Tools That Made All the Difference
Beyond the thin liner brush, I discovered that fan brushes are incredible for creating leaf textures. I’ll load one lightly with paint and dab it over base colors to create realistic leaf surface textures.
Makeup sponges are perfect for creating soft, blended backgrounds that make the leaves pop. I’ll sponge on gradient skies or soft color washes.
Detail brushes in multiple sizes let me vary the scale of my leaves and branches, creating more realistic compositions.
Color Combinations That Actually Work
I learned through trial and error that certain fall color combinations work better than others for nail art.
Burnt orange with deep burgundy is classic and always looks sophisticated. Golden yellow with rusty red creates warmth and richness.
Avoid using too many colors on one nail – it gets muddy and overwhelming. I stick to 2-3 colors per nail maximum.
Making Autumn Leaves Last
Autumn leaf nail art can be surprisingly durable because most of it is solid color work. The detailed elements need extra protection though.
I always seal thin branch lines with an extra coat of top coat. Those delicate details are the first to chip if not properly protected.
Ridge-filling base coat is essential when you’re layering multiple colors and textures. It creates a smooth foundation that helps everything adhere better.
Common Mistakes I Made (So You Don’t Have To)
The biggest error? Making leaves too uniform. Real autumn leaves vary in size, shape, and color intensity. Embrace the imperfections.
I also used to paint leaves too small. Larger, more dramatic leaf shapes actually read better on the small canvas of a nail.
Another mistake: trying to paint every single leaf vein. Simple center veins are usually enough to sell the leaf effect without overcomplicating the design.
Ready to add some playful personality to your Halloween nails? Hit “next” below to discover how to create the most adorable monster faces that are friendly enough for kids but stylish enough for adults – including the fuzzy texture technique that makes them look genuinely three-dimensional!


GIPHY App Key not set. Please check settings