5. Witchy Black Cat Silhouettes
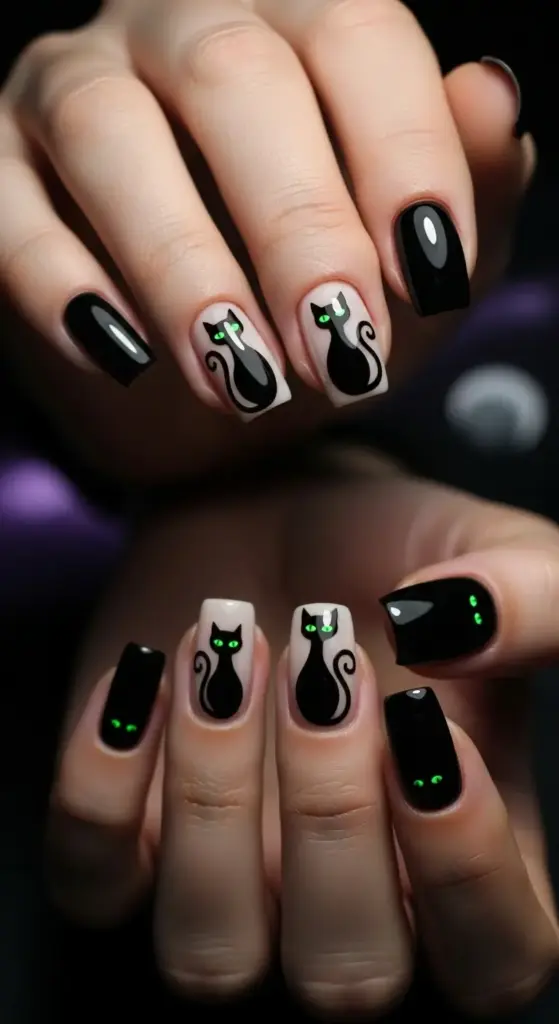
Black cat nail art was my white whale for the longest time. I’d see these gorgeous witchy cat silhouettes on Pinterest and think “how hard can it be?”
Spoiler alert: harder than I thought. My first attempts looked more like deformed blobs than elegant felines.
My Shaky Hand Reality Check
Let’s talk about steady hand techniques because this was my biggest hurdle. I have naturally shaky hands – too much caffeine, probably – and painting perfect cat silhouettes seemed impossible.
I tried everything: holding my breath, bracing my arms, even attempting to paint after yoga class when I was supposedly “centered.” Nothing worked.
Then I discovered the game-changing technique: using my pinky as an anchor. I rest my painting hand’s pinky on my other hand while I work, creating a stable base.
This simple trick transformed my cat silhouette accuracy overnight. Suddenly I could paint smooth curves instead of jagged disaster lines.
The Cat Shape That Actually Looks Like a Cat
Here’s what nobody tells you about black cat silhouettes: the proportions matter way more than perfect lines.
I used to focus so much on making smooth curves that I’d end up with cats that looked more like potatoes with ears. The shape is everything.
Real cat silhouettes have specific proportions: the head should be about one-third the size of the body, ears should be triangular and alert, and that iconic arched back is crucial.
I start by painting a small circle for the head, then add the body as an oval positioned slightly below and behind it. The tail curves up and over – this is what sells the “cat” look.
Green Glowing Eyes: My Obsession
Special effect polishes for cat eyes completely changed my nail art game. I’m talking about that supernatural glow that makes your cats look genuinely mystical.
Orly’s “Glowstick” mixed with a tiny drop of green polish creates the most incredible glowing cat eyes. I use the tiniest dotting tool to place two small dots where the eyes should be.
The trick is charging them under a bright light for at least 15 minutes. Under blacklight at Halloween parties, these eyes are absolutely mesmerizing.
I also discovered China Glaze’s “Glow With the Flow” – it’s specifically designed for glow effects and lasts longer than mixing your own.
Background Magic: Setting the Mood
Moonlit sky backgrounds became my signature after I accidentally created one while trying to fix a botched gradient. Sometimes mistakes lead to the best discoveries!
For the moonlit effect, I start with a dark blue base, then use a makeup sponge to dab white polish in one corner for the moon. The key is building it up gradually.
Purple gradients are perfect for that witchy vibe. I blend deep purple at the base into lighter lavender at the tips, then add my cat silhouette over the gradient.
Starry night backgrounds are surprisingly easy once you know the trick. After your base color dries, use a fan brush lightly loaded with white polish to create scattered star effects.
Stamps vs. Freehand: The Great Debate
I’ll be honest – nail stamps saved my sanity when I was starting out with cat silhouettes. There’s no shame in using tools that make your life easier!
Born Pretty Store has incredible cat-themed stamping plates. The silhouettes are perfectly proportioned and consistent across all nails. Consistency was something I struggled with for months.
But here’s the thing about nail stencils: they can look a bit too perfect sometimes. I learned to add small imperfections after stamping – a slightly crooked tail or asymmetrical ears.
Freehand gives you more personality and uniqueness. Each cat can have its own character, which I actually prefer now that my technique has improved.
The Stencil Technique That Changed Everything
When I finally tried cat stencils, I made every beginner mistake possible. The biggest one? Not securing the stencil properly.
I use tweezers to position the stencil, then press down firmly with a silicone tool. Any air bubbles will cause polish to seep underneath.
The key is using very little polish on your brush and building up the color gradually. Too much polish at once creates bleeding and ruins those crisp silhouette edges.
I remove the stencil while the polish is still slightly wet – this prevents peeling and gives cleaner lines.
Cat Charms and 3D Accessories
Cat-themed nail charms took my witchy nails to the next level. I’m talking tiny metal cats, rhinestone eyes, even miniature witch hats for the cats to “wear.”
Amazon has incredible selections of Halloween nail charms. I buy them in bulk because I tend to go overboard with the decorating.
The trick with 3D cat accessories is placement. I usually put them on one accent nail so they don’t overwhelm the overall design. Less is more when it comes to dimensional elements.
I use a tiny drop of nail glue to secure charms, then seal everything with extra top coat. This prevents them from catching on things and falling off.
Color Variations Beyond Basic Black
While classic black cat silhouettes are timeless, I’ve experimented with other colors that create different moods.
Deep purple cats against orange backgrounds give a more playful Halloween vibe. Navy blue cats on silver backgrounds look sophisticated and mysterious.
I even tried holographic polish for cat silhouettes once – the effect was stunning under certain lighting, like the cats were made of starlight.
Common Mistakes That Drove Me Crazy
The biggest error I made repeatedly? Rushing the background. If your base isn’t completely dry, adding the cat silhouette will cause smudging and blending.
I also used to make cat ears too small. Proportionally larger ears actually look more authentic and recognizable as cat silhouettes.
Another mistake: trying to add too much detail. Silhouettes work because of their simplicity. Adding whiskers or facial features defeats the purpose.
Making Them Last Through Halloween Madness
Cat silhouette nail art is actually pretty durable since it’s mostly solid color work. The key is proper base preparation and sealing.
I always use a sticky base coat because it helps the polish adhere better, especially important for dark colors that can stain.
Two coats of top coat are essential – one right after completing the design, then another coat the next day for extra protection.
Ready to embrace your inner child with some adorable autumn vibes? Click “next” below to discover how to create stunning autumn leaves and branches that capture the essence of fall – including the watercolor technique that made my leaves look so realistic, people thought I’d used actual pressed leaves!


GIPHY App Key not set. Please check settings