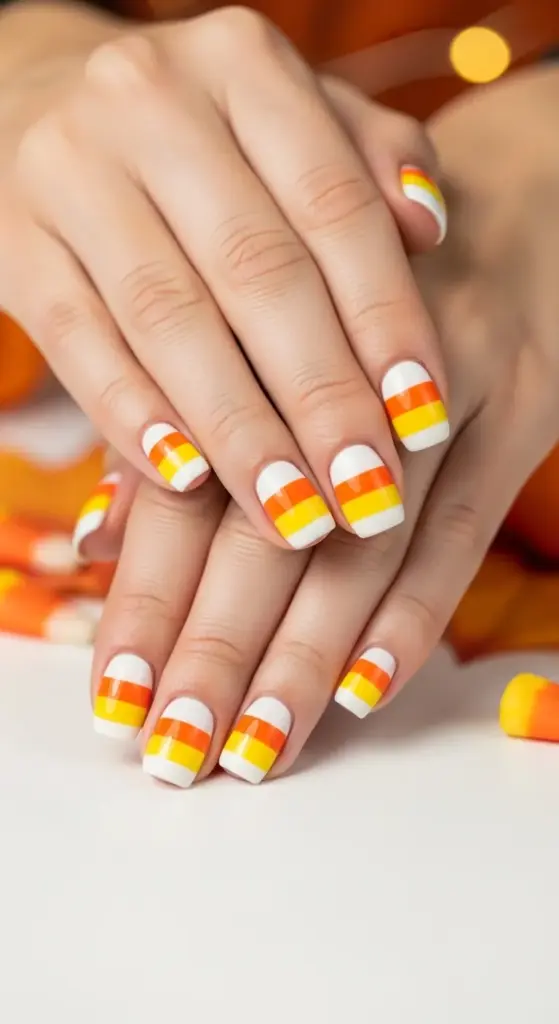
4. Candy Corn Inspired Manicure
Candy corn nails seemed like they’d be a piece of cake when I first attempted them. I mean, how hard could three stripes be, right?
Oh, sweet summer child that I was. My first attempt looked like a toddler had finger-painted with Halloween colors.
My Striping Disaster (And What I Learned)
Picture this: me, confidently painting yellow, orange, and white stripes freehand with a regular nail polish brush. The lines were wobbly, uneven, and honestly looked more like abstract art than candy.
I was so frustrated I almost gave up on candy corn nail art entirely. Thank goodness I didn’t!
The problem wasn’t my technique – it was my approach. I was trying to paint perfect stripes in one go, which is basically impossible without proper tools or methods.
The Great Freehand vs. Tape Debate
Let me settle this once and for all: tape method wins every single time for beginners. I spent weeks trying to master freehand candy corn stripes before finally admitting defeat.
For the tape technique, I use regular scotch tape cut into thin strips. The key is pressing the edges down firmly so polish doesn’t seep underneath.
I paint the entire nail white first, let it dry completely, then tape off the bottom third and paint it yellow. Patience is absolutely crucial here.
After the yellow dries, I tape off the middle section and paint the top orange. The result? Perfect candy corn stripes that actually look intentional.
Freehand: When I Finally Got It Right
Don’t get me wrong – freehand candy corn is totally doable once you know the tricks. It just took me about 50 practice nails to figure it out.
The secret is using a flat shader brush instead of the regular polish brush. I dip it in the polish, wipe off excess on the bottle rim, then paint in smooth, confident strokes.
I start with the white base, then add the yellow stripe while the white is still slightly tacky. This helps the colors blend naturally at the edges.
For the orange section, I use the same technique. The slight blending actually makes it look more realistic than harsh, perfect lines.
Creative Variations That Blew My Mind
Once I mastered basic candy corn nails, I started experimenting with variations. Reverse candy corn became my unexpected favorite!
Instead of white at the tip, I put yellow there, then orange in the middle, and white at the base. It’s like an upside-down candy corn and somehow looks even more striking.
Abstract candy corn interpretations are perfect when you want the vibe without the precision. I’ll do diagonal stripes, or paint the colors in organic, flowing shapes rather than straight lines.
Sometimes I’ll just do one accent nail with full candy corn stripes and paint the others in solid coordinating colors. Less overwhelming but still totally festive.
The Texture Game-Changer
This technique completely transformed my candy corn manicure game: mixing matte and glossy finishes.
I paint the entire design, then apply matte top coat over everything. Once that’s dry, I use a small brush to add glossy top coat just to the yellow section.
The contrast is absolutely stunning. The glossy yellow pops against the matte orange and white, creating this dimensional effect that photographs beautifully.
Sometimes I’ll make just the white tip glossy, or alternate between matte and glossy stripes. Each variation gives a completely different vibe.
Coordinating With Halloween Outfits
Here’s something I learned through trial and error: candy corn nails don’t automatically go with every Halloween look. Shocking, I know.
They’re perfect with cute, playful costumes – think witch with colorful accessories, friendly scarecrow, or anything autumn-themed rather than scary.
For more sophisticated Halloween outfits, I tone down the candy corn by doing it on just one accent nail, or using the colors in a more abstract pattern.
Color coordination is key. If your costume has black accents, consider adding thin black lines between your candy corn stripes. It ties everything together beautifully.
The Polish Brands That Actually Work
Not all yellows and oranges are created equal for candy corn nail art. I learned this the expensive way by buying tons of polishes that looked perfect in the bottle but terrible on nails.
For yellow, China Glaze’s “Happy Go Lucky” is my holy grail. It’s bright, opaque, and has that perfect candy corn yellow tone.
Essie’s “Orange, It’s Obvious!” nails the orange shade perfectly. And for white, I stick with my trusty Essie “Blanc” – it’s consistent and opaque.
Pro tip: Test your color combination on a nail wheel first. Some yellows look too green next to certain oranges, and it throws off the whole candy corn effect.
Making Them Last Through Trick-or-Treating
Candy corn manicures can be surprisingly durable if you prep them right. The key is building up thin layers rather than trying to get full opacity in one coat.
I always use a ridge-filling base coat because the multiple color layers can create texture differences. This smooths everything out.
For longevity, I seal with two coats of top coat – one immediately after finishing the design, then another the next morning. This creates a protective barrier that keeps those crisp lines intact.
Common Mistakes I Made (Learn From My Pain)
The biggest error? Not letting each color dry completely before adding the next. Patience is not my strong suit, but it’s absolutely essential for clean candy corn stripes.
I also used to make my stripes too thick. Real candy corn has relatively thin color bands, so keeping your stripes proportional makes them look more authentic.
Another mistake: trying to fix wobbly lines while the polish was still wet. Just let it dry and clean up with a small brush dipped in acetone later.
Ready to add some feline magic to your Halloween nails? Hit “next” below to discover how to create those mysterious black cat silhouettes that’ll have everyone asking about your nail artist – spoiler alert: the secret is all in the brush technique I stumbled upon by accident!


GIPHY App Key not set. Please check settings