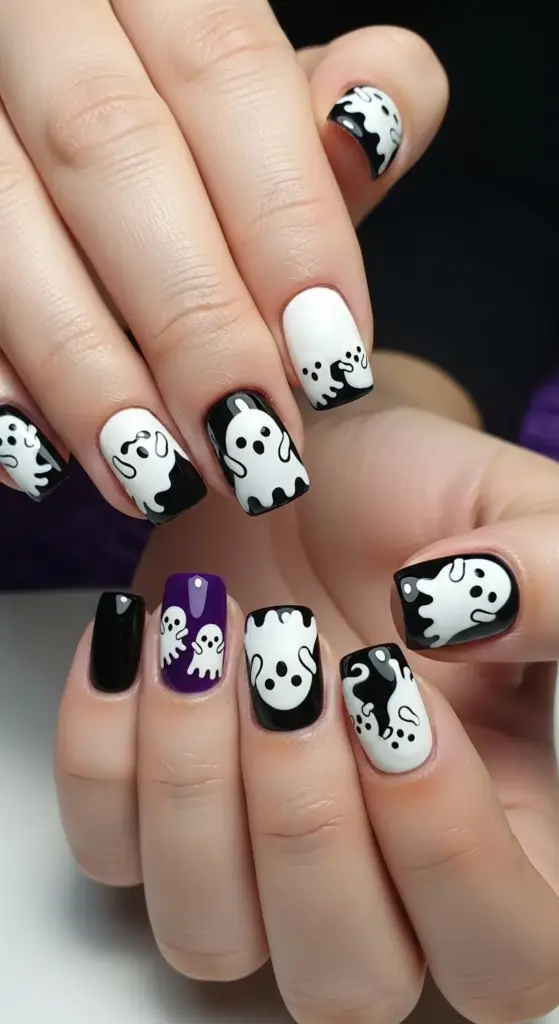
3. Adorable Ghost Nail Art
I’ll be honest – ghost nail art was supposed to be the “easy” Halloween design I’d master first. Famous last words, right?
My initial attempts looked more like white blobs than cute spirits. But once I figured out the tricks, these became my absolute favorite Halloween nail designs!
My White Polish Wake-Up Call
Let me save you from my biggest early mistake: not all white polishes are created equal for ghost nail art.
I started with some random white I had in my collection – it was streaky, took four coats to look opaque, and dried with this weird grayish tint. My “ghosts” looked more like sad clouds.
After some serious trial and error, Essie’s “Blanc” became my holy grail. It’s creamy, opaque in two coats, and has this perfect bright white finish that actually looks ghostly.
OPI’s “Alpine Snow” is another winner if you can find it. Both of these give you that crisp, clean base that makes your ghost shapes pop.
The Base Technique That Changed Everything
Here’s what I wish someone had told me from the start: perfect ghost shapes aren’t actually perfect circles.
Real ghosts (well, cartoon ones anyway) have that slightly wobbly, organic shape. I used to stress about making perfect rounds, but imperfection is actually your friend here.
I start by painting the entire nail with my base color – usually black or deep purple. Then I use a small detail brush to paint the ghost body, starting from the bottom and working up.
The key is making the bottom edge wavy, like the ghost is floating. I do little scalloped edges that look like a flowing sheet.
Creating Personalities With Dotting Tools
This is where the magic happens! Dotting tools are absolutely essential for giving your ghosts character.
For cute expressions, I use the smallest dotting tool to create two small black dots for eyes, positioned slightly closer together. Wide-set eyes look more spooky than adorable.
Then I add a tiny “o” shape for the mouth – not a perfect circle, more like a surprised expression. This instantly makes them look friendly and approachable.
I learned this from watching my niece draw: cute ghost expressions always have that innocent, surprised look rather than scary grimaces.
The Matte vs. Glossy Game-Changer
Okay, this technique blew my mind when I first discovered it. Using matte and glossy top coats strategically adds incredible dimension to ghost nail art.
I paint the entire design, then apply matte top coat over everything. Once that’s dry, I use a small brush to add glossy top coat just to the ghost’s “body.”
The contrast is absolutely stunning. The matte background makes the glossy ghost appear to float right off your nail. It’s like a 3D effect without any of the complicated techniques.
Sometimes I’ll make just the ghost’s eyes glossy while keeping everything else matte. It gives them this lifelike sparkle that’s both cute and slightly mysterious.
Glow-in-the-Dark Magic (My New Obsession)
Glow-in-the-dark polish took my ghost nails from cute to absolutely magical. I wish I’d discovered this sooner!
Orly’s “Glowstick” is my current favorite – it charges quickly under regular light and glows for hours. The effect is subtle during the day but absolutely enchanting at Halloween parties.
I usually paint the entire ghost with regular white polish first, then add a thin layer of glow-in-the-dark on top. This gives better opacity and a stronger glow effect.
Pro tip I learned the hard way: charge your glow-in-the-dark nails under a lamp for at least 10 minutes before heading out. Phone flashlights work in a pinch too!
Creating Mini Ghost Families
This is hands-down my favorite ghost nail art variation. Mini ghost families are ridiculously cute and surprisingly easy to create.
I dedicate one nail (usually the ring finger) to the “family portrait.” I paint one larger ghost in the center – that’s the parent ghost.
Then I add two smaller ghosts on either side, positioned slightly lower. These are the baby ghosts, and I make their eyes even closer together for maximum cuteness.
Each ghost gets a slightly different expression. Maybe one is winking, another looks surprised, and the third has a tiny smile. It tells a little story on your nail!
Size Variations That Actually Work
The trick to different sized ghosts is maintaining the same proportions. Smaller ghosts shouldn’t just be shrunk-down versions – they need adjusted features.
For baby ghosts, I make the eyes proportionally larger compared to their body size. This mimics how we naturally perceive “cute” in real life.
I also vary the ghost positions across my nails. Some float higher, others lower. A few might be tilted slightly, like they’re playfully bobbing around.
Common Mistakes I Made (So You Don’t Have To)
The biggest error? Making ghost eyes too big or too far apart. This instantly shifts them from cute to creepy.
I also used to make the mistake of perfectly centering every ghost on each nail. Random positioning looks much more natural and playful.
Another lesson learned: don’t overthink the mouth shapes. Simple dots or tiny lines work better than elaborate expressions. Less is definitely more with ghost faces.
Making Them Last Through Halloween
Ghost nail art is actually pretty durable since it’s mostly solid color work. The key is sealing those tiny facial features properly.
I always do a thin layer of top coat right over the completed design, then add a second coat the next day. This prevents the small details from chipping off.
Ready to sweeten up your Halloween manicure? Click “next” below to learn how to create those iconic candy corn nails that perfectly capture autumn’s sweetest treat – plus I’ll share the tape trick that finally gave me those crisp, clean lines I’d been struggling with for months!


GIPHY App Key not set. Please check settings