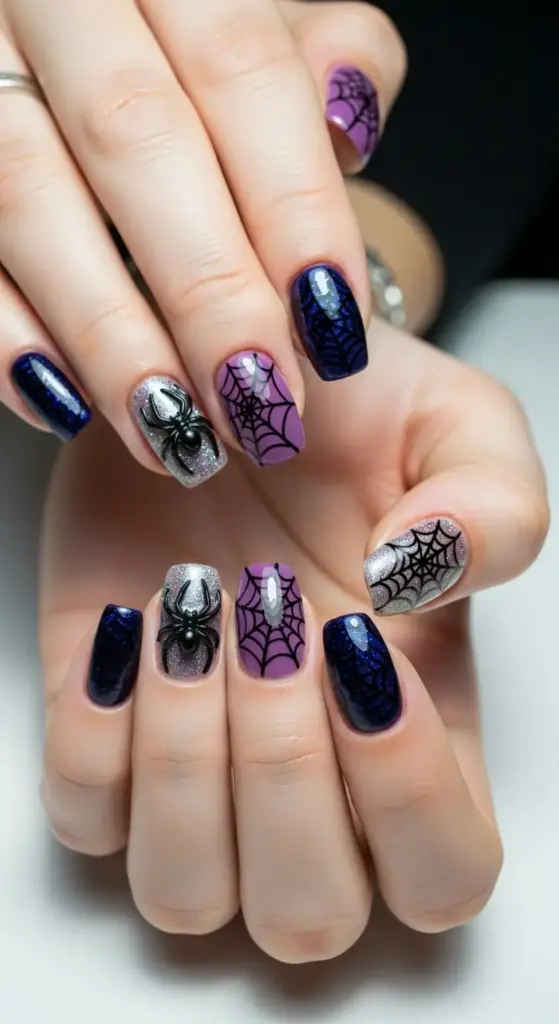
2. Spooky Spider Web Designs
Let me be real with you – spider web nail art used to intimidate the heck out of me. I thought you needed some kind of artistic genius to pull it off.
Boy, was I wrong! And boy, did I make some hilarious mistakes along the way.
My First Spider Web Disaster (Learn From My Pain)
Picture this: me with a regular nail polish brush trying to paint intricate spider web patterns. The lines were so thick they looked more like prison bars than delicate webs.
I was using whatever black polish I had lying around – some old drugstore brand that was basically the consistency of tar. Not my brightest moment.
The “web” ended up looking like I’d let a toddler scribble on my nails with a Sharpie. My sister still brings this up at family dinners, by the way.
The Tools That Actually Matter (Don’t Skimp Here!)
After that epic fail, I invested in proper nail art tools. Game changer doesn’t even begin to cover it.
You absolutely need a thin liner brush – I’m talking size 0 or 00. I use the ones from Born Pretty Store, they’re like $2 each and last forever.
Dotting tools are crucial too, especially for creating those perfect web intersections. I have a set with different sized tips, but honestly, the smallest one does most of the heavy lifting.
For polish, Orly’s “Liquid Vinyl” is my ride-or-die black. It flows smoothly and doesn’t get gloopy like cheaper alternatives.
The Technique That Finally Clicked
Here’s what nobody tells you about realistic spider web patterns – they’re not perfectly symmetrical! Real webs have imperfections, and that’s what makes them look authentic.
I start by painting my base color – usually a deep purple or midnight blue. Dark backgrounds make the web pop like crazy.
Then comes the fun part: creating the web structure. I paint one diagonal line from corner to corner, then another crossing it. These are your anchor lines.
Building the Web (It’s Easier Than You Think)
From those anchor lines, I add curved connecting lines. The key is making them slightly uneven – perfect curves look fake and robotic.
I learned this trick from a nail tech on Instagram: vary the spacing between your web lines. Some sections should be tighter, others more spread out.
The whole process takes maybe 10 minutes per hand once you get the hang of it. I used to spend an hour on each nail because I was being way too precious about it.
Adding 3D Spiders for Maximum Drama
Okay, this is where things get fun! 3D spider embellishments sound fancy, but they’re actually super simple to apply.
I buy mine in bulk from Amazon – those little plastic spiders that come in Halloween decoration packs. They’re perfect for nails and cost practically nothing.
The trick is using a tiny drop of nail glue (not regular super glue – learned that lesson the hard way). Place the spider while your top coat is still slightly tacky.
Pro tip: Position your spider off-center on the web. It looks more natural and less like a craft project gone wrong.
Minimalist vs. Gothic: Finding Your Vibe
I’ve experimented with both minimalist spider webs and full-on gothic nail designs. Both have their place, honestly.
For minimalist webs, I stick to just a few clean lines on one or two accent nails. Think subtle and chic – perfect for the office Halloween party.
Gothic designs? That’s where I go all out. Multiple webs, glitter, maybe some rhinestones if I’m feeling extra. These are for when you want to make a statement.
Common Mistakes (And How I Fixed Them)
The biggest mistake I see people make? Rushing the drying process. Spider webs need each line to be completely dry before adding the next one.
I used to smudge my work constantly because I was impatient. Now I use a quick-dry top coat between layers – it’s a total game-changer.
Another common issue: making the web lines too thick. Thin, delicate lines are what sell the realistic look.
If your hand shakes (like mine does after too much coffee), try bracing your painting hand against your other hand for stability.
The Secret to Long-Lasting Web Designs
Here’s something I learned through trial and error: spider web nail art is actually pretty durable if you seal it properly.
I always finish with two coats of top coat – one right after completing the design, then another the next day. This creates a protective barrier that keeps those delicate lines intact.
Ready to add some adorable spookiness to your Halloween look? Hit that “next” button below to discover how to create the cutest ghost nail art that’s friendly enough for kids but stylish enough for adults – trust me, these little spirits will steal everyone’s heart!


GIPHY App Key not set. Please check settings