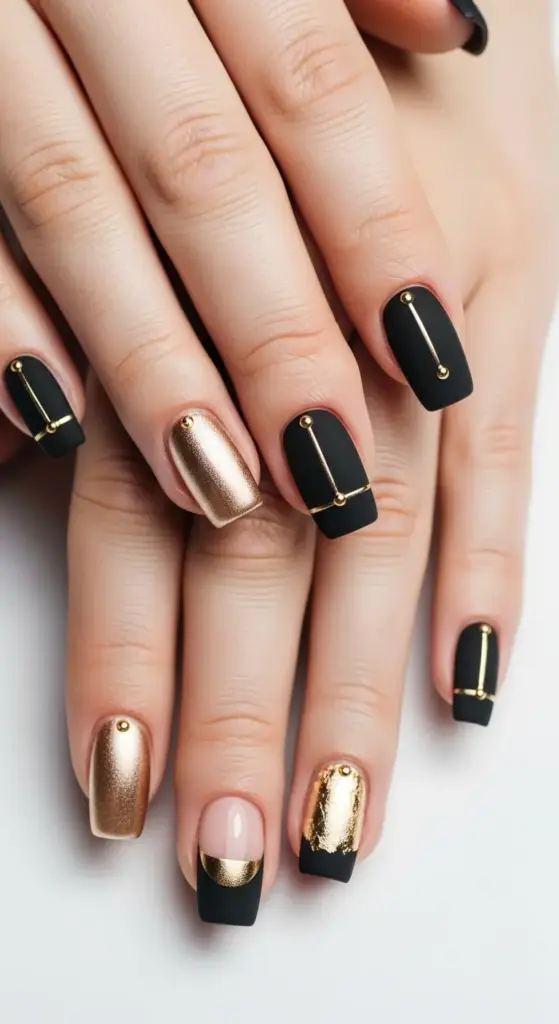
6. Black French with Metallic Accents
The first time I tried adding metallic accents to my black French tips, I went completely overboard and ended up looking like I’d stuck my fingers in a craft store explosion. Gold everywhere, silver mixed in randomly – it was a hot mess.
But then I saw Zendaya’s nails at the Golden Globes with these perfectly placed thin gold lines, and I realized I’d been thinking about metallics all wrong. Less is definitely more with this technique.
Why Metallic Accents Create Instant Luxury
There’s something about metallic elements that immediately elevates any manicure from “nice” to “expensive-looking.” It’s like adding jewelry to your fingertips.
The way metallics catch and reflect light creates this dynamic quality that changes depending on how you move your hands. I’ve literally gotten distracted staring at my own nails in meetings!
Strategic Placement That Screams High-End
The golden rule is restraint – one or two metallic elements max per nail. Any more and it starts looking chaotic instead of chic.
My go-to placement is a thin metallic line right where the black French tip meets the natural nail. It’s like adding a delicate border that defines the whole design.
Metallic dots at the corners of your French tips create this subtle sparkle that’s noticeable but not overwhelming.
For special occasions, I’ll do metallic half-moons at the base of the nail while keeping the tips black. It’s unexpected and so elegant.
Accent nails work beautifully – do four nails with simple black French tips and one nail with metallic details. Your ring finger is perfect for this.
Foil Application Techniques From VIP Salons
I had to bribe my nail tech with so many coffees to learn these professional foil secrets, but it was totally worth it.
Transfer foil requires special adhesive – don’t try to use regular topcoat or nail glue. The foil won’t stick properly and will look patchy.
Apply the foil adhesive in thin, precise lines where you want your metallic accents. Less is more here – thick adhesive creates messy, uneven foil application.
Wait until the adhesive is completely clear and tacky before applying foil. This usually takes 2-3 minutes, and patience is absolutely crucial.
Press the foil down firmly with a cuticle pusher or your finger, then peel away quickly in one smooth motion. Hesitating or going slowly creates incomplete transfers.
The Brush-On Metallic Method
Metallic nail polish is actually easier to control than foil for beginners, and the results can be just as stunning.
Use a thin nail art brush – never the brush that comes with the bottle. You need precision for elegant metallic accents.
Apply in thin layers rather than trying to get full opacity in one coat. Metallic polish can get gloopy quickly if you’re not careful.
Work quickly but steadily – metallic polish starts getting tacky faster than regular polish, so you can’t take forever perfecting your lines.
Color Theory for Choosing Complementary Metallics
This is where I made my biggest mistakes early on. Not all metallics work with black – some combinations look cheap instead of chic.
Gold and rose gold are your safest bets with black French tips. They create warmth and luxury without clashing.
Silver and platinum work beautifully for cooler, more modern looks. They’re perfect if you wear a lot of silver jewelry.
Copper and bronze create this unexpected richness that’s perfect for fall and winter. They’re warmer than silver but not as bold as gold.
Avoid mixing metallic tones on the same nail – stick to one metallic family per manicure for the most sophisticated look.
The Gradient Metallic Technique
This advanced technique creates seamless transitions from black to metallic that look absolutely incredible.
Start with your black French tip base and let it dry completely. This becomes your foundation.
Mix your metallic polish with clear topcoat to create different opacity levels – I use 3:1, 2:1, and 1:1 ratios.
Apply the lightest metallic mixture first, blending it into the black while both are still workable.
Build up the metallic intensity gradually with each layer, focusing the strongest metallic at your desired accent points.
Professional Sealing Methods
Metallic elements are notorious for flaking if you don’t seal them properly. I learned this the hard way when my gorgeous gold accents started peeling off after two days.
Use a high-quality topcoat – cheap topcoats don’t adhere well to metallic surfaces and can actually cause more flaking.
Apply topcoat in thin, even layers over metallic areas. Thick topcoat can cause the metallics to lift or bubble.
Let each layer dry completely before applying the next. Rushing this step is what causes most metallic flaking issues.
For foil accents, use two thin coats of topcoat rather than one thick one. The first coat seals the foil, the second adds durability.
Tools That Make All the Difference
Thin nail art brushes are essential for precise metallic application. I keep sizes 0, 00, and 000 specifically for metallic work.
A small makeup sponge works great for gradient metallic effects – it creates softer blending than brushes.
Cuticle pushers are perfect for pressing down foil transfers and getting clean, sharp edges.
Good lighting is crucial – metallics look completely different under different light sources, so work near a window if possible.
Common Metallic Mistakes That Ruin the Look
Using too much metallic is the biggest mistake I see. A little goes a very long way with these accents.
Applying metallics over wet polish causes smudging and uneven coverage. Always wait for your base to dry completely.
Mixing warm and cool metallics on the same manicure creates visual chaos instead of elegance.
Not sealing properly leads to flaking and chipping that makes the whole manicure look cheap.
The Celebrity-Inspired Placement Guide
Rihanna’s signature look features thin gold lines parallel to the French tip edge – it’s subtle but so effective.
Blake Lively often does metallic dots at the corners of her French tips for red carpet events.
Margot Robbie’s nail artist loves doing metallic half-moons at the base with black tips – it’s unexpected and gorgeous.
Jennifer Lopez frequently rocks single metallic accent nails with otherwise simple black French tips.
Maintenance Tips for Long-Lasting Metallics
Avoid harsh chemicals like bleach or strong cleaning products – they’ll dull metallic finishes quickly.
Reapply topcoat every 3-4 days to keep metallics looking fresh and prevent flaking.
Use cuticle oil carefully – apply it around your nails, not on them, to avoid breaking down the metallic elements.
Wear gloves for cleaning and gardening – metallics show wear and tear more obviously than regular polish.
These metallic accents are absolutely stunning, but the final technique is going to blow your mind! Next up, we’re diving into negative space designs that create optical illusions and make your nails look like they were designed by modern artists.
Click “next” to discover the negative space secrets that are secretly dominating the most exclusive nail salons in Hollywood! 🌟


GIPHY App Key not set. Please check settings