5. Textured Black French Tips
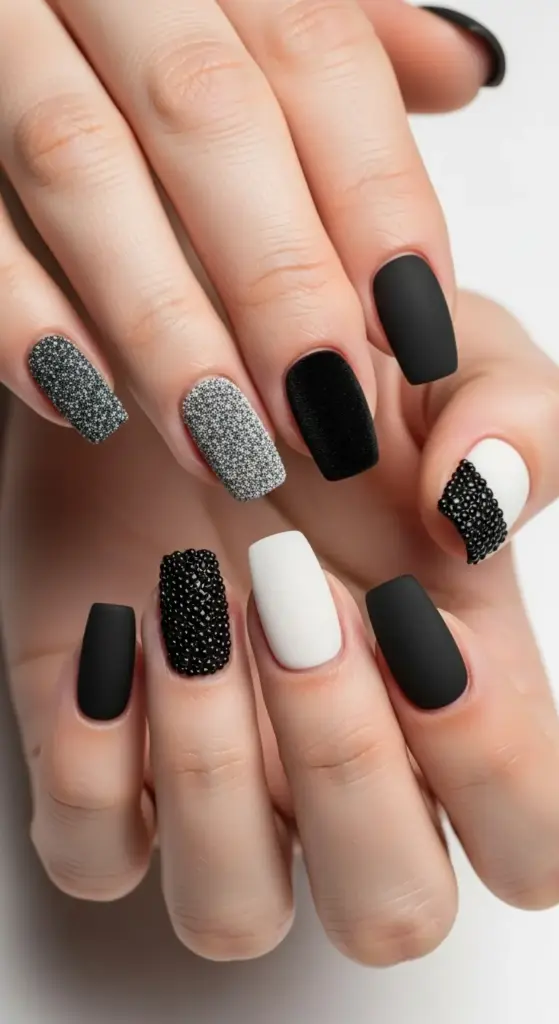
I remember the exact moment I became obsessed with textured black French tips – it was watching Ariana Grande’s nails at some award show, and I literally rewound the red carpet footage three times just to stare at her fingertips.
They looked like tiny pieces of velvet jewelry. I knew I had to figure out how to recreate that dimensional magic, even though I had zero clue where to start.
Why Texture Changes Everything
Regular polish just sits flat on your nail – but texture creates this incredible depth that catches light in the most amazing ways. It’s like the difference between a photograph and a sculpture.
People literally reach out to touch textured nails because they look so tactile and interesting. I’ve had strangers ask me about my manicure in grocery store lines!
Sand Texture Application That Actually Works
Sand texture polish was my gateway drug into the textured nail world, and honestly, it’s the most forgiving for beginners.
The key is building up thin layers rather than trying to get full coverage in one coat. I learned this after creating what looked like sandpaper on my nails.
Apply your black base color first and let it dry completely. The sand texture needs something solid to grip onto.
Use a stippling motion with the sand polish rather than brushing it on. This creates more even texture distribution and prevents those weird bald spots.
Work quickly once you start – sand texture polish starts setting faster than regular polish, so you can’t go back and fix mistakes easily.
Velvet Texture Secrets From Celebrity Nail Techs
This technique blew my mind when I finally figured it out. Velvet powder creates the most luxurious finish I’ve ever seen on nails.
Apply your black polish and immediately – and I mean immediately – dust the velvet powder over the wet polish using a fluffy brush.
Tap off excess powder gently with a clean brush. Don’t press hard or you’ll create uneven patches in the velvet finish.
Let it set for at least 10 minutes before touching anything. Velvet texture is delicate when it’s first applied.
Seal with a matte topcoat if you want to preserve the texture, or use glossy topcoat for a smoother finish with subtle texture underneath.
Caviar Bead Application That Looks Professional
Caviar beads create this incredible 3D effect that photographs amazingly well, but the application technique is totally different from other textures.
Pour the beads into a small dish – never try to work directly from the container. You need to be able to roll your nail through them.
Apply thick, wet polish and immediately roll your nail through the caviar beads while the polish is still tacky.
Press gently with a clean brush to make sure all the beads adhere properly. Any loose beads will fall off later and ruin the effect.
Don’t use topcoat over caviar beads – it flattens the texture and defeats the whole purpose.
Layering Techniques for Dimensional Effects
This is where things get really fun and creative. Combining different textures creates these incredible multi-dimensional effects.
I love doing sand texture as a base with small areas of smooth glossy black for contrast. It’s like having different materials on each nail.
Velvet and glitter combinations work beautifully – apply the velvet first, then add tiny dots of glitter polish in strategic spots.
Caviar beads over matte black creates this stunning contrast between the smooth base and the textured beads.
Base Preparation That Makes or Breaks Everything
Your base prep is absolutely crucial for textured finishes – way more important than with regular polish.
File and buff your nails until they’re completely smooth. Any ridges or imperfections will show through textured polish like crazy.
Use a ridge-filling base coat and let it dry completely. I usually wait at least 5 minutes, even though it feels like forever.
Clean your nails with rubbing alcohol right before applying texture. Any oils or residue will prevent proper adhesion.
Celebrity Nail Tech Product Recommendations
After stalking way too many celebrity nail artists on social media, I’ve figured out their go-to products.
Zoya’s PixieDust collection gets mentioned constantly for sand texture effects. The formula is consistent and the color payoff is incredible.
OPI’s Liquid Sand polishes are another favorite – they dry to this perfect gritty finish that looks expensive.
For velvet powder, most pros use Cuccio’s flocking powder. It’s finer than craft store versions and creates a more luxurious finish.
Caviar beads from Born Pretty seem to be the industry standard – they’re perfectly round and come in tons of colors.
The Temperature and Humidity Factor
Here’s something nobody talks about – weather affects textured polish application way more than regular polish.
High humidity makes sand texture take forever to set and can cause uneven drying patterns.
Cold temperatures make velvet powder clump together instead of distributing evenly.
I keep my textured polishes at room temperature for at least an hour before using them. Cold polish doesn’t flow properly for texture work.
Common Texture Disasters and How to Fix Them
Patchy sand texture usually means you didn’t shake the bottle enough. Those texture particles settle at the bottom quickly.
If velvet powder looks clumpy, you probably applied it over polish that was too wet. The powder needs slightly tacky polish, not soaking wet.
Caviar beads falling off means your base polish wasn’t tacky enough when you applied them. Work faster next time.
Uneven texture distribution happens when you go back over areas that have already started setting. One pass only with textured polishes!
Maintenance Tips That Keep Texture Looking Fresh
Textured nails chip differently than smooth polish – they tend to wear down gradually rather than chipping in chunks.
Avoid hand creams directly on textured nails – they can break down the texture and make it look patchy.
Gentle soap and water for washing hands – harsh chemicals will dull textured finishes faster than anything.
Touch up with matching texture polish rather than trying to spot-fix with regular polish. The difference will be super obvious.
The Professional Finishing Touch
Clean up around your cuticles carefully – textured polish makes any messiness look really obvious and unprofessional.
Shape your nails after texture application if needed, but be gentle. Aggressive filing can disturb the textured surface.
Take photos in different lighting to see how your texture catches light. Natural sunlight shows texture best, but indoor lighting reveals different aspects.
These textured techniques are absolutely stunning, but get ready for some serious glamour! Next up, we’re diving into metallic accents that make black French tips look like expensive jewelry – I’m talking about foil application secrets that celebrity nail techs charge hundreds for.
Click “next” to discover the metallic magic that transforms simple black tips into red-carpet worthy masterpieces! ✨


GIPHY App Key not set. Please check settings