3. Black French Ombré Fade
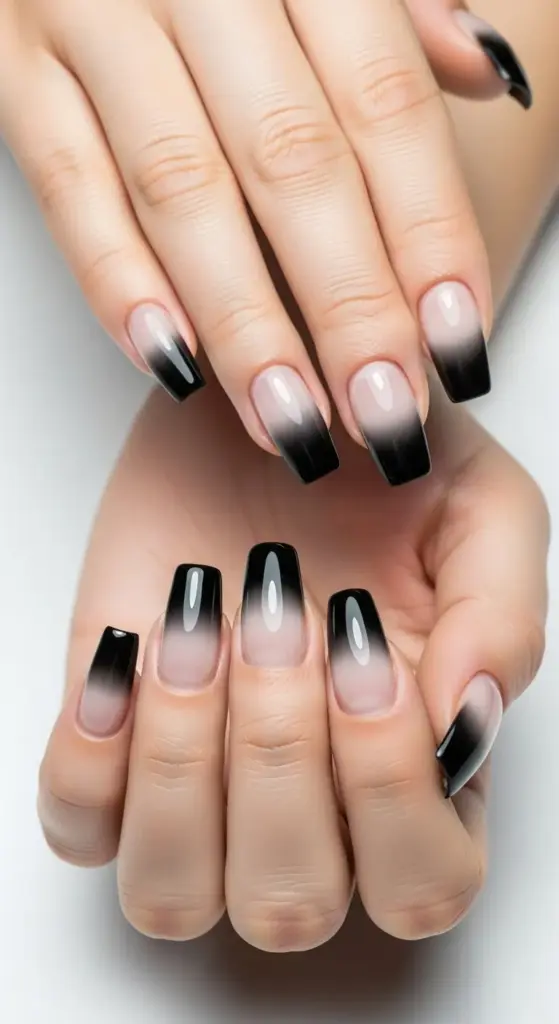
I’ll be completely honest – my first attempt at a black French ombré looked like I’d dipped my nails in muddy water. The gradient was chunky, the colors were muddy, and I was ready to give up entirely.
But then I watched my nail tech create this absolutely flawless fade that went from deep black at the tips to crystal clear at the base. It was like watching magic happen right before my eyes.
Why Ombré Black French Is So Mesmerizing
There’s something hypnotic about watching black gradually disappear into nothing. It’s like each nail becomes this tiny piece of abstract art.
The gradient effect makes your fingers look impossibly long and elegant. I’ve gotten more compliments on this technique than any other manicure I’ve ever done.
High-End Salon Gradient Techniques
Here’s what I learned after bribing my nail tech with way too many lattes to spill her secrets:
The sponge method is overrated for this particular look. Most high-end salons actually use a brush technique that gives much more control over the fade.
Start with three different shades – pure black, a gray-black mix, and a sheer black tint. You’re basically creating your own custom gradient palette.
Apply the darkest color first at just the very tips of your nails. This becomes your anchor point for the entire gradient.
Work in tiny sections – maybe 2mm at a time. Rushing this process is what creates those harsh lines that scream “amateur.”
Color Transition Secrets That Actually Work
The biggest secret? You’re not blending colors – you’re layering transparencies.
Mix your black polish with clear topcoat to create different opacity levels. I use a 3:1 ratio for medium opacity and 1:1 for the lightest shade.
Apply each layer while the previous one is still slightly tacky. This is crucial for seamless blending – completely dry polish won’t blend properly.
Use a stippling motion rather than brushing. Gentle dabbing motions help the colors melt into each other naturally.
Brush Selection That Makes All the Difference
Fan brushes are your secret weapon for this technique. The splayed bristles create natural-looking gradients that regular brushes just can’t achieve.
I keep three different fan brushes – one for dark application, one for medium tones, and one that’s completely clean for final blending.
Flat shader brushes work well too, especially the ones with slightly rounded edges. They give you more precision than fan brushes when you need it.
Never use the brush that comes with your polish bottle for ombré work. Those brushes are designed for solid coverage, not gradients.
Application Angles That Pros Use
Hold your brush at a 45-degree angle to your nail surface. This gives you the perfect amount of contact for smooth blending.
Start from the tip and work toward the base with gentle, overlapping strokes. Each stroke should cover about half of the previous one.
Rotate your brush slightly as you work down the nail. This prevents those telltale brush marks that give away amateur technique.
Use a rocking motion rather than straight strokes. It helps distribute the polish more evenly and creates softer transitions.
The Wet-on-Wet Technique
This is where the magic really happens, and it took me forever to get the timing right.
Apply your darkest shade first and immediately start working with your medium tone while it’s still wet. The key is working fast but not frantically.
Blend each transition zone for about 10-15 seconds before moving to the next section. Any longer and the polish starts getting tacky.
Keep a clean, damp brush handy for final smoothing. Just barely damp – too much moisture will thin out your polish.
Troubleshooting Common Ombré Disasters
Muddy colors happen when you blend too aggressively or use too much polish. Less is always more with gradients.
If you see harsh lines, don’t panic. A clean, barely damp brush can often soften them while the polish is still workable.
Patchy coverage usually means your base wasn’t smooth enough. Always use a ridge-filling base coat for ombré work.
When the gradient looks too subtle, add another layer of your darkest shade just at the tips. It’ll deepen the contrast without affecting the fade.
Pro Tips That Changed My Game
Practice on nail wheels first – seriously. I wasted so much polish trying to perfect this on my actual nails.
Work in good lighting – preferably natural light. Artificial lighting can make it impossible to see subtle color transitions.
Clean your brushes between each nail with a quick dip in acetone. Contaminated brushes create muddy, unpredictable results.
Take breaks between hands – your eyes get tired looking at gradients, and tired eyes make mistakes.
The Temperature Trick
Here’s something most tutorials don’t mention: room temperature affects how your polish blends.
Slightly warm polish flows better for gradient work. I keep my bottles in a sunny spot for about 10 minutes before starting.
Cold polish is too thick for smooth blending. If your polish feels thick, warm the bottle in your hands for a few minutes.
Finishing Touches That Make It Look Professional
Apply topcoat in thin, even layers – thick topcoat can disturb your carefully crafted gradient.
Use a glass file to perfect your nail shape after the gradient is complete. The smooth fade draws attention to any imperfections in nail shape.
Cuticle oil applied carefully around the nail (not on it!) makes the whole manicure look more polished and professional.
The ombré fade is gorgeous, but get ready to have your mind completely blown! Next up, we’re diving into geometric black French lines that create optical illusions – I’m talking about precision techniques that make your nails look like they were designed by architects.
Click “next” to discover the geometric secrets that celebrity nail artists charge premium prices for! 🔥


GIPHY App Key not set. Please check settings