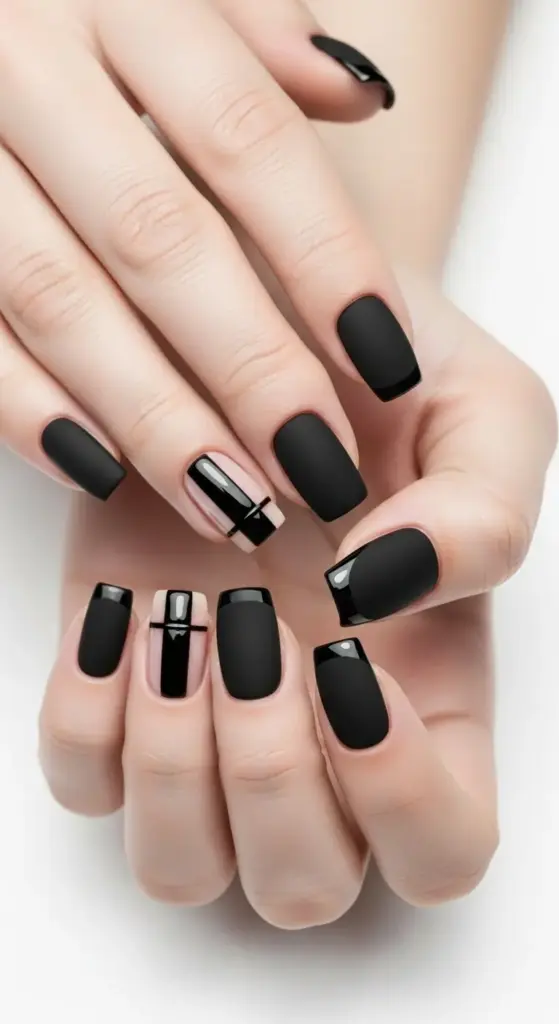
2. Matte Black French with Glossy Accent
Okay, so after I mastered the reverse black French, I thought I was hot stuff. Then I saw Bella Hadid’s nails at some award show and literally gasped out loud in the grocery store checkout line.
Her matte black French tips had these strategic glossy accents that made them look like expensive jewelry. I knew I had to figure out how to recreate that look, even if it meant ruining a few more manicures in the process.
Why This Combo Is Pure Magic
The matte and glossy contrast creates this incredible depth that regular polish just can’t achieve. It’s like having two different textures living in perfect harmony on your nails.
I’ve noticed people literally stop mid-conversation to stare at this manicure. There’s something about that texture play that just draws the eye and holds attention.
Professional Application Methods That Actually Work
Here’s what I learned after watching way too many YouTube tutorials and making countless mistakes:
Start with your base color in regular glossy black polish. Don’t go straight to matte – trust me on this one. I tried skipping this step and the coverage was patchy and awful.
Let that base coat dry completely – and I mean completely. Any tackiness will mess up your matte topcoat application.
Apply your matte topcoat using long, smooth strokes. Don’t go back over areas you’ve already covered, even if they look streaky. The matte finish will even out as it dries.
Work quickly but deliberately – matte topcoat starts setting faster than regular polish, so you can’t take your sweet time.
Strategic Glossy Accent Placement
This is where the real artistry comes in, and honestly, it took me months to figure out the best placements.
The classic approach is to leave just the very tip glossy while making everything else matte. It creates this subtle ombré effect that’s so sophisticated.
My personal favorite is the “accent stripe” method – I paint a thin glossy line right where the black meets the natural nail. It’s like adding a piece of jewelry to each finger.
Geometric glossy shapes work incredibly well too. I’ve done tiny triangles, half-moons, and even thin diagonal lines. The key is keeping it minimal – less is definitely more with this technique.
For special occasions, I’ll add glossy dots or small shapes scattered across the matte surface. It looks like expensive nail art but takes maybe five extra minutes.
Tools and Products Celebrity Nail Techs Swear By
After stalking way too many celebrity nail artists on Instagram, I’ve figured out their secret weapons.
Essie’s Matte About You topcoat is mentioned constantly in their posts. It dries fast and gives that perfect velvety finish without looking chalky.
For the glossy accents, most pros use Seche Vite quick-dry topcoat. It’s crystal clear and doesn’t yellow over time like some cheaper options.
Thin nail art brushes are absolutely essential for precise glossy placement. I use size 0 and 00 brushes – anything bigger makes it too hard to control.
A cleanup brush dipped in acetone is your best friend for fixing mistakes. Keep it handy because matte polish shows every imperfection.
The Application Sequence That Changed Everything
I used to apply the matte coat first, then try to add glossy accents. Big mistake. The acetone in the glossy topcoat would dissolve parts of the matte finish.
Here’s the correct order: Base coat, color, glossy topcoat everywhere, then carefully apply matte topcoat only where you want it matte.
Use tape or nail vinyls to protect your glossy areas while applying the matte coat. Just make sure to remove them immediately while the matte coat is still wet.
Maintenance Tips That Keep It Looking Fresh
Matte finishes show oils and fingerprints like nobody’s business. I keep a soft cloth in my purse for quick touch-ups throughout the day.
Avoid hand creams on your nails – they’ll make the matte areas look patchy and weird. Apply lotion carefully around your nails instead.
Reapply matte topcoat every 3-4 days to keep that perfect texture. The glossy areas usually stay perfect much longer.
When you wash dishes or clean, wear gloves religiously. Harsh chemicals will dull both the matte and glossy finishes faster than anything else.
Common Mistakes I Made (So You Don’t Have To)
Don’t shake your matte topcoat bottle – it creates bubbles that’ll ruin the smooth finish. Roll it between your palms instead.
I used to apply matte topcoat too thick, thinking it would look more dramatic. Thin coats always look better and last longer.
Never use cuticle oil right before applying matte topcoat. Any residue will create these weird glossy spots that look totally accidental.
This matte and glossy combo is stunning, but wait until you see what happens when we blend it into a perfect ombré fade! The gradient effect with black French tips creates this smoky, mysterious look that’s been secretly requested by A-listers for months.
Hit that “next” button to discover the black French ombré technique that’s making traditional gradients look totally outdated! ✨


GIPHY App Key not set. Please check settings