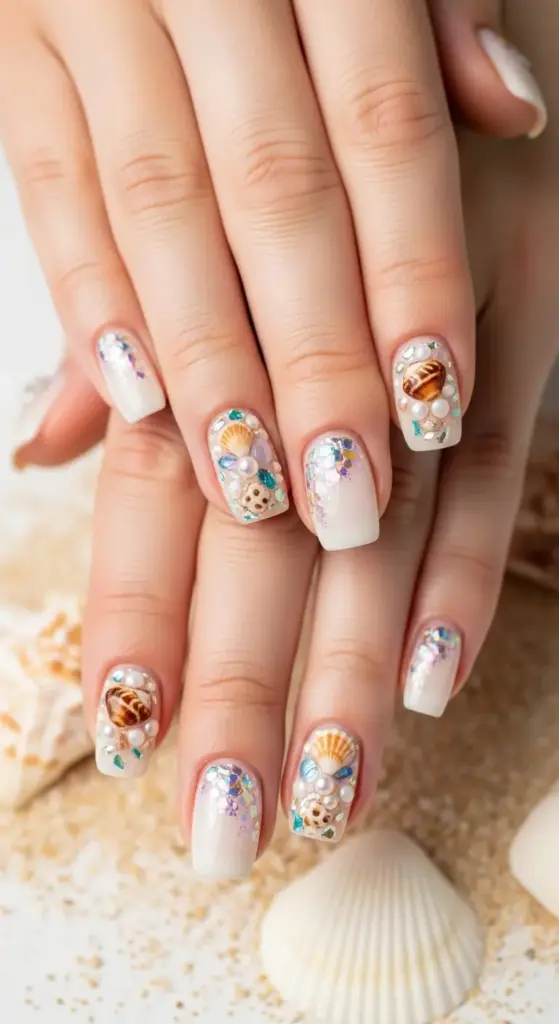
6. Seashell and Pearl Embellishments
I’ll be honest – my first attempt at seashell nail art was a complete disaster. I literally glued tiny shells from my backyard onto my nails thinking I was being creative and beachy.
They fell off within hours, taking half my nail polish with them. Plus, they were so chunky I couldn’t even hold my phone properly.
But there’s something magical about pearl and shell embellishments when done right. They transform your nails into these tiny treasures that catch the light like actual jewelry.
Sourcing Real Shell Pieces Safely
Here’s what I wish someone had told me before my shell disaster: not all shells are nail-safe, and you definitely can’t just pick random ones off the beach.
Craft store shells are your safest bet. They’re already cleaned, sized appropriately, and won’t have any weird bacteria or sharp edges that could damage your nails.
I love the tiny crushed shell pieces from Michaels – they come in these perfect nail-sized fragments that look authentic but are actually practical to wear.
For real beach shells, you need to sanitize them properly. Soak them in rubbing alcohol for 10 minutes, then let them dry completely. Only use shells smaller than your pinky nail – anything bigger looks ridiculous and won’t stay put.
Never use shells with sharp or jagged edges. I learned this the painful way when a broken shell piece actually cut my cuticle.
Adhesion Techniques That Actually Work
The biggest mistake people make with 3D nail art elements is using regular nail glue. It’s too thick, dries too fast, and creates these ugly bumps around your embellishments.
Nail resin is the game-changer here. It’s thinner than glue, self-leveling, and creates a smooth finish around your shells and pearls.
My technique: apply your base color and let it dry completely. Place a tiny drop of resin where you want your embellishment, then gently press the shell or pearl into place with tweezers.
The key is using just enough resin to secure the piece without it oozing out around the edges. Less is definitely more here.
For flat shell pieces, I sometimes use a thin layer of clear polish as adhesive. It’s gentler on your natural nails and easier to remove later.
Creating Pearl Effects Without Real Pearls
Real pearls on nails are beautiful but expensive and impractical for beach vacations. Here’s how I create that lustrous pearl effect using regular nail polish.
Start with a white or cream base. Then, while it’s still slightly tacky, dab on tiny amounts of iridescent topcoat using a small brush or dotting tool.
Sally Hansen’s “Shell We Dance?” is perfect for this – it has that gorgeous pearl shimmer that looks incredibly realistic.
For more dimension, I layer different iridescent shades. A base of white, then touches of pink pearl, then a hint of blue or green iridescence on top.
The trick is building up the layers gradually. Real pearls have depth and complexity, not just flat shimmer.
Balancing Embellishments for Everyday Wear
The line between “gorgeous beach goddess” and “craft project gone wrong” is thinner than you think with seashell embellishments.
My rule: accent nails only. I put shells or pearls on just my ring fingers, maybe add a tiny pearl to one other nail. Any more than that and you look like you fell into a tackle box.
Size matters too. Those big statement shells might look cool in photos, but try typing on your phone or opening a can of soda. Not happening.
I stick to embellishments that don’t extend more than 2mm above my nail surface. Anything higher catches on everything and feels awkward.
For everyday wearability, I prefer crushed shell pieces mixed into clear topcoat rather than whole shells glued on top. You get that gorgeous texture and shimmer without the bulk.
The Art of Strategic Placement
Shell and pearl placement can make or break your entire look. Random placement looks messy and amateur.
I follow the rule of thirds – imagine your nail divided into three sections, and place embellishments at the intersection points. It’s more visually pleasing than centering everything.
For multiple small pearls, I create little clusters rather than spacing them evenly. Think about how pearls naturally group together in oysters.
Asymmetrical placement often looks more organic and beachy than perfectly centered designs. Real shells wash up randomly on beaches, so your nail art should have that same natural feel.
Removal Without Nail Damage
This is where most people mess up their natural nails. 3D embellishments require gentle, patient removal – no picking or forcing.
Soak your nails in acetone-free nail polish remover for 10-15 minutes. The embellishments should start loosening on their own.
Use a cuticle pusher (never your other nails) to gently nudge off any pieces that are still stuck. If something won’t budge easily, soak longer.
For stubborn resin or glue residue, I use a nail file to gently buff it away after the embellishments are removed. Work slowly and don’t apply too much pressure.
Cuticle oil is essential after removal. All that soaking and gentle scraping can leave your nails and cuticles pretty dry.
Making It Beach-Vacation Practical
Let’s talk reality: seashell nail art needs to survive actual beach activities, not just look good in photos.
I’ve learned to avoid embellishments on my dominant hand’s pointer finger and thumb – those get the most use and abuse during vacation activities.
Waterproof topcoat is non-negotiable. I use two coats over my embellishments to create a protective dome that keeps everything secure.
For active beach days (surfing, volleyball, snorkeling), I actually remove my embellished nails and go with simple polish. The shells and pearls are gorgeous for dinner and photos, but they’re not practical for every activity.
The Instagram Factor
Here’s the truth about pearl and shell nail art – it photographs incredibly well, which is probably why you’re considering it for your beach vacation.
The three-dimensional elements catch light beautifully in photos, creating these gorgeous highlights and shadows that flat nail art can’t achieve.
For the best photos, position your hands so the light hits your embellishments at an angle. Direct overhead lighting flattens everything out.
Ready to discover the laziest (but most effective) way to get stunning beach nails that look professionally done? Click “next” to learn about waterproof nail stickers and decals that’ll save you hours of application time while still delivering Instagram-worthy results!


GIPHY App Key not set. Please check settings