4. Ocean-Inspired Blue Marble
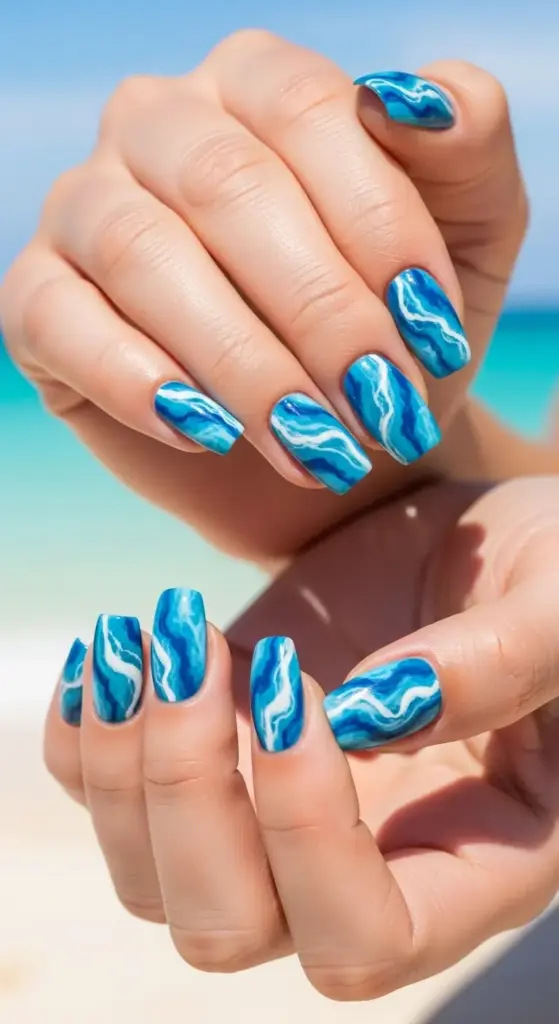
The first time I attempted marble nail art, I ended up with what looked like blue Play-Doh that had been run over by a truck. Seriously, it was that bad.
I was getting ready for a cruise to the Caribbean and thought, “How hard could it be to make my nails look like ocean waves?” Turns out, pretty darn hard when you don’t know what you’re doing.
But after some trial and error (okay, a lot of error), I finally cracked the code on ocean marble nails that actually look like tiny masterpieces.
The Simple Tools That Changed Everything
Here’s what blew my mind: you don’t need fancy nail art brushes or expensive equipment to create realistic marble effects. The best marble nails I’ve ever done used stuff I already had lying around.
Plastic wrap is your secret weapon. Not the fancy press-and-seal kind – just regular old cling wrap from your kitchen drawer.
I also use toothpicks for creating those delicate marble veins and a small makeup brush (the kind that comes free with eyeshadow palettes) for blending.
The game-changer tool? A fan brush from the dollar store art section. It creates the most realistic wave-like patterns I’ve ever achieved.
Color Palette That Actually Looks Like Ocean
After many failed attempts that looked more like muddy pond water than pristine ocean, I finally figured out the authentic ocean color palette.
Start with Essie’s “Borrowed & Blue” as your base – it’s this perfect medium ocean blue that isn’t too bright or too dark. Then layer in Sally Hansen’s “Water Color” (a gorgeous teal) and OPI’s “Alpine Snow” for those foamy wave caps.
The secret ingredient? A tiny bit of gray. Real ocean water isn’t just blue – it has depth and shadows. I use just a drop of “Chinchilly” by Essie mixed into my blues.
Don’t go overboard with the white though. I learned this the hard way when my “ocean” nails looked more like a milk spill.
Layering Techniques for Real Depth
The difference between amateur and professional-looking blue marble nails is all in the layering. You can’t just slap some colors together and hope for the best.
Start with your base blue color – two thin coats, completely dry. This is your ocean foundation.
While your second coat is still slightly tacky (about 45 seconds after application), drop tiny amounts of your lighter blue and white onto the nail using a dotting tool or toothpick.
Here’s the magic part: immediately press crumpled plastic wrap onto the wet polish and gently twist. The plastic creates those organic, flowing patterns that look like actual water movement.
Work fast here – you’ve got maybe 30 seconds before the polish starts to set and you lose that blendability.
Creating Those Realistic Marble Veins
The marble veining technique took me forever to master. I kept making lines that looked too perfect and geometric instead of natural and flowing.
Real marble (and ocean patterns) have irregular, branching veins that follow no logical pattern. To recreate this, I use a fan brush dipped in white polish, then drag it lightly across the nail in curved, flowing motions.
The key is varying your pressure. Start light, press down slightly in the middle of the stroke, then lift up again. This creates those natural thick-to-thin variations you see in real marble.
For finer details, I use a toothpick to draw thin connecting lines between the larger veins. These should be super subtle – if they’re obvious, you’ve gone too heavy.
Sealing for Maximum Water Resistance
Nothing’s worse than spending an hour creating perfect ocean marble nail art only to have it smudge the first time you touch water. Been there, done that, cried about it.
The trick is timing your topcoat application. Wait until your marble design is completely dry – I’m talking 10-15 minutes, not the usual 2-3 minutes.
I use Seche Vite’s Fast Dry Top Coat but apply it in a floating motion without actually touching the nail surface on the first pass. This prevents smudging those delicate marble details.
After the first topcoat layer dries (about 2 minutes), apply a second coat with normal brush contact. This double-sealing method has saved my marble manicures through snorkeling, swimming, and even aggressive beach volleyball games.
Blue Tone Variations for Every Preference
Not everyone wants the same ocean blue, and honestly, different blue marble variations work better with different skin tones and vacation vibes.
Caribbean Blue Marble: Use “Turquoise & Caicos” by Essie as your base with white and pale aqua accents. Perfect for tropical destinations.
Deep Ocean Marble: Start with “Navy Like It” by OPI, add touches of teal and silver. This looks incredible against tanned skin.
Mediterranean Blue: “Something Blue” by Sally Hansen with pearl white and soft gray veining. Very elegant and sophisticated.
Pacific Coast Marble: Mix “Bikini So Teeny” by OPI with sage green undertones for that California coast vibe.
Troubleshooting Your Marble Disasters
Problem: Colors look muddy instead of distinct. Solution: You’re over-blending. Work faster and use less pressure with your tools.
Problem: Marble veins look too perfect and fake. Solution: Vary your hand pressure and make more irregular, branching patterns.
Problem: Design smudges when applying topcoat. Solution: Wait longer between steps and use the floating application technique I mentioned.
The biggest lesson I learned with ocean marble nails? Embrace the imperfection. Real ocean patterns are chaotic and unpredictable, so if your marble looks a little wild, you’re probably doing it right.
Want to know the vibrant nail color that makes every beach photo pop and complements sun-kissed skin like nothing else? Hit “next” to discover why coral reef bright nails are the ultimate confidence booster for your beach vacation!


GIPHY App Key not set. Please check settings