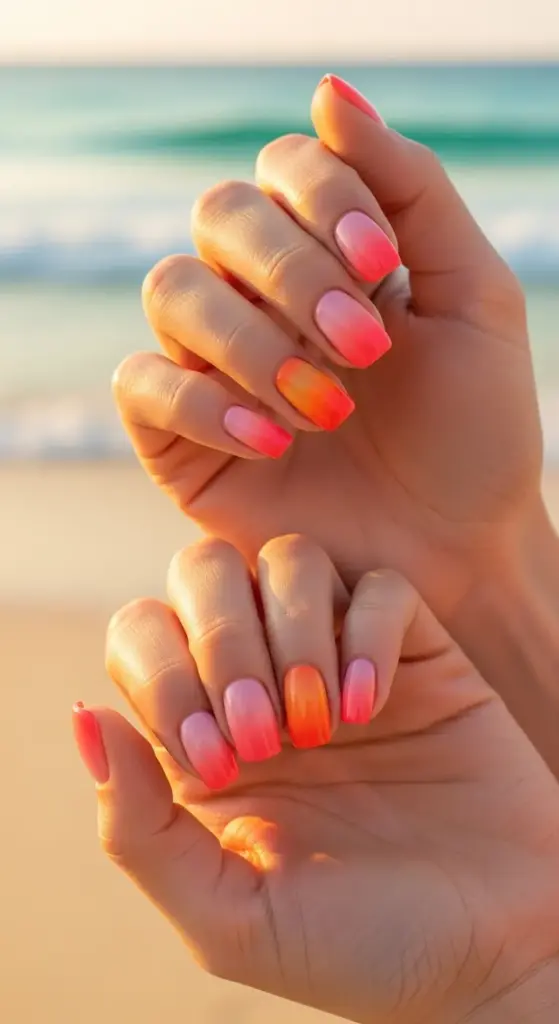
2. Tropical Sunset Ombre
I’ll never forget the first time I tried to create an ombre nail design. It was two weeks before my Tulum trip, and I’d seen this gorgeous sunset gradient on Pinterest that I had to recreate.
What I ended up with looked more like a toddler’s finger painting experiment. The colors were muddy, streaky, and honestly kind of tragic.
But here’s the thing about tropical sunset nails – once you nail the technique (pun intended), they’re absolutely stunning and surprisingly durable for beach activities.
The Magic of Makeup Sponges
After my first disaster, I discovered the secret weapon that changed everything: makeup sponges. Not just any sponges though – you need the dense, fine-textured ones.
I use those little triangular beauty blenders that come in multipacks from the drugstore. The cheap ones actually work better than expensive ones because they’re denser.
Here’s why sponges work so much better than brushes: they create that soft, diffused blend that mimics an actual sunset. Brushes leave streaks and harsh lines that scream “amateur hour.”
My Go-To Color Combo
For the perfect tropical sunset gradient, I swear by this three-color combination: Essie’s “Cute as a Button” (coral), OPI’s “A Good Man-darin is Hard to Find” (orange), and Sally Hansen’s “Pink Pong” (soft pink).
The coral goes at the base near your cuticle. Orange hits the middle of your nail. Pink fades out at the tip.
Trust me on this order – I tried it backwards once and it looked like a weird reverse sunset that made no sense.
Step-by-Step Blending That Actually Works
Start with a white base coat. This is crucial because it makes all your colors pop and blend more smoothly.
Paint each color in horizontal stripes on a piece of foil or plastic. Don’t paint directly on your nail yet – that’s where most people mess up.
Dab your damp sponge into all three colors, then gently press and roll it across your nail from cuticle to tip. The key word here is gently – no aggressive rubbing.
Repeat this process 3-4 times, letting each layer dry slightly between applications. You’ll see the gradient effect building up gradually.
The Water-Resistance Game Changer
Here’s what I learned the hard way during my first beach vacation with ombre nails: regular topcoat isn’t enough if you’re planning to actually enjoy the water.
After one snorkeling session, my beautiful sunset gradient had turned into a blurry mess. The colors had bled together like watercolors in the rain.
Now I always use Seche Vite’s Ultra V topcoat, but here’s the secret – apply it in two thin coats instead of one thick one. The first coat seals the gradient, the second coat adds that glossy, protective barrier.
For extra protection, I also do a gel topcoat if I have my UV lamp handy. It’s like putting your nail art in a protective bubble.
Smooth Transitions: The Real Secret
The difference between amateur and professional-looking sunset ombre nails comes down to those color transitions. Harsh lines are the enemy here.
While your gradient is still slightly tacky (about 30 seconds after application), take a clean, barely damp sponge and gently dab over the transition areas. This softens any harsh edges and creates that dreamy, blended effect.
I also learned to work one nail at a time instead of trying to do all ten at once. Ombre technique requires your full attention on each nail to get those transitions right.
Troubleshooting Your Ombre Disasters
Problem: Colors look muddy and brown instead of vibrant. Solution: You’re probably over-blending. Less is more with the sponge technique.
Problem: Harsh lines between colors. Solution: Make sure your sponge is slightly damp and use a rolling motion instead of straight dabbing.
Problem: Gradient looks patchy. Solution: Your base coat probably wasn’t white enough, or you didn’t build up enough layers.
The biggest mistake I see people make? Rushing the process. Tropical sunset nails take patience, but the payoff is incredible when you’re watching an actual sunset with nails that match the sky.
Want to know the minimalist nail trend that’s perfect for those who love elegance but hate high maintenance? Hit that “next” button to discover why nude nails with gold accents are the ultimate sophisticated beach look!


GIPHY App Key not set. Please check settings