
Halloween is just around the corner, and your nails deserve to be part of the spooky fun! Did you know that 68% of people notice someone’s nails within the first few seconds of meeting them?
This October 2025, why settle for boring nails when you can rock some seriously cute Halloween nail art that’ll have everyone asking where you got them done?
Whether you’re a nail art newbie or a seasoned pro, I’ve got you covered with seven absolutely adorable Halloween nail designs that are surprisingly easy to recreate at home.
From subtle autumn vibes to full-on spooky glam, these ideas will transform your fingertips into tiny canvases of Halloween magic.
Trust me, you’ll be kicking yourself if you don’t try at least one of these before October 31st!
1. Pumpkin Spice Gradient Nails
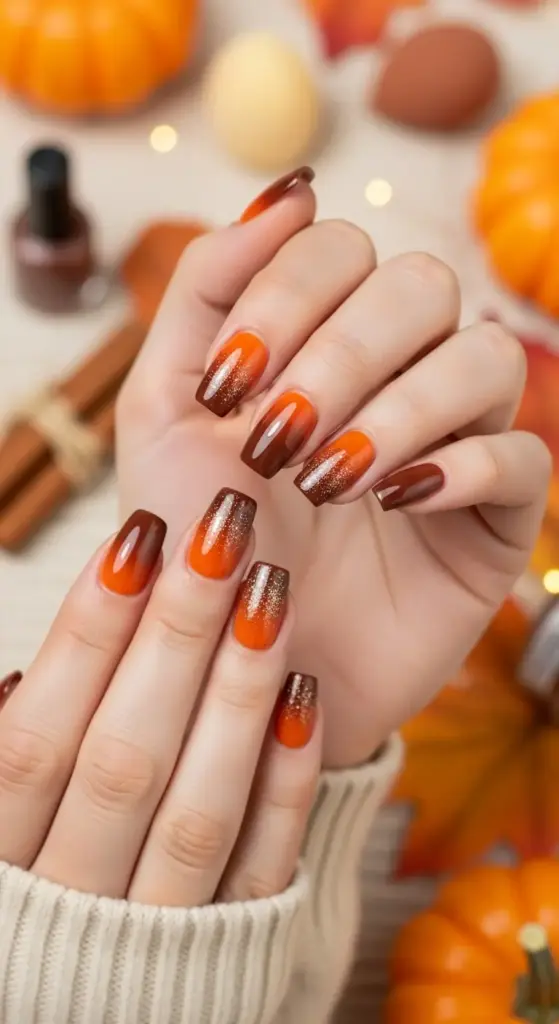
Okay, let me tell you about my pumpkin spice gradient nail obsession – and trust me, it took me way too many failed attempts to get this right!
I remember my first try at creating that perfect orange-to-brown ombre effect. What a disaster that was.
My Epic First Attempt (And What Went Wrong)
Picture this: me, sitting at my kitchen table with five different orange polishes spread out like I’m some kind of nail art guru. Spoiler alert – I wasn’t.
I slapped on the colors thinking I could just blend them with my finger. Big mistake.
The result looked more like a muddy mess than the gorgeous autumn gradient I was going for. My nails literally looked like I’d dipped them in chocolate milk that had gone bad.
The Game-Changing Discovery: Makeup Sponges
After that epic fail, I did some serious research. Turns out, makeup sponges are absolutely crucial for seamless color blending.
Here’s what I learned the hard way: you need those dense, fine-textured sponges – not the cheap ones that fall apart when you look at them wrong.
I now swear by the triangular makeup wedges you can get at any drugstore. They’re like $3 for a pack of 20, and they make all the difference in achieving that professional salon look.
My Go-To Color Combo That Actually Works
After testing probably 15 different nail polish brands, I’ve found my holy grail combination. OPI’s “A-Piers to Be Tan” as the base orange, blended into Essie’s “Chocolate Cakes” for that rich brown.
The key is starting with the lightest shade first. I paint my entire nail with the orange, then while it’s still slightly tacky, I dab the brown onto just the tip using my trusty makeup sponge.
This technique prevents that harsh line that screams “amateur hour.”
The Blending Technique That Changed Everything
Here’s where I messed up for months: I was trying to blend in straight lines. Don’t do this!
Instead, use a bouncing motion with your sponge. Dab, don’t drag. I learned this from watching way too many YouTube tutorials at 2 AM.
Start with light pressure and gradually build up the color intensity. It takes about 3-4 layers to get that smooth gradient transition, but trust me, it’s worth the patience.
Adding That Perfect Autumn Sparkle
Now for the fun part – glitter accents! I used to go overboard here too, dumping glitter like I was decorating a craft project.
The secret is subtlety. I use China Glaze’s “Champagne Kisses” – just a light dusting over the entire gradient while the top coat is still wet.
Less is definitely more when it comes to that autumn sparkle. You want people to notice the beautiful gradient first, then discover the glitter as a lovely surprise.
Making Your Manicure Last Through Halloween Madness
Here’s something nobody tells you about gradient nails – they chip differently than regular manicures. The color transitions can make chips more noticeable.
I always use a ridge-filling base coat now. It creates a smoother surface for the gradient and helps everything adhere better.
For top coat, I swear by Seche Vite. Yeah, it’s pricier than drugstore options, but it dries fast and creates this glass-like finish that protects your pumpkin spice masterpiece.
The real game-changer? I learned to do touch-ups. Keep your orange and brown polishes handy for quick fixes after Halloween parties.
Ready to take your Halloween nails to the next level? Click the “next” button below to discover how to create those adorable spooky spider web designs that’ll have everyone asking where you got your nails done – spoiler alert: they’re easier than you think!


GIPHY App Key not set. Please check settings